


Safely Clear a Clogged Garbage Disposal Drain With a Sink Auger
To clear a clogged kitchen disposal drain, do not feed a sink auger through the garbage disposal grinding chamber. Turn off power at the breaker, remove the P-trap and horizontal trap arm under the sink, then feed a small manual drain snake into the exposed wall drain. Rotate the cable gently as you advance it, pull out or break apart the clog, and flush the line with cold water after reassembly.
A disposal may still run even when food sludge, grease, or fibrous waste has blocked the pipe farther down the line. Most of these clogs form in the P-trap, trap arm, or branch drain – not inside the disposal itself. If a 20-foot snake does not reach the blockage, the clog may be deeper in the plumbing system and need professional drain cleaning or a camera inspection.
I am Dayton Whitworth, a second-generation plumbing professional serving Greater Brazoria County, Galveston County, Houston, and nearby Gulf Coast communities. My sink auger garbage disposal experience includes helping homeowners diagnose slow kitchen drains, clear downstream pipe clogs, and know when a recurring backup needs more than a DIY fix.
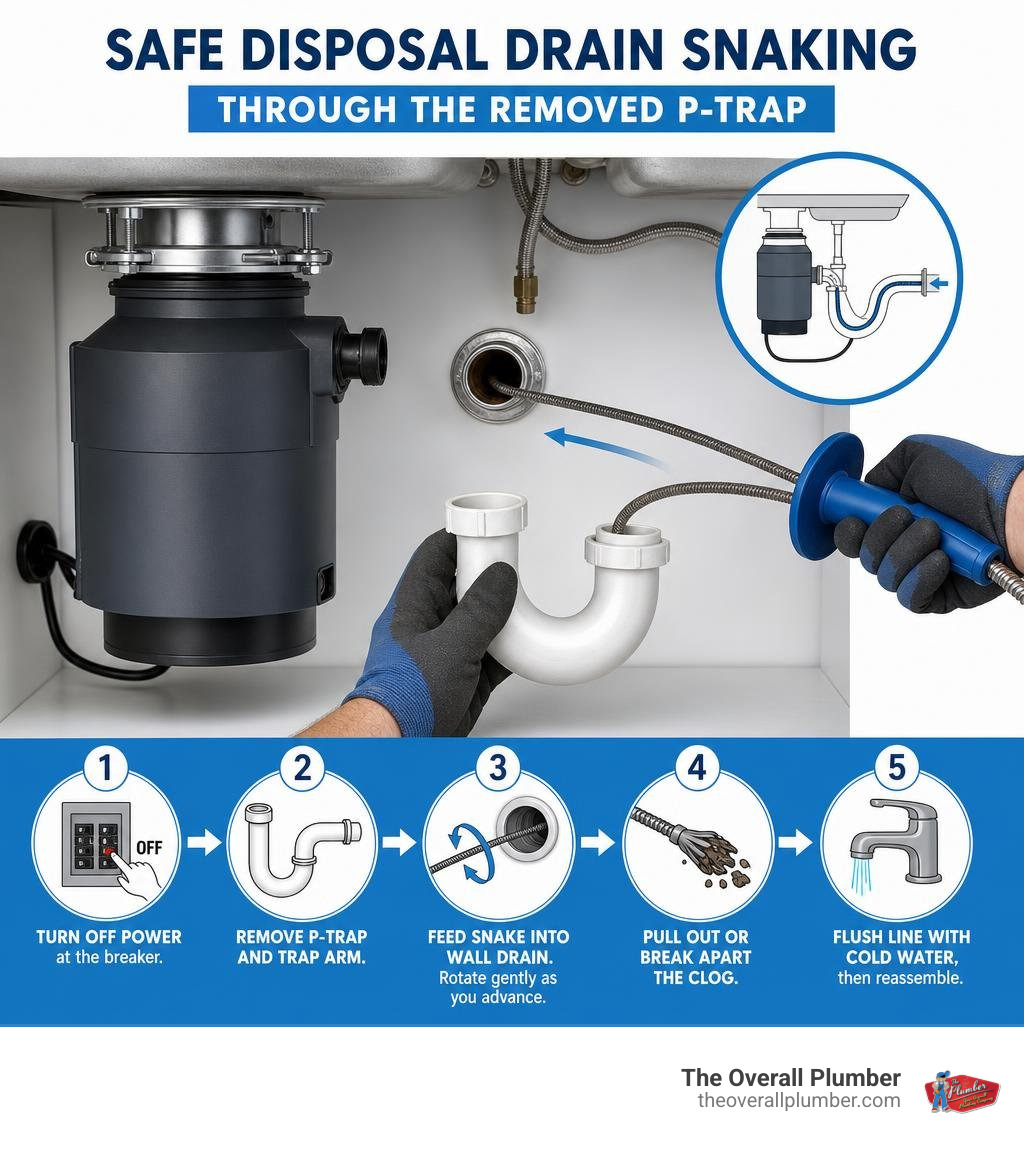
Simple sink auger garbage disposal word guide:
Why Kitchen Drains Clog Past the Disposal Unit
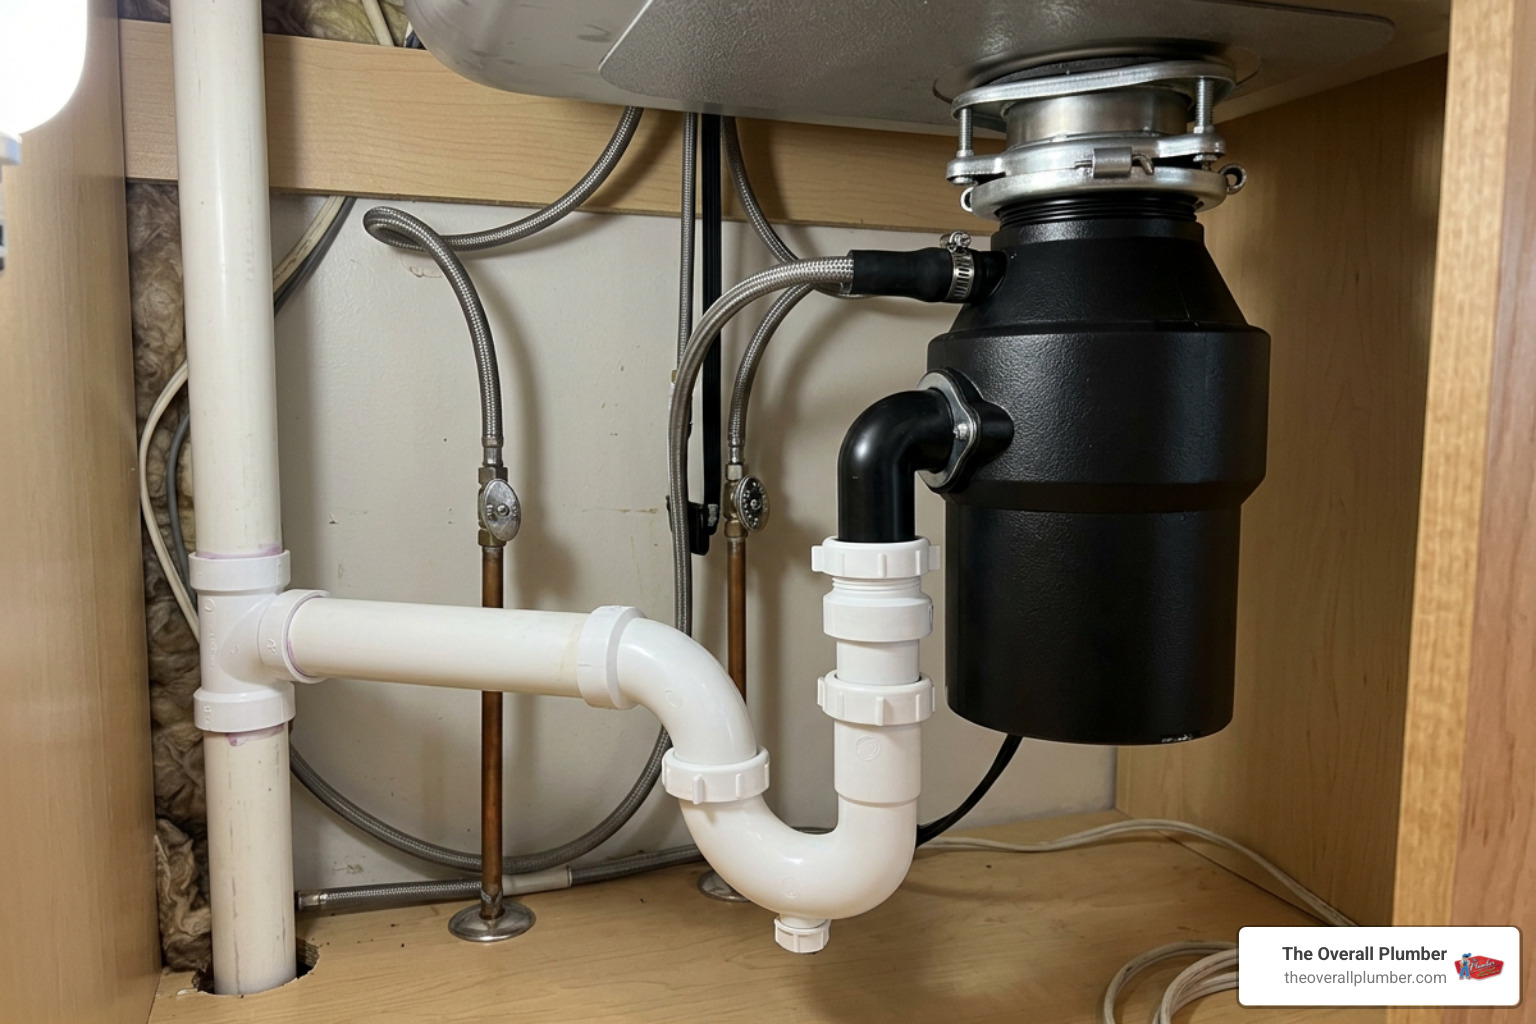
When you turn on your disposal, the motor spins rotating impellers that fling food scraps against a stationary shredder ring. This process breaks solid food into tiny bits suspended in water. However, the disposal only reduces particle size; it does not vaporize waste. Once that mixture exits the unit through the discharge outlet, it enters the under-sink plumbing assembly.
Most kitchen sink blockages do not happen inside the metal grinding chamber. Instead, they develop downstream in the P-trap, the horizontal trap arm, or the branch drain pipe behind the drywall. Dense materials like coffee grounds, eggshell granules, pasta starches, and melted fats, oils, and grease (FOG) travel past the unit. As the water cools, grease congeals along the pipe walls, acting like sticky flypaper for shredded food solids.
Over time, this accumulation narrows the internal pipe diameter until water can no longer pass freely. If you spot moisture pooling below your cabinet while dealing with a backup, you may also want to investigate the lowdown on leaks under your garbage disposal to ensure loosened slip nuts or worn gaskets are not compounding your problem. Furthermore, standard FOODSERVICE DISPOSER manuals explicitly stress the necessity of cleaning horizontal drain runs with an auger to clear out hardened waste materials so the drainage system functions properly.
Can You Snake Directly Through the Disposal?
The short answer is absolutely not. You should never push a plumbing auger cable directly through the top sink drain opening and into the disposal chamber.
The interior of a food waste disposer is packed with metal components:
- Swivel impellers
- A hardened shredder ring
- A central motor shaft
- Rubber splash baffles
Feeding a flexible steel auger cable down into these components creates severe risks. The cable tip can easily get snagged between the shredder plate and the housing. If the cable binds, pulling it back out can bend the internal impellers or warp the drive shaft. Worse yet, if someone accidentally flips the power switch while a metal cable is inserted, the motor can burn out instantly, violently whip the cable, and cause severe personal injury. To safely clear the blockage, you must bypass the grinding chamber entirely by accessing the plumbing underneath.
How to Execute the Sink Auger Garbage Disposal Process
To clear a stubborn branch line blockage yourself, you will need a few basic plumbing supplies:
- A standard drum snake (a 1/4-inch or 5/16-inch manual cable auger)
- Channel-lock pliers (tongue-and-groove pliers)
- A shallow catch bucket or oil drain pan
- Absorbent rags and old bath towels
- Waterproof work gloves and protective safety glasses
- A small wire brush or bottle brush
- Flashlight or headlamp
Before you begin, understanding unclogging a stubborn kitchen main drain without calling a plumber will give you great perspective on how kitchen waste lines run inside residential walls.
Preparing for the Sink Auger Garbage Disposal Setup
Safety comes first whenever you are working around an electrical appliance connected to water pipes.
- Cut the Power: Locate the disposal electrical cord under the sink and unplug it from the wall outlet. If the unit is hardwired directly into a junction box, go to your home electrical service panel and switch off the corresponding circuit breaker. Test the sink switch to verify the unit cannot turn on.
- Clear the Cabinet: Remove all cleaning supplies, dish soaps, and storage bins from under the sink. You need full, unhindered room to work.
- Protect the Area: Spread old towels across the bottom base of the cabinet and onto the kitchen floor.
- Position the Catch Bucket: Place your bucket directly underneath the curved P-trap fitting. Standing wastewater will release as soon as you loosen the pipe connections.
Removing the P-Trap and Trap Arm
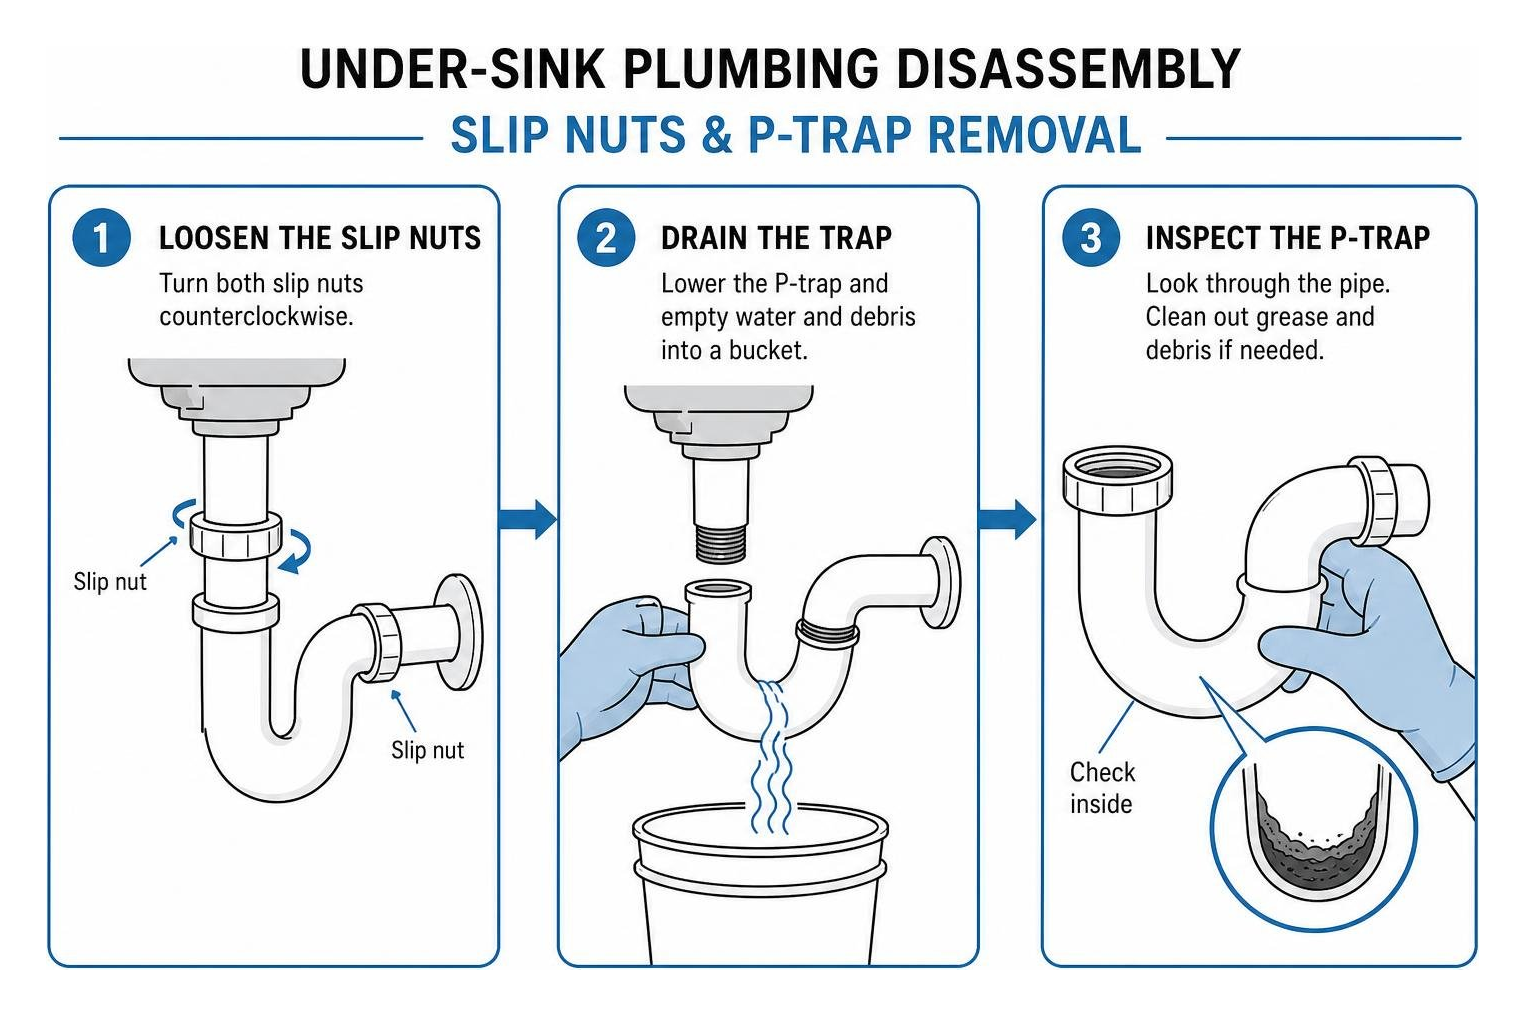
Now you will disassemble the drainage trap assembly to provide an open pathway for your snake. Deciding between tools? Reviewing electric vs manual: choosing the best heavy duty drain auger can help you select the safest gear for residential PVC.
- Loosen the Slip Nuts: Using your hands or channel-lock pliers, turn the plastic slip nuts counterclockwise. There is typically one nut connecting the P-trap to the vertical disposal discharge pipe and one connecting the trap to the horizontal wall arm.
- Drain the Trap: Carefully lower the curved P-trap section and empty its water and trapped food sludge into your bucket.
- Inspect the P-Trap: Look through the curved pipe. If it is packed with grease and debris, scrub it clean in another sink or outdoor spigot with a wire brush.
- Remove the Wall Trap Arm: Loosen the slip nut at the wall connection adapter and slide the horizontal pipe arm straight out. Check its interior for blockages; grease often settles along this horizontal run.
Step-by-Step Sink Auger Garbage Disposal Drain Cleaning
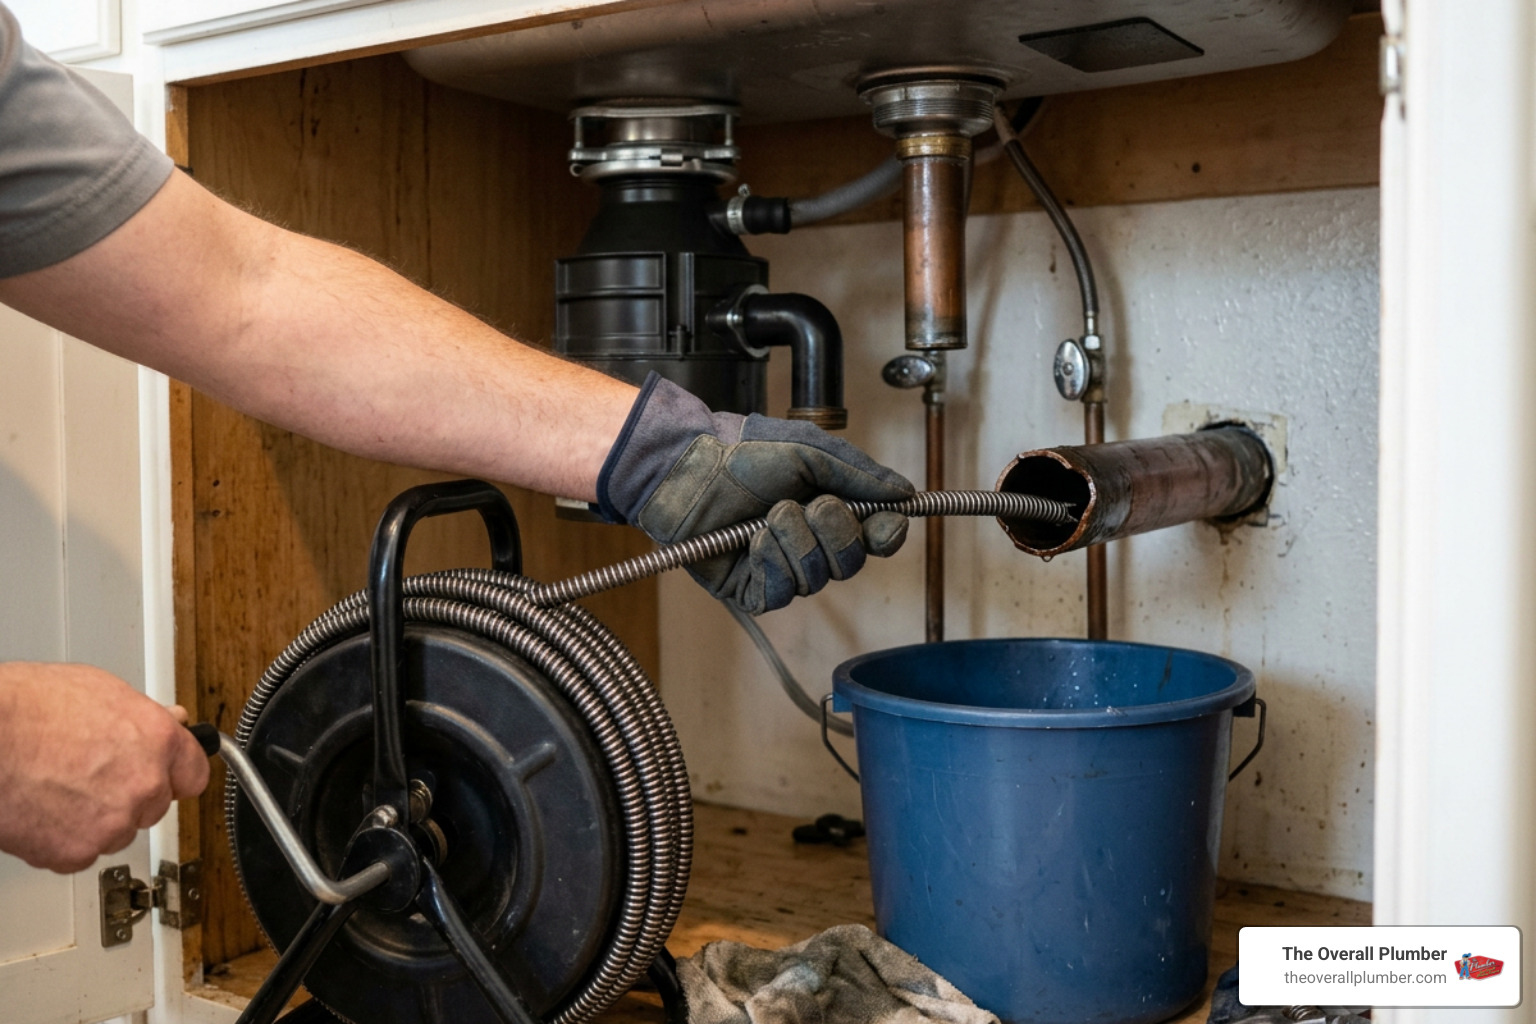
With the trap removed, you have direct, unobstructed access to the branch drain pipe entering your home’s wall. While heavy-duty equipment like a 115-Volt 50 ft. Electric Auger with 5/16 in. Inner Core Cable exists for deep plumbing runs, a standard 25-foot manual hand-drum auger works perfectly for most kitchen fixture lines.
- Feed the Cable: Pull approximately 6 to 12 inches of cable out of the auger drum and slide the tip into the wall drain pipe opening.
- Advance Past Bends: Push the cable forward by hand until you encounter resistance. If the cable stops after only a foot or two, it has likely encountered an elbow fitting. Rotate the drum handle clockwise while applying gentle, steady forward pressure to navigate the bend.
- Engage the Obstruction: When the cable stops advancing deeper in the pipe (often between 5 to 15 feet in), you have reached the food clog. Lock the cable collar screw on the drum.
- Break Up the Sludge: Turn the crank handle clockwise while pushing gently into the clog. This allows the corkscrew head to bore into compacted food matter, snag fibrous strands, and grind away grease buildup on the pipe perimeter.
- Retrieve the Cable: Loosen the thumbscrew and slowly draw the cable back out of the pipe, feeding it directly back into the drum. Wipe the dirty cable with an old rag as it retracts. Deposit retrieved food chunks and hair straight into your trash bucket.
- Repeat if Necessary: Run the cable into the pipe a second time to ensure you have thoroughly scraped the interior walls of the pipe clean.
Reassembling and Testing the Drain Line
Once the cable runs smoothly through the wall pipe without snagging, it is time to put the plumbing back together.
- Check the Washers: Inspect the rubber or polyethylene beveled slip-joint washers. If they are cracked, misshapen, or brittle, replace them to avoid future leaks.
- Align the Trap Arm: Slide the horizontal trap arm into the wall pipe, ensuring it maintains a slight downward slope (at least 1/4 inch per foot of fall) toward the wall for proper gravity drainage.
- Reconnect the P-Trap: Position the P-trap between the disposal discharge tube and the wall arm.
- Tighten Connections: Hand-tighten all plastic slip nuts firmly. Once hand-tight, apply an extra quarter-turn using your channel-lock pliers. Do not overtighten, as excessive force can crack PVC threads.
- Restore Power and Flush: Plug the disposal back into the wall outlet or flip the breaker back on. Turn on the cold water faucet at full stream and let it run for 2 to 3 minutes. Inspect every joint under the sink with a dry paper towel to confirm there are zero drips.
Alternative DIY Methods Before Using a Drain Auger
If you do not have a drain snake on hand or prefer to start with less invasive troubleshooting, there are several mechanical and natural methods worth attempting first.
| Method | Best For | Pros | Limitations |
|---|---|---|---|
| Jam-Buster Wrenchette | Motor humming / jammed blades | Clears stuck internal impellers quickly | Does not clear pipe clogs downstream |
| Flat Sink Plunger | Soft, localized trap blockages | Fast, chemical-free pressure clearing | Requires tight seal; ineffective on deep clogs |
| Baking Soda & Vinegar | Mild sludge & foul odors | Safe on pipes; dissolves light grease | Cannot power through dense, fibrous masses |
| Sink Auger (Drain Snake) | Stubborn, deep branch line blockages | Directly bores through and retrieves dense clogs | Requires under-sink pipe disassembly |
Freeing a Jammed Grinding Plate
If your unit hums when turned on but does not spin or drain, the issue is an internal jam rather than a blocked pipe. Underneath the base of most continuous-feed models, you will find a small hex socket in the center. Insert a 1/4-inch Allen wrench or the jam-buster wrenchette included with your unit into this hole. Crank it back and forth several times to manually spin the shredder plate and free stuck items. If the motor shut down due to overheating, wait 5 minutes and depress the red thermal reset button on the bottom of the casing.
Using a Sink Plunger
A standard flat-cup sink plunger can dislodge soft blockages caught in the trap. If you have a double-basin sink, seal the opposite drain opening tightly with a wet rag or rubber stopper to prevent air pressure from escaping. Fill the clogged sink with 2 inches of water, place the plunger cup firmly over the disposal opening, and pump up and down vigorously for 20 to 30 seconds.
The Natural Fizz Flush
For minor grease accumulation, avoid commercial liquid drain cleaners and try a natural foaming mixture. Pour 1 cup of baking soda into the disposal chamber, followed by 2 cups of distilled white vinegar. Let the bubbling action sit for 15 minutes to break down organic slime, then flush thoroughly with hot tap water. For more insight on household remedies, check out the Coca-Cola drain trick: fact or fizzy fiction? to see what really works on household sludge.
When DIY Snaking Fails to Clear Deep Clogs
A standard 20-foot to 25-foot handheld sink auger solves the vast majority of kitchen sink clogs. However, if you extend your snake its full length into the wall pipe and hit no obstruction—yet water continues to back up—the clog is located further down in the main waste stack or sewer lateral.
Deep clogs are frequently caused by years of grease solidification, heavy mineral scale on aging cast-iron pipes, or root intrusion in the main line. When a handheld snake is not enough, professional diagnostic and clearing methods become necessary:
- Sewer Camera Diagnostics: A video camera sewer line inspection sends a high-resolution, waterproof camera through your drainage network. This pinpoints the exact location and nature of the obstruction without guesswork.
- Hydro Jetting: For kitchen lines coated in heavy grease layers, mechanical snaking only punches a narrow hole through the sludge. Utilizing the ultimate guide to drain line jetting reveals how high-pressure water blasting scrubs pipe walls completely clean down to the bare surface, preventing recurring backups.
Frequently Asked Questions About Garbage Disposal Drain Snaking
Why is water backing up into the other sink basin?
In a standard double-basin kitchen sink, both bowls connect beneath the counter to a shared horizontal branch pipe before entering the wall. When food waste clogs that shared pipe past the junction, wastewater pushed out by the disposal has nowhere to go. Following the path of least resistance, the dirty water flows backward up through the adjoining sink strainer.
Can chemical drain cleaners unclog a disposal pipe?
We strongly advise against pouring caustic chemical drain cleaners down a garbage disposal. Liquid chemicals sit in the grinding chamber and P-trap, eating away at rubber seals, corroding metal disposal components, and softening PVC pipe glue. Furthermore, if the chemical fails to clear the clog, you will be left with a sink full of toxic, corrosive liquid that can splash onto your skin and eyes when you disassemble the trap to snake the line.
What foods should never go down the disposal?
To protect your plumbing from future blockages, keep these troublesome items out of your disposal:
- Fats, Oils, and Grease (FOG): Liquid fats solidify inside cold wall pipes and form impenetrable blockages.
- Fibrous Vegetables: Celery stalks, corn husks, artichoke leaves, and banana peels contain tough stringy fibers that wrap around the rotating shredder.
- Starchy & Expandable Foods: Potato peels, rice, pasta, and beans turn into a thick, sticky paste that glues itself to the pipe walls.
- Granular Items: Coffee grounds and eggshell particles settle in the belly of the P-trap like wet sand.
- Non-Food Items: Glass, twist ties, bottle caps, plastic wrappers, and silverware.
If your home operates on a private waste system, reviewing guidelines for Garbage Disposals for Septic Systems – Is Your Septic Tank Safe? | InSinkErator US will help you maintain a healthy bacterial balance in your tank.
Long-Term Maintenance and Professional Drain Support
Preventing kitchen sink clogs comes down to daily operational habits. Always turn on a strong stream of cold water before switching on the disposal, feed food scraps gradually rather than stuffing the chamber full, and allow the water to run for 15 to 30 seconds after grinding stops to flush all solids completely through the horizontal wall pipe.
When stubborn kitchen clogs resist DIY efforts, our team is ready to step in. The Overall Plumber delivers reliable, long-term drainage solutions across Greater Houston, Brazoria County, and Galveston County. We back our work with satisfaction guarantees, priority scheduling, no overtime fees, and zero trip charges. If your disposal drain is backed up and needs expert attention, explore our Houston Auger Service or call our team to get your kitchen flowing smoothly again.