


Replace a Water Heater Pressure Relief Valve Safely
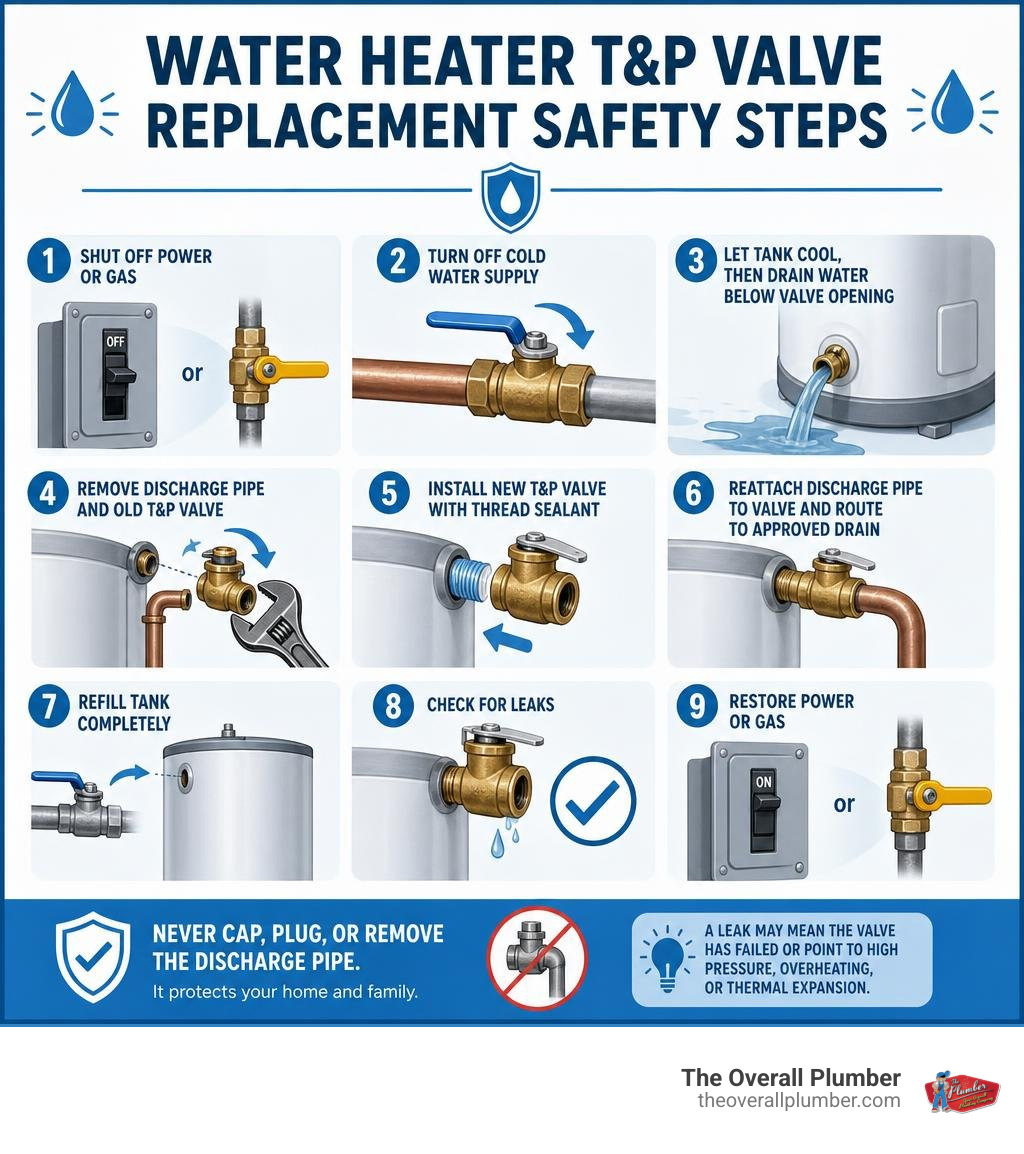
To replace a water heater pressure relief valve, first shut off the heater’s power or gas and the cold-water supply. Let the tank cool, drain water below the valve opening, remove the discharge pipe and old valve, then install a matching temperature and pressure (T&P) valve with approved thread sealant. Refill the tank completely, check for leaks, and only then restore power or gas.
This small brass valve is a critical safety device. It opens if the tank reaches unsafe pressure or temperature, commonly 150 PSI or 210 F on residential units. Never cap, plug, or remove the discharge pipe from a leaking valve. A leak can mean the valve has failed, but it can also point to high home water pressure, overheating, or thermal expansion.
I am Dayton Whitworth, a second-generation plumbing professional serving the Greater Houston and Gulf Coast area. I help homeowners diagnose leaks and safely replace pressure relief valve water heater components while checking for the root cause behind repeated discharge.
Replace pressure relief valve water heater terms to learn:
Understanding the Temperature and Pressure Relief (T&P) Valve
Every storage tank water heater operates under constant domestic water pressure and intense thermal cycles. The Temperature and Pressure (T&P or TPR) relief valve serves as the mechanical guardian of this closed vessel. Installed directly into the top or upper side of the water tank, this brass safety fitting monitors both internal fluid pressure and water temperature, operating according to strict safety standards for temperature and pressure relief valves.
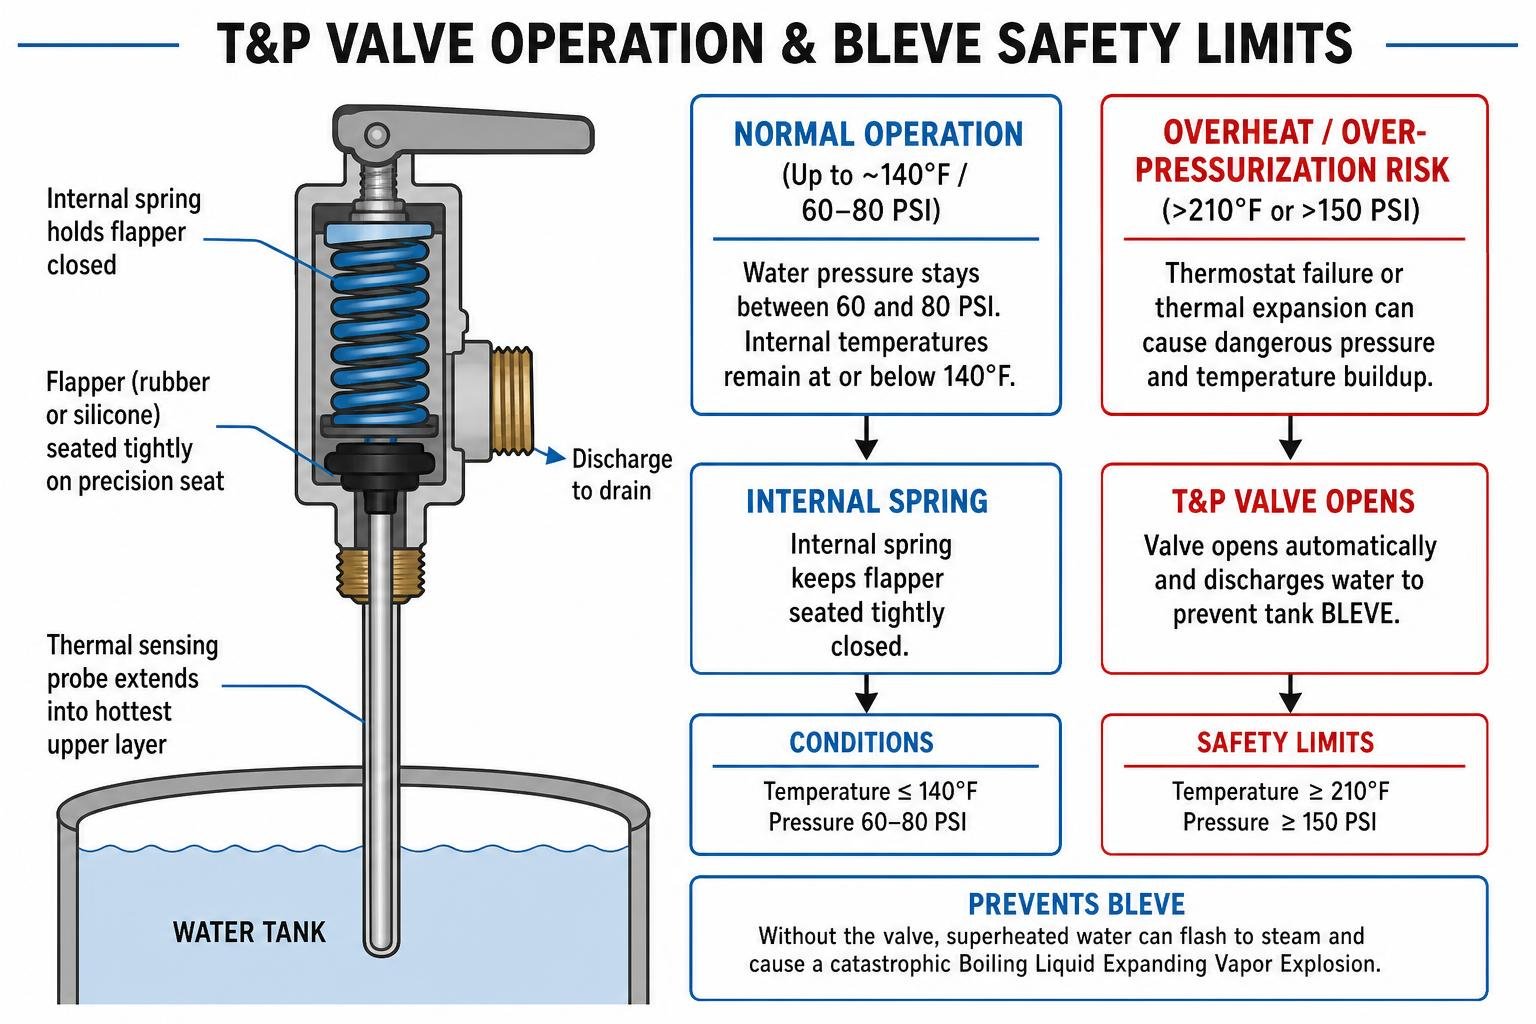
Inside the valve housing sits a calibrated heavy-duty spring holding a rubber or silicone flapper securely against a precision seat. Extending downward into the hottest upper layer of the water tank is a coated thermal sensing probe. Under standard operational conditions, water pressure stays between 60 and 80 PSI, and internal temperatures remain at or below 140°F, leaving the spring relaxed and the valve sealed shut.
However, if a thermostat gets stuck, or if thermal expansion creates massive hydraulic forces within a closed plumbing system, the valve provides an automatic mechanical failsafe. Without this device, expanding water and trapped steam would exert immense structural pressure outward against the steel tank walls.
Critical Safety Role and BLEVE Prevention
To understand why this valve is non-negotiable, consider the physics of boiling water under pressure. As water heats from 32°F to its boiling point of 212°F, each pound absorbs roughly 180 BTUs of sensible heat. However, transforming that same pound of 212°F liquid water into 212°F steam requires an enormous 970 BTUs—known as the latent heat of vaporization.
When confined inside a pressurized water heater tank, water can heat well past 212°F without flashing into steam because the tank pressure keeps it in a liquid state. If an uncontrolled temperature runaway occurs without a functioning relief valve and the tank ruptures, that superheated liquid instantaneously expands into steam. This catastrophic physical phenomenon is known as a BLEVE (Boiling Liquid Expanding Vapor Explosion).
The sudden expansion can release sufficient kinetic energy to launch a residential water heater right through second-story floors, ceilings, and roofs like an unguided rocket. Standard residential T&P valves prevent this disaster by opening immediately when conditions hit either of two critical safety thresholds:
- Temperature Threshold: 210°F (99°C)
- Pressure Threshold: 150 PSI
Signs Your T&P Valve Is Failing
A malfunctioning safety valve cannot protect your home. Keep an eye out for these clear warning signs that indicate your valve is worn out or compromised:
- Constant Weeping or Dripping: Water continually trickles from the valve outlet or the attached discharge pipe onto the floor or drain pan.
- Heavy Mineral Scale Buildup: Hard water crust, white calcium deposits, or greenish-blue corrosion coat the valve seat, spring chamber, or exterior threading.
- Stuck Manual Test Lever: The metal test lever on top of the valve is frozen solid or offers immense resistance when lifted gently.
- Failure to Reseat: After testing the valve or experiencing a pressure cycle, water continues spraying or gushing without snapping back shut.
- Visible Rust and Pitting: Corrosion across the brass valve body that threatens the integrity of the threads.
If you notice chronic dripping or severe calcification, consulting our A Comprehensive Guide to Water Heater Installation can help you evaluate whether simple component maintenance or a full system replacement makes the best financial sense.
When to Replace Pressure Relief Valve Water Heater Components
Plumbing safety valves do not last forever. Even if a valve appears completely clean on the outside, internal mechanical wear and constant contact with mineral-heavy water degrade its operational reliability over time.
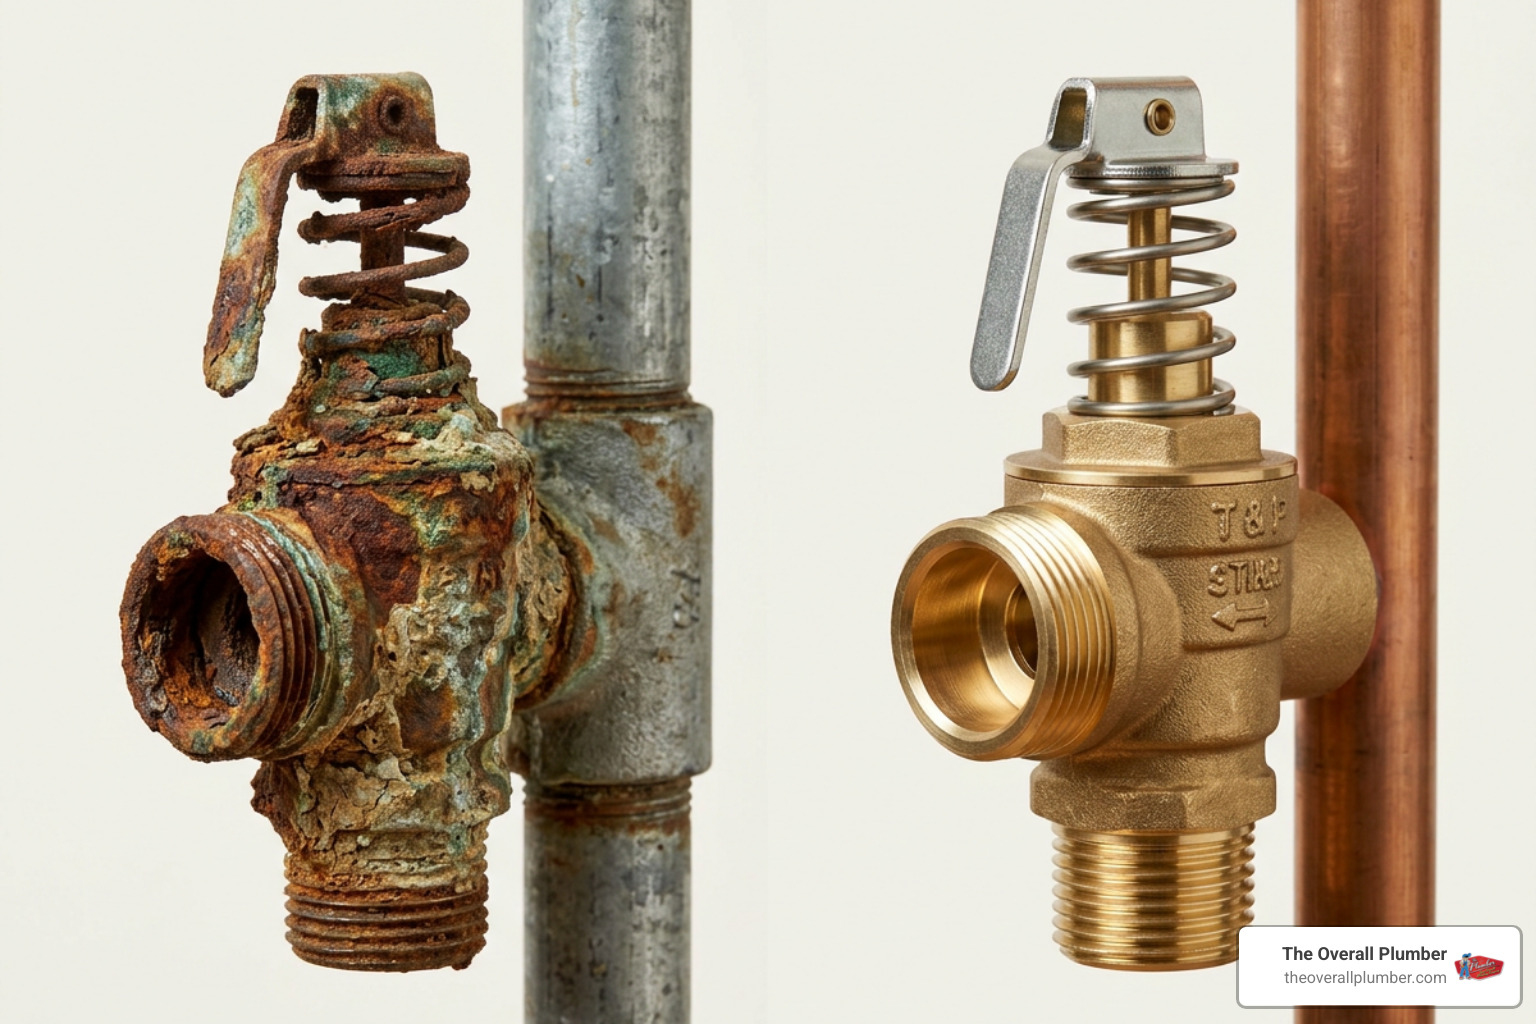
Most water heater manufacturers and plumbing safety boards recommend replacing the T&P valve every 3 to 5 years as essential preventative maintenance. In areas across the Texas Gulf Coast—including Galveston, Harris County, and Brazoria County—local water supplies often carry high concentrations of total dissolved solids (TDS). These minerals precipitate rapidly in hot environments, coating internal valve springs with lime scale and causing premature failure.
Why You Should Replace Pressure Relief Valve Water Heater Units Regularly
T&P valves are sealed, factory-calibrated safety devices. They cannot be disassembled, cleaned, lubricated, or adjusted by homeowners or field technicians. Attempting to pry open a calcified valve or clean internal springs with chemicals destroys the factory calibration and creates an extreme hazard.
Over years of service, several things degrade the valve:
- Internal Spring Fatigue: Constant thermal expansion cycles weaken the spring tension, causing the valve to weep prematurely at standard municipal pressures.
- Lime Accumulation: Scale builds up on the rubber seating washer, preventing it from making an airtight and watertight seal.
- Seat Corrosion: Galvanic corrosion between dissimilar metals or hard water exposure erodes the brass mating surfaces.
For homeowners in communities like Pearland, scheduling regular plumbing checkups is vital to catching these hidden wear points. If you are uncertain about the age of your safety fittings, reach out for reliable Water Heater Service Installation in Pearland to ensure your equipment remains fully code-compliant.
Sizing and Rating Requirements
You must choose an exact replacement valve that matches your water heater’s engineering requirements. Installing an undersized or incorrectly rated valve creates an unsafe installation.
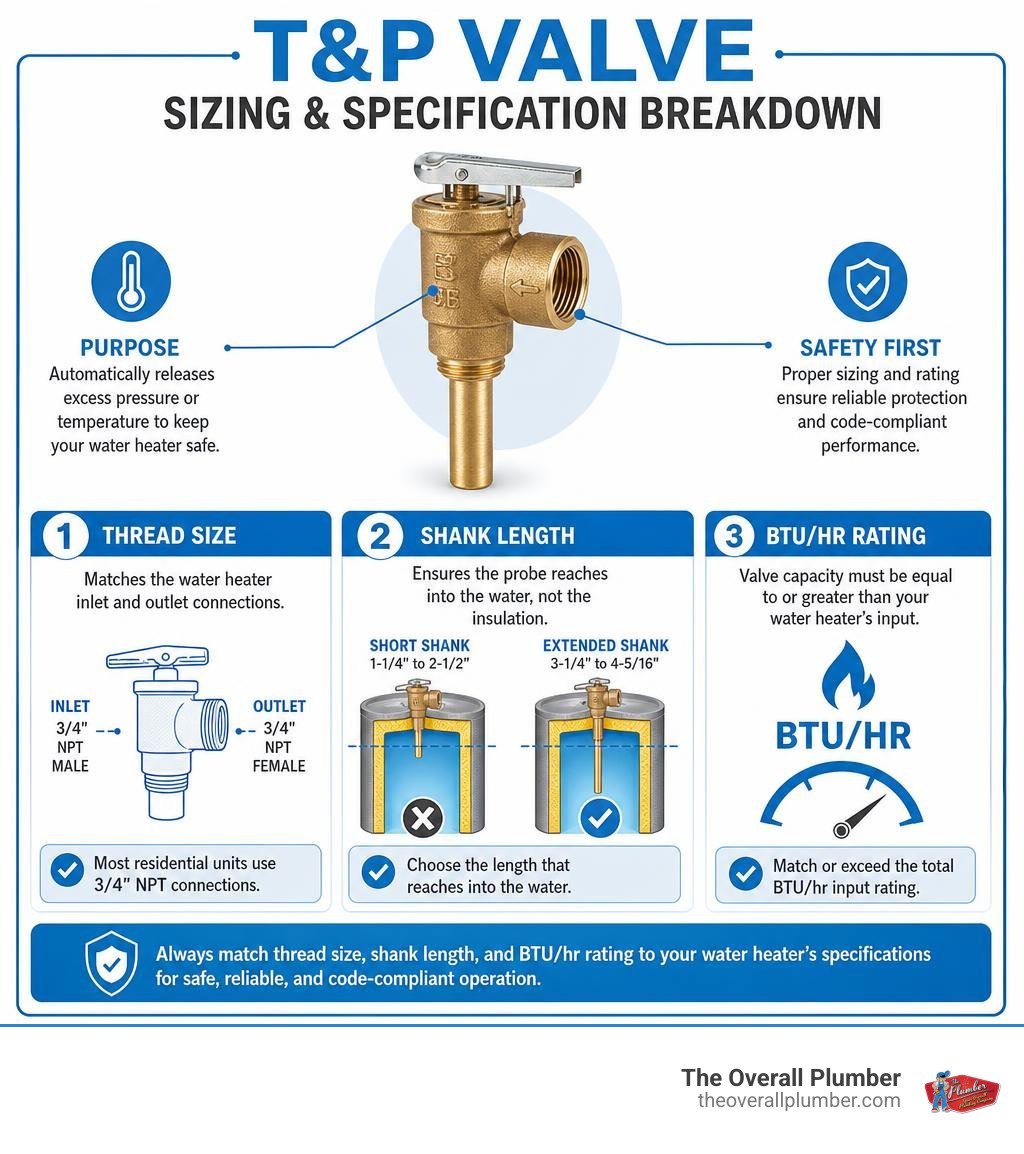
When selecting a new valve, verify the following specifications against the data plate on your water heater:
- Thread Sizing: The vast majority of modern residential storage water heaters use 3/4-inch NPT (National Pipe Taper) male inlet threads by 3/4-inch female NPT outlet threads. (Select older units or compact travel heaters may use 1/2-inch NPT).
- Shank Length: Water heaters feature varying insulation thicknesses (from 1 inch up to 2.5+ inches). Replacement valves come in short shank (1-1/4 in. to 2-1/2 in.) and extended shank (3-1/4 in. to 4-5/16 in.) configurations. The temperature sensing probe must reach into the actual water volume, not sit trapped inside the tank’s outer foam insulation jacket.
- BTU/HR Steam Discharge Rating: The replacement valve’s CSA/ASME steam rating must equal or exceed the total BTU/hr input rating of the heater (e.g., 40,000 to 105,000+ BTU/hr for gas systems).
- Pressure & Temperature Limits: Standard residential units require 150 PSI maximum relief pressure and 210°F maximum temperature relief.
- Certifications: Always look for ASME (American Society of Mechanical Engineers) and CSA/ANSI Z21.22 certification stamps stamped directly onto the metal data tag attached to the valve. Review standard pressure relief valve installation guidelines to ensure the valve body matches your equipment orientation.
Step-by-Step Instructions for T&P Valve Replacement
Replacing a T&P valve takes about 20 to 45 minutes and requires straightforward plumbing tools. Follow this structured process to complete the job cleanly and safely.
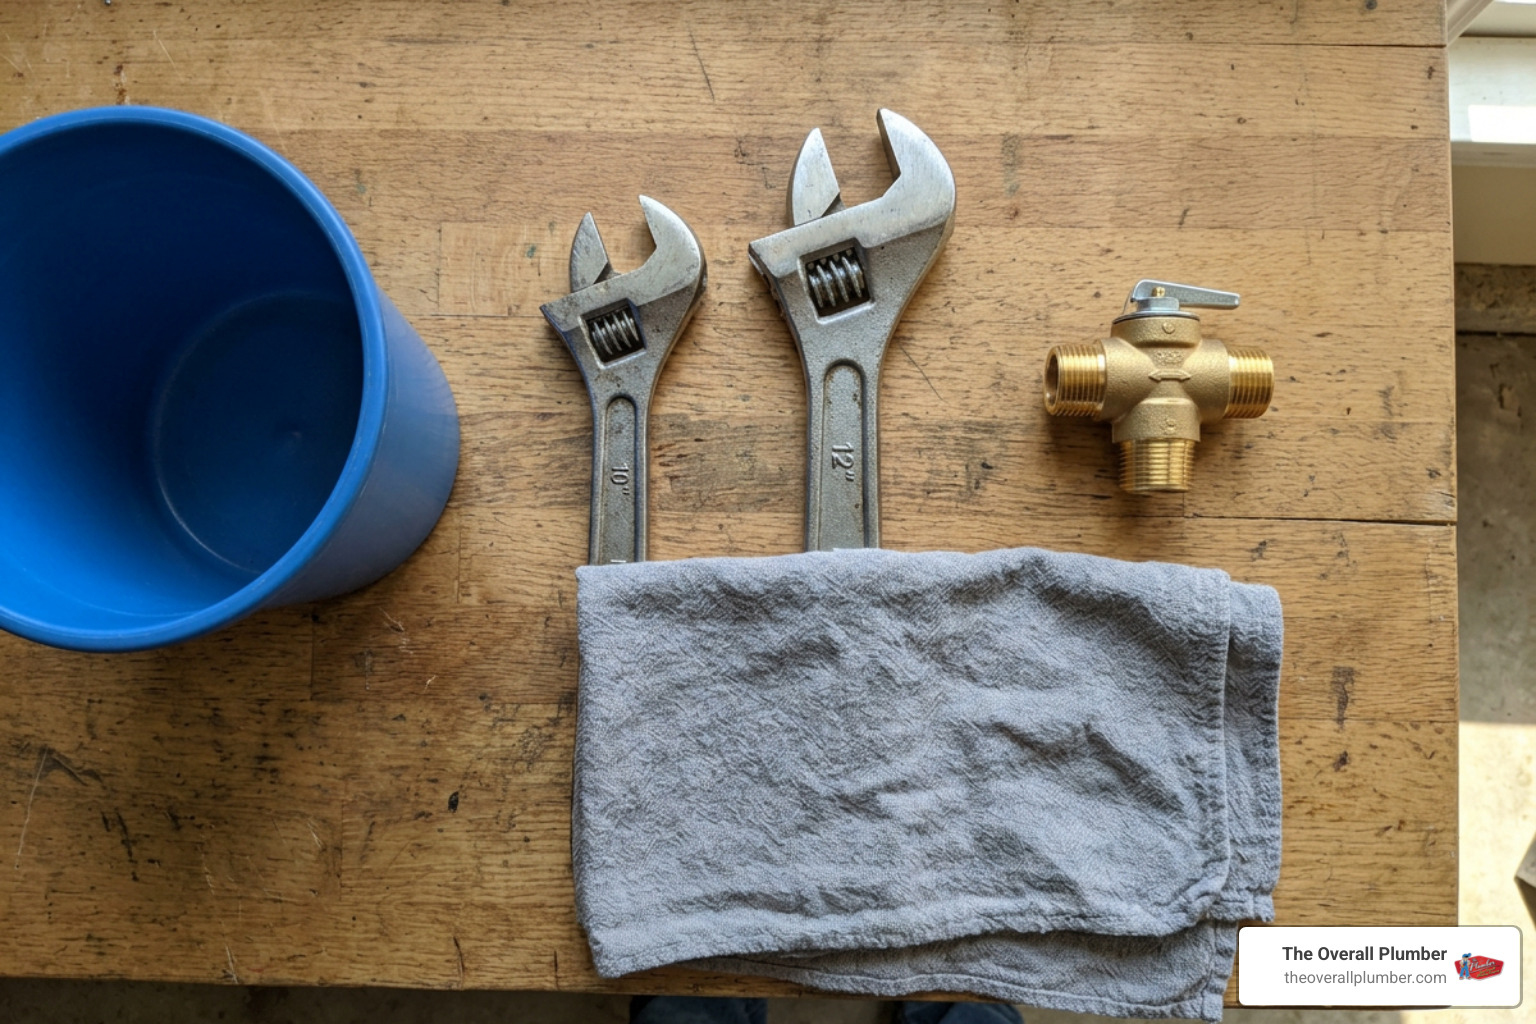
Required Tools and Materials
Gather your tools and materials before turning off your water heater:
- Replacement 3/4-inch T&P valve (ASME/CSA rated at 150 PSI / 210°F with proper shank length)
- 10-inch or 12-inch adjustable wrench
- 12-inch or 14-inch pipe wrench (or heavy slip-joint pliers)
- Thread sealing tape (PTFE / Teflon tape) or water-rated pipe dope (e.g., RectorSeal #5)
- Standard garden hose
- 5-gallon bucket and clean rags
- Wire brush (for cleaning tank port threads)
- Penetrating oil (such as WD-40 or PB Blaster, for stubborn fittings)
- Heavy leather work gloves and safety glasses
Preparing and Depressurizing the Tank
- Isolate Energy Supplies:
- For Electric Heaters: Go to your main circuit panel and flip the double-pole circuit breaker serving the water heater to the OFF position. (Never work on a live unit).
- For Gas Heaters: Turn the temperature control dial to PILOT or rotate the gas shutoff valve to the OFF position.
- Turn Off Cold Water Supply: Locate the cold water shutoff valve situated directly above the water heater on the inlet pipe and close it completely (turn the handle perpendicular to the line for ball valves or clockwise for gate valves).
- Relieve Internal Pressure: Open a hot water faucet inside your home (such as a nearby laundry sink or bathtub) to relieve residual line pressure.
- Drain Water Below the Valve Level: Attach your garden hose to the drain valve at the bottom of the water heater tank and run the opposite end to a floor drain, sump, or outside. Open the drain valve with a flathead screwdriver or handle.
- Side-Mounted Valve: Drain approximately 10 to 15 gallons to bring the water line below the port.
- Top-Mounted Valve: Drain roughly 2 to 5 gallons to drop internal pressure and clear the top manifold.
- Close the tank drain valve once sufficient water has cleared.
Removing the Old Valve and Installing the New Unit
- Disconnect the Discharge Pipe: Using an adjustable wrench or pipe wrench, grip the discharge pipe connected to the T&P valve outlet and unthread it counterclockwise. Set the pipe aside.
- Unscrew the Malfunctioning T&P Valve: Fit a pipe wrench or large adjustable wrench firmly around the hexagonal brass base of the old valve. Turn it counterclockwise to loosen.
- Plumber’s Tip: If the valve is seized due to mineral scale or corrosion, do not strike it violently. Spray penetrating oil around the exposed threads, wait 10–15 minutes, and try rocking the wrench slightly tighter first before backing it out counterclockwise.
- Clean Tank Threads: Once the old valve is removed, inspect the female threads inside the tank port. Use a stiff wire brush and a dry rag to clean away crusty mineral deposits, rust flakes, and residual thread sealant. Ensure the opening is clean and dry.
- Apply Thread Sealant: Take your new T&P relief valve and wrap the male threads with 4 to 6 tight wraps of Teflon tape in a clockwise direction (so the tape does not unravel when you screw it into the tank). Alternatively, apply a smooth, even coating of certified pipe thread sealant paste across the threads.
- Thread in the New Valve: Carefully hand-thread the new valve clockwise into the tank opening to avoid cross-threading. Once hand-tight, place your wrench on the valve’s hexagonal base and tighten it until snug—typically 1/4 to 1/2 additional turn. Align the threaded discharge outlet port so it points straight downward toward the floor. Avoid overtightening, which can distort internal valve seats or crack the tank’s welded spud fitting.
- Reinstall the Discharge Pipe: Wrap Teflon tape on the male threads of the discharge pipe, thread it into the outlet of the new T&P valve, and tighten it securely with a wrench until snug.
Restoring System Operation and Testing
- Refill the Tank Completely: Keep a nearby hot water faucet open in your home. Slowly open the cold water supply valve above the water heater. As the tank fills, air will hiss out of the open faucet. When a steady, solid stream of water flows without sputtering or air pockets, the tank is 100% full. Turn off the faucet.
- Inspect for Leaks: Carefully inspect the threads around the new T&P valve and discharge tube connection. Wipe the brass dry and watch for 3 to 5 minutes to confirm there is zero weeping, seepage, or bubbling.
- Restore Energy:
- Electric Units: Turn the double-pole circuit breaker back ON. (Crucial: Never restore power until the tank is completely full of water, or you will instantly dry-fire and ruin the electric heating elements!)
- Gas Units: Turn the gas valve back on and follow manufacturer lighting instructions to relight the pilot, then set the thermostat dial between 120°F and 130°F.
- Perform a Manual Valve Test: Place a bucket under the bottom outlet of the discharge pipe. Gently raise the metal test lever on the T&P valve halfway for 2 to 3 seconds. Water should rush through the discharge tube into your bucket. Release the lever; it should snap down firmly, and the water flow should stop immediately without persistent dripping.
Troubleshooting and Avoiding Common Installation Mistakes
While replacing a pressure relief valve is an accessible plumbing project, small mistakes can lead to component damage, property leaks, or safety hazards. Keep these critical installation rules in mind:
- Overtightening Fittings: Brass is a softer metal. Cranking on the valve body with a massive cheater bar can warp the valve seat or crack the internal tank lining. Tighten firmly until sealed, but do not force it.
- Dry Firing Heating Elements: If an electric water heater is energized while the tank is half-empty, the upper electric element will burn out within 30 to 60 seconds. Always bleed all air through a household faucet before touching the breaker.
- Discharge Pipe Material Errors: Never connect flexible garden hoses, thin vinyl tubing, or standard PEX (unless explicitly rated and local code-approved) to a relief valve. Use rigid, temperature-rated piping such as copper, galvanized steel, or CPVC.
- Code-Compliant Discharge Clearance: Plumbing codes require discharge lines to run downward by gravity, without traps, kinks, or shutoff valves. The pipe must terminate between 6 inches to 12 inches above the floor or directly over an approved floor drain pan to prevent hot-water scalding risks.
Addressing Persistent Leaks and Thermal Expansion
If your brand-new T&P valve continues to drip, pop open intermittently, or weep water several hours after installation, the valve itself is rarely defective. Instead, the valve is doing its job by venting excess hydraulic pressure caused by external factors.
- Closed-Loop Plumbing Systems: Municipalities increasingly install check valves, backflow preventers, and pressure-reducing valves (PRVs) at water meters. This creates a closed plumbing loop. When the water heater warms 50 gallons of cold water, the fluid expands in volume by roughly 2%. In an unyielding closed pipe system, this thermal expansion drives domestic pressure over 150 PSI, forcing the T&P valve to open. Installing or recharging a potable hot water expansion tank absorbs this excess expansion and keeps your system balanced.
- High Municipal Water Pressure: If your city water supply delivers pressure above 80 PSI without a working pressure reducing valve, your plumbing fixtures and safety valves will weep continuously.
- Failed Thermostat: If a thermostat fails in the closed position, heating elements or gas burners will continuously heat the water above 210°F, triggering temperature release.
If you are dealing with unresolved leaks or suspect serious pressure spikes, do not wait for water damage to occur. Reach out to our 24/7 team for rapid troubleshooting—Don’t Get Left in the Cold – Choosing a 24 Hour Water Heater Service helps protect your home from sudden plumbing emergencies.
Cost Breakdown: DIY vs. Pro to Replace Pressure Relief Valve Water Heater
Replacing the valve yourself offers clear cost savings if you have the necessary wrenches and basic plumbing comfort. However, hiring a licensed plumbing professional provides comprehensive diagnostic testing, verification of household water pressure, and full code compliance.
| Replacement Factor | DIY Replacement | Professional Plumbing Service |
|---|---|---|
| Parts & Materials | $15 – $35 (Valve & Teflon tape) | $20 – $40 (Commercial-grade OEM valve) |
| Required Tools | $0 – $45 (Wrenches, hose if needed) | Included with service |
| Labor Cost | $0 (20–45 minutes personal time) | $130 – $260 |
| Total Project Cost | $15 – $35 | $150 – $300 |
| System Safety Inspection | Homeowner visual check | Full thermal, pressure & safety check |
| Code & Expansion Check | Self-evaluated | Fully verified by licensed plumber |
| Workmanship Warranty | None (Self-warranted) | Complete satisfaction guarantee |
If your water heater is approaching 10 to 12 years of age and experiencing multiple fitting leaks, review our guide on How Much to Budget for Your New Water Heater Installation to evaluate whether a repair or a full unit replacement is the smarter long-term investment.
Frequently Asked Questions About Pressure Relief Valves
Can a faulty T&P valve cause a water heater to burst?
Yes. If a temperature control thermostat fails or a thermal runaway event occurs while the T&P valve is jammed shut by mineral deposits or corrosion, pressure inside the steel vessel will climb unabated. Without a safety release mechanism, the tank will experience structural failure and potentially explode in a catastrophic BLEVE event.
How much water do you need to drain before replacing the valve?
You do not need to drain the entire water heater tank. For a top-mounted relief valve, draining 2 to 5 gallons (about 30 to 60 seconds of drainage) drops the water line and relieves pressure. For a side-mounted valve, drain roughly 10 to 15 gallons to drop the water level safely below the side port so no water spills when the valve is unthreaded.
Is it safe to cap or plug a leaking relief valve?
Absolutely not. Capping, plugging, or installing a shutoff valve on a T&P valve outlet is one of the most hazardous plumbing mistakes possible and violates all national plumbing codes. Capping the valve eliminates the tank’s sole mechanical safety release. If excess pressure or temperature develops, the tank cannot vent, turning the unit into a severe safety hazard. If a valve leaks, it must be diagnosed and replaced immediately.
Safe and Reliable Water Heater Solutions
For professional diagnostic help with pressure relief valve leaks, thermal expansion problems, or a complete water heater replacement across Houston, League City, Pasadena, and the surrounding Texas Gulf Coast, contact The Overall Plumber for fast, expert assistance.