


A Broken Toilet Handle Wastes More Water Than You Think
If you need to fix a broken toilet handle, here’s the short answer:
- Turn off the water supply valve behind the toilet.
- Remove the tank lid and disconnect the lift chain from the handle arm.
- Loosen the mounting nut inside the tank by turning it clockwise (it’s reverse-threaded).
- Slide out the old handle and insert the new one through the tank hole.
- Hand-tighten the new nut counter-clockwise, then snug it gently with a wrench.
- Reattach the lift chain, leaving about 1/4 inch of slack.
- Turn the water back on and test flush.
Most homeowners can finish this repair in under 30 minutes with basic tools and a replacement handle that costs $10 to $25.
A stuck or broken toilet handle is easy to ignore — until you notice your water bill creeping up. A handle that sticks down or fails to lift the flapper properly can waste up to 200 gallons of water per day. That’s not a small drip. That’s a real, ongoing cost hitting your household every single day you put off the fix.
The good news? This is one of the most beginner-friendly plumbing repairs you can do. No special skills required. Just a few basic tools, the right replacement part, and about 15 to 30 minutes of your time.
I’m Dayton Whitworth, a second-generation plumber serving Greater Brazoria County, Galveston County, Houston, and the surrounding Gulf Coast — and fixing broken toilet handles is one of the most common calls we get from homeowners who want a quick, reliable solution. In the guide below, we’ll walk you through everything you need to know to get your toilet working properly again.
Glossary for fix broken toilet handle:
Diagnosing Your Toilet Handle Issues
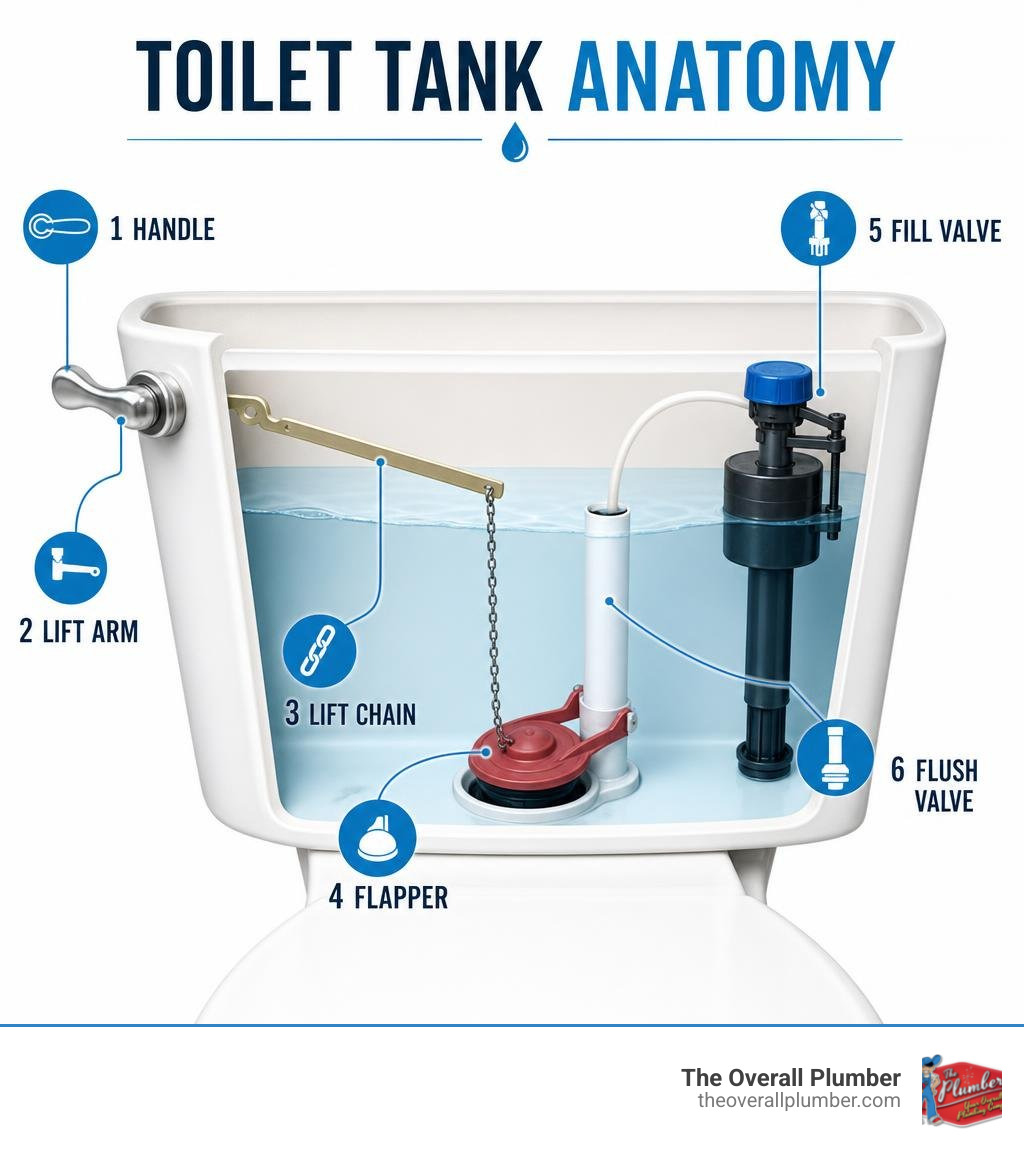
Before you rush off to the hardware store in Pearland or Pasadena, it helps to take off the tank lid and see what’s actually happening inside. The toilet handle assembly (technically called a toilet trip lever) is a simple mechanical system, but when one small piece fails, the whole flush cycle falls apart.
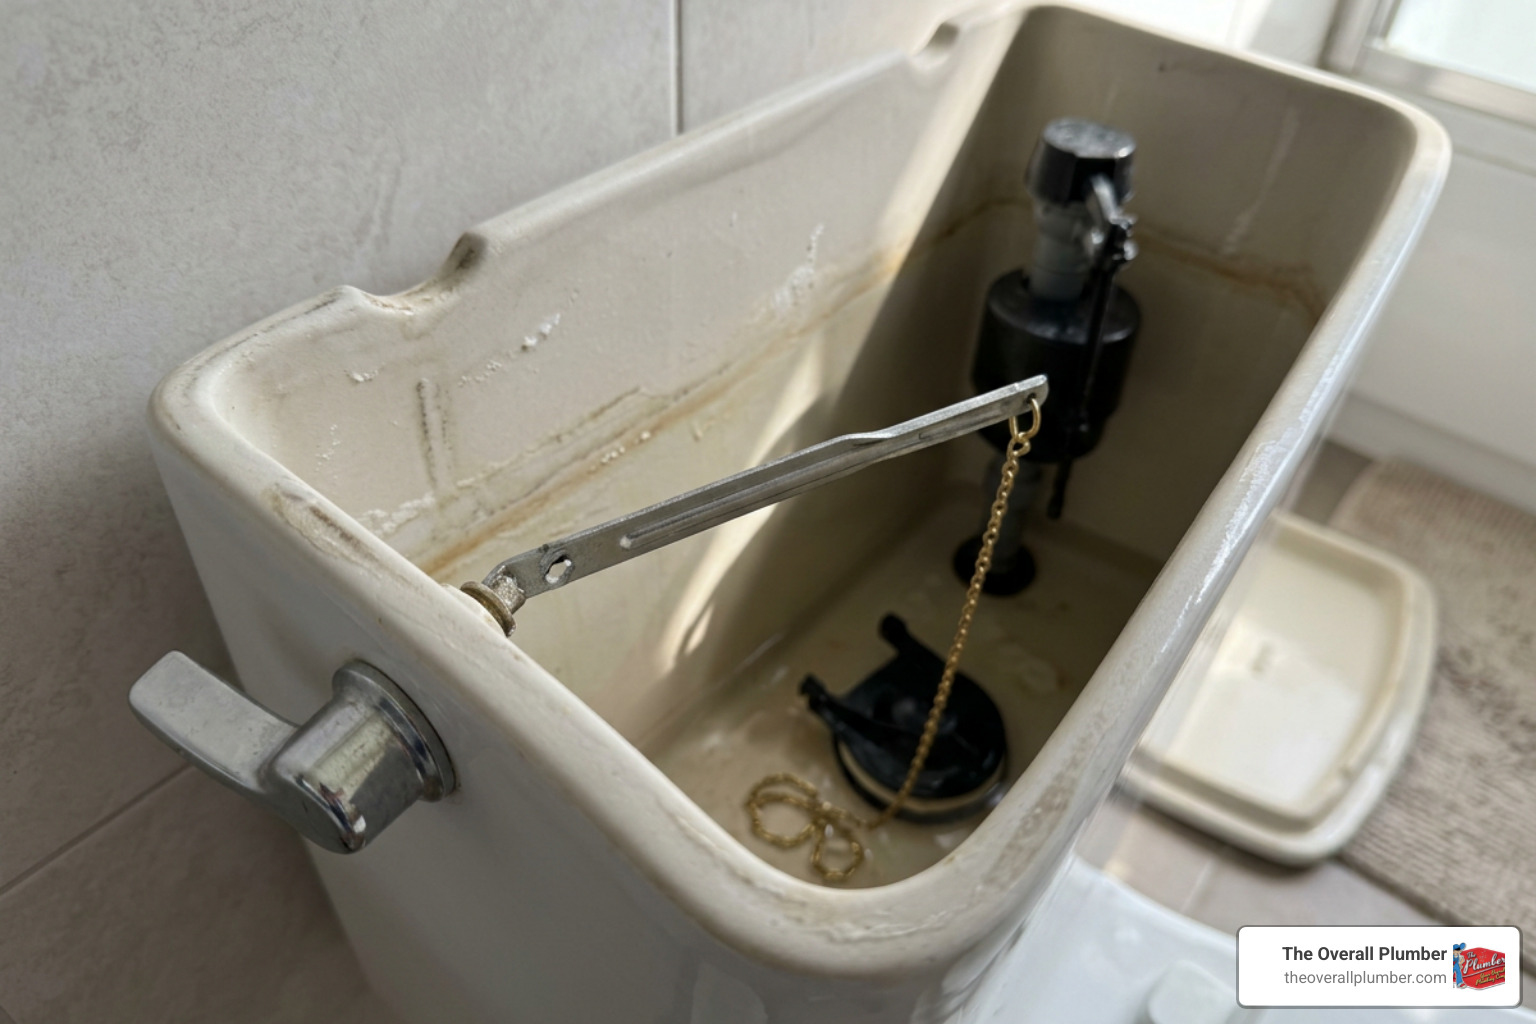
When you press the handle down on the outside of the tank, it rotates a metal or plastic trip lever arm inside. This arm lifts a metal or plastic lift chain, which pulls the rubber flapper up from the flush valve seat. Water then rushes from the tank into the bowl to trigger the flush. Once the tank empties, the flapper drops back down, sealing the drain so the tank can refill.
If your toilet handle is loose, sticking, or completely unresponsive, the issue is almost always located in this chain of command.
Signs It’s Time to Fix a Broken Toilet Handle
Here are the most common symptoms that tell us a toilet handle is on its last legs:
- The “Mushy” or Sticking Handle: You press the handle down, and instead of a crisp spring back, it stays down or feels incredibly loose. This often means the mounting nut inside the tank has backed off, or the internal spring mechanism in modern handles has weakened and failed.
- The Running Toilet: If your toilet runs constantly, a stuck handle might be holding the flapper open. This is a massive water waster and can easily slip under the radar.
- The Ghost Flush: If the mounting nut is loose or the arm is bent, the flapper might not seat correctly, causing water to slowly leak into the bowl until the fill valve kicks on to top off the tank.
- Stripped Plastic Threads or Worn Keyed Connections: Many builder-grade handles use a plastic “keyed” connection where the handle meets the lever arm. Over time, repeated flushing wears down these plastic grooves, causing the handle to spin uselessly without lifting the arm.
- A Disconnected or Broken Chain: If the handle moves perfectly but nothing happens, the lift chain has likely rusted through, broken, or unhooked itself from the lever arm.
Repair vs. Replacement
Can you get away with a quick repair, or do you need a full replacement?
If the problem is simply a loose mounting nut, you can often fix it in thirty seconds by tightening the nut (remembering that it’s reverse-threaded!). If the chain has slipped off, you can hook it back on using needle-nose pliers.
However, if the plastic handle is cracked, the threads are completely stripped, or the metal lever arm has corroded and snapped, a full replacement is the only reliable option. While some online forums suggest using epoxy or superglue to mend a broken plastic arm, we strongly advise against it. The constant tension of pulling up a water-logged flapper will snap a glue joint in a matter of weeks. Because a brand-new, high-quality replacement handle only costs between $10 and $25, replacing the entire assembly is by far the most cost-effective, long-term solution.
Preparing for the Repair
Getting everything ready beforehand will keep this job quick and stress-free. There is nothing worse than having your toilet tank open only to realize you don’t have the right wrench.

Tools and Materials Needed to Fix a Broken Toilet Handle
You don’t need a heavy-duty plumber’s truck to tackle this project. Gather these basic household items before you start:
- An adjustable wrench or water pump pliers: For loosening the mounting nut.
- Needle-nose pliers: Extremely helpful for opening and closing the chain clips.
- A new toilet handle assembly kit: Make sure to select one compatible with your toilet.
- Plumber’s tape (Teflon tape): Useful if you need to secure a slightly worn thread.
- Old towels: To set the heavy porcelain tank lid on so it doesn’t scratch your bathroom floor or crack.
For a highly detailed technical breakdown of the disassembly process, you can also consult the iFixit Toilet Handle Replacement Guide.
Choosing the Right Replacement Handle
Not all toilet handles are created equal. Before buying a replacement at your local home improvement store in League City or Santa Fe, check how your current handle is mounted:
- Front-Mount Handles: The most common style. The handle is located on the front-left or front-right of the tank.
- Side-Mount Handles: Mounted on the left or right side panel of the tank. These often require a specific angle or curved arm to clear the internal components of the tank.
- Angle-Mount Handles: Positioned on the curved corner of the tank.
- Universal Fit Handles: These feature adjustable or bendable brass arms designed to fit front, side, or angled positions. They are highly convenient, but we still recommend checking the packaging to ensure compatibility with your specific toilet brand.
Pro-Tip: If you want to make absolutely sure you get the right match, turn off the water, remove your old handle, and bring it with you to the store to compare it directly on the shelf.
Step-by-Step Guide: How to Fix a Broken Toilet Handle
Ready to get to work? Follow these steps to replace your broken handle like a pro.

Step 1: Turn Off the Water and Prep the Workspace
Before doing any work inside your toilet tank, locate the shut-off valve on the wall behind the toilet. Turn it clockwise until it stops. If you have an older valve that feels stuck, do not force it, as this can cause a leak. For more on handling these valves safely, see our guide on how to install your new toilet shut-off valve. Once the water is off, flush the toilet and hold the handle down to drain as much water as possible from the tank.
Step 2: Remove the Tank Lid
Carefully lift the heavy porcelain tank lid off and place it flat on an old towel. Porcelain is incredibly fragile; setting it on a hard tile floor can easily chip or crack it, turning a $15 handle fix into a much larger expense.
Step 3: Disconnect the Lift Chain
Locate the lift chain connected to the lever arm inside the tank. Note which hole on the arm the chain is hooked into (most arms have three or more holes to allow for adjustment). Use your needle-nose pliers to squeeze open the spring clasp or hook, then slide the chain off the arm.
Step 4: Remove the Old Mounting Nut (The “Reverse Thread” Secret)
Here is the step that trips up most DIYers: toilet handle mounting nuts are reverse-threaded. This design prevents the nut from loosening up over time as the handle is repeatedly pushed down.
- To loosen the nut, turn your wrench or pliers clockwise (to the right).
- Once loose, spin the nut off by hand and slide it off the lever arm.
- For more professional tips on handling stubborn nuts and levers, you can read This Old House Guide to Toilet Handles.
Step 5: Pull Out the Old Handle
Gently slide the old lever arm out through the hole in the side of the tank. Take a moment to clean any mineral buildup or grime around the mounting hole using a damp cloth. A clean surface ensures a watertight seal with your new handle’s rubber gasket.
Step 6: Install the New Handle
Slide the lever arm of your new handle through the tank hole from the outside. Make sure the handle is oriented horizontally in its resting position. On the inside of the tank, slide the rubber washer and then the mounting nut over the arm.
Hand-tighten the nut by turning it counter-clockwise (to the left). Once it is hand-tight, use your wrench to snug it up just a quarter-turn more.
Step 7: Reconnect and Adjust the Lift Chain
Attach the lift chain to the new lever arm, aiming for the same hole position as before. You want about 1/4 inch of slack in the chain when the handle is at rest. If the chain is too tight, it will pull the flapper up slightly, causing a constant leak. If it is too loose, the handle won’t lift the flapper high enough to trigger a complete flush. If your flapper is looking worn or discolored from mineral buildup, this is the perfect time to replace a toilet flapper to ensure a perfect seal.
Step 8: Test Your Work
Turn the water shut-off valve back on counter-clockwise and let the tank fill. Flush the toilet several times to observe the mechanism. Check that the handle moves freely, the flapper lifts completely, and the chain doesn’t get snagged on other tank components like the fill valve.
Common Mistakes to Avoid During Installation
While replacing a toilet handle is highly straightforward, avoiding these common missteps will save you from future headaches:
- Overtightening the Mounting Nut: This is the absolute number one mistake we see. The toilet tank is made of clay porcelain. If you crank down on the mounting nut with too much force, you can easily crack the tank. Tighten it hand-tight, then give it a very gentle snug with your wrench.
- Forgetting the Reverse Threads: Trying to turn the nut counter-clockwise to loosen it will only tighten it further, potentially stripping the plastic threads or cracking the tank hole. Always turn clockwise to loosen!
- Leaving Too Much or Too Little Chain Slack: A chain with zero slack will cause your toilet to run continuously. A chain with too much slack won’t open the flapper long enough, forcing you to hold the handle down to get a full flush.
- Ignoring a Corroded Fill Valve: If you find yourself constantly adjusting the handle but the toilet still won’t fill or run correctly, the root cause might be a failing fill valve rather than the handle itself. If so, check out our guide on toilet fill valve repair to get the rest of your tank running like new.
Frequently Asked Questions About Toilet Handles
Why is my toilet handle mounting nut reverse-threaded?
The mounting nut is reverse-threaded (left-handed) so that the natural downward action of flushing the toilet doesn’t gradually loosen the nut over time. If it were standard-threaded, every downward push of the handle would push the nut in the direction of loosening, eventually causing the handle to fall off.
How do I adjust the lift chain for a perfect flush?
Ideally, your lift chain should have about 0.25 inches (1/4 inch) of slack. If you need to make adjustments, use needle-nose pliers to move the clip to a different link on the chain. For more fine-tuning tips, you can read the WikiHow Toilet Handle Adjustment Tips.
Can I use glue or epoxy to fix a broken handle?
We do not recommend it. While epoxy can create a strong temporary bond, the constant leverage and tension required to lift a heavy rubber flapper against water pressure will quickly break the glue joint. Replacing the handle is incredibly inexpensive and provides a permanent fix.
DIY vs. Professional Toilet Handle Repair Cost
| Repair Method | Average Parts Cost | Average Labor Cost | Time Required |
|---|---|---|---|
| DIY Repair | $10 – $25 | $0 | 15 – 30 minutes |
| Professional Plumber | Included in service | $100 – $150 (Service fee) | 10 – 15 minutes |
Professional Toilet Repair Services in East Texas
While a broken handle is usually an easy DIY project, sometimes plumbing issues run a bit deeper. If you run into a rusted mounting nut that refuses to budge, find a hairline crack in your porcelain tank, or discover that your shut-off valve is leaking, it’s always safest to call in a licensed professional.
If you decide you’d rather leave it to the experts, or if you’re considering upgrading your entire fixture and want to know more about toilet replacement cost, we are here to help. At The Overall Plumber, we proudly serve homeowners across Houston, Galveston, League City, Texas City, Friendswood, Pearland, and Pasadena. We stand by our work with satisfaction guarantees, priority scheduling, and we never charge overtime fees.
If you need a hand with your home’s plumbing, visit The Overall Plumber or call us directly at tel:1-888-555-0199 to schedule your service.