


How to Descale a Tankless Water Heater
To descale a tankless water heater, turn off its power and gas supply, then close the hot and cold water isolation valves. Connect a small submersible pump and two hoses to the service ports. Circulate a descaling solution approved for your model through the heater, then rinse it thoroughly with fresh water before restoring service. Check your unit’s manual for the right solution and run time.
I’m Dayton Whitworth, a second-generation plumbing professional serving Houston and nearby Gulf Coast communities. My plumbing experience shapes this quick look at how to descale a tankless water heater safely.
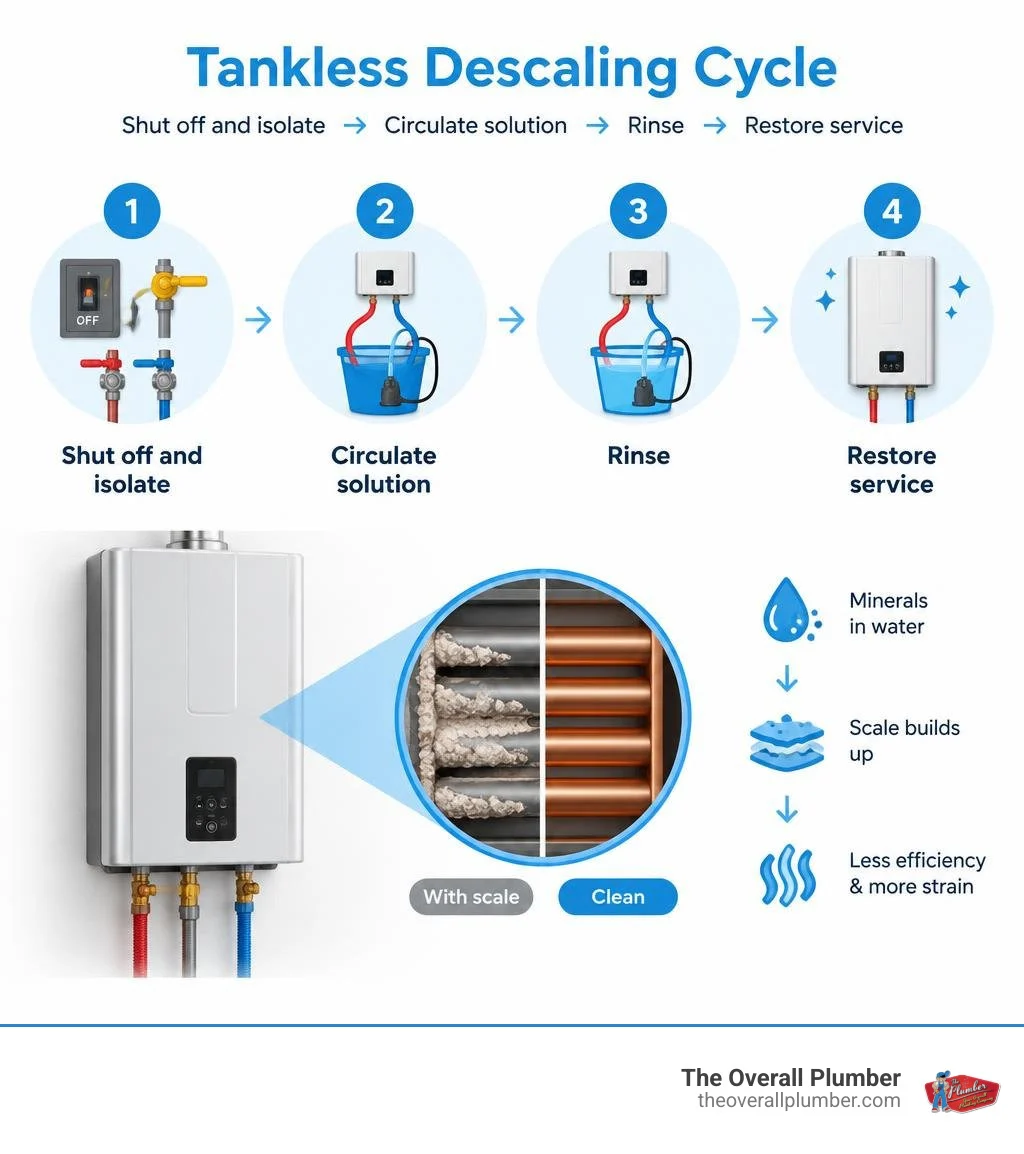
Why Routine Maintenance Protects Your Tankless System
Tankless water heaters deliver on-demand hot water by superheating water as it passes rapidly through a compact heat exchanger. Unlike traditional storage tanks that maintain a large reservoir, tankless units fire high-intensity burners or electric elements to achieve instant thermal transfer.
As groundwater heats up, dissolved minerals like calcium and magnesium precipitate out of the solution, creating hard mineral scale (calcium carbonate). This scale coats the narrow internal copper or stainless steel passages of your heat exchanger. Because limescale acts as a thermal insulator, it forces your burners to work harder and hotter to heat the same volume of water, reducing energy efficiency by up to 30%. Over time, unaddressed scale causes localized hot spots, metal fatigue, flow restrictions, and early component failure.
Flushing a tankless unit is completely different from maintaining a traditional tank. When you learn how to drain a water heater safely, you simply open a bottom valve to let gravity drain out settled sediment. A tankless unit has no tank to drain; it requires an active, pressurized pump loop to dissolve and remove stubborn mineral scale clinging to the heat exchanger walls.
| Feature | Tankless Water Heater Descaling | Storage Tank Water Heater Flushing |
|---|---|---|
| Primary Target | Bound mineral scale (calcium/magnesium) inside narrow heat exchanger tubing | Loose sediment and silt collected at the bottom of the storage tank |
| Method | Closed-loop forced chemical circulation via submersible pump | Gravity drain or municipal pressure purge via garden hose |
| Cleaning Agent | Virgin food-grade white vinegar or NSF-certified citric acid descaler | Plain fresh municipal water |
| Process Duration | 45 to 60 minutes of active chemical circulation | 10 to 20 minutes of passive draining |
| Equipment Needed | Submersible pump (1/6–1/5 HP), 5-gallon bucket, 2 washing machine hoses | Single standard garden hose |
Signs It Is Time to Descale a Tankless Water Heater
Scale build-up develops gradually, but your system provides clear warning indicators when mineral restrictions threaten heat transfer.
Watching for common indicators of scale accumulation helps you intervene before a complete system shutdown occurs. Common symptoms include:
- Diminished Flow Rate: Hot water trickles out of showerheads or faucets at a noticeably lower volume than cold water.
- Fluctuating Water Temperatures: Showers suddenly turn lukewarm or cycle between scalding and chilly as thermal sensors struggle to read temperatures through scale buildup.
- Extended Wait Times: The unit takes longer than normal to fire up and deliver hot water to distant fixtures.
- Error Codes on Digital Controllers: Diagnostic codes indicating ignition failure, heat exchanger overheating, or low water flow (such as error codes related to flow sensors or combustion performance).
- Audible Strain: Buzzing, knocking, or humming sounds coming from the unit during operation due to restricted water pathways.
Is It Safe to Descale a Tankless Water Heater After 5+ Years?
Homeowners often ask if descaling a neglected unit that has gone unserviced for five years or longer is safe. In many cases, performing a gentle flush successfully restores flow and efficiency. However, extreme caution is necessary.
In severely neglected units operating in hard water regions, heavy scale can actually plug microscopic pinholes created by underlying corrosion. When you dissolve years of heavy scale buildup, you may expose pre-existing heat exchanger erosion, leading to leaks.
If your unit has gone five or more years without maintenance, perform a visual pre-inspection of the casing, plumbing joints, and combustion chamber. Use a mild solution like undiluted white vinegar rather than aggressive, high-strength industrial acids, and monitor the circulation bucket closely for metallic debris or copper flakes. If you notice signs of structural corrosion or severe external leakage, shut off the pump immediately and schedule a professional assessment.
Essential Tools and Solutions for the Job
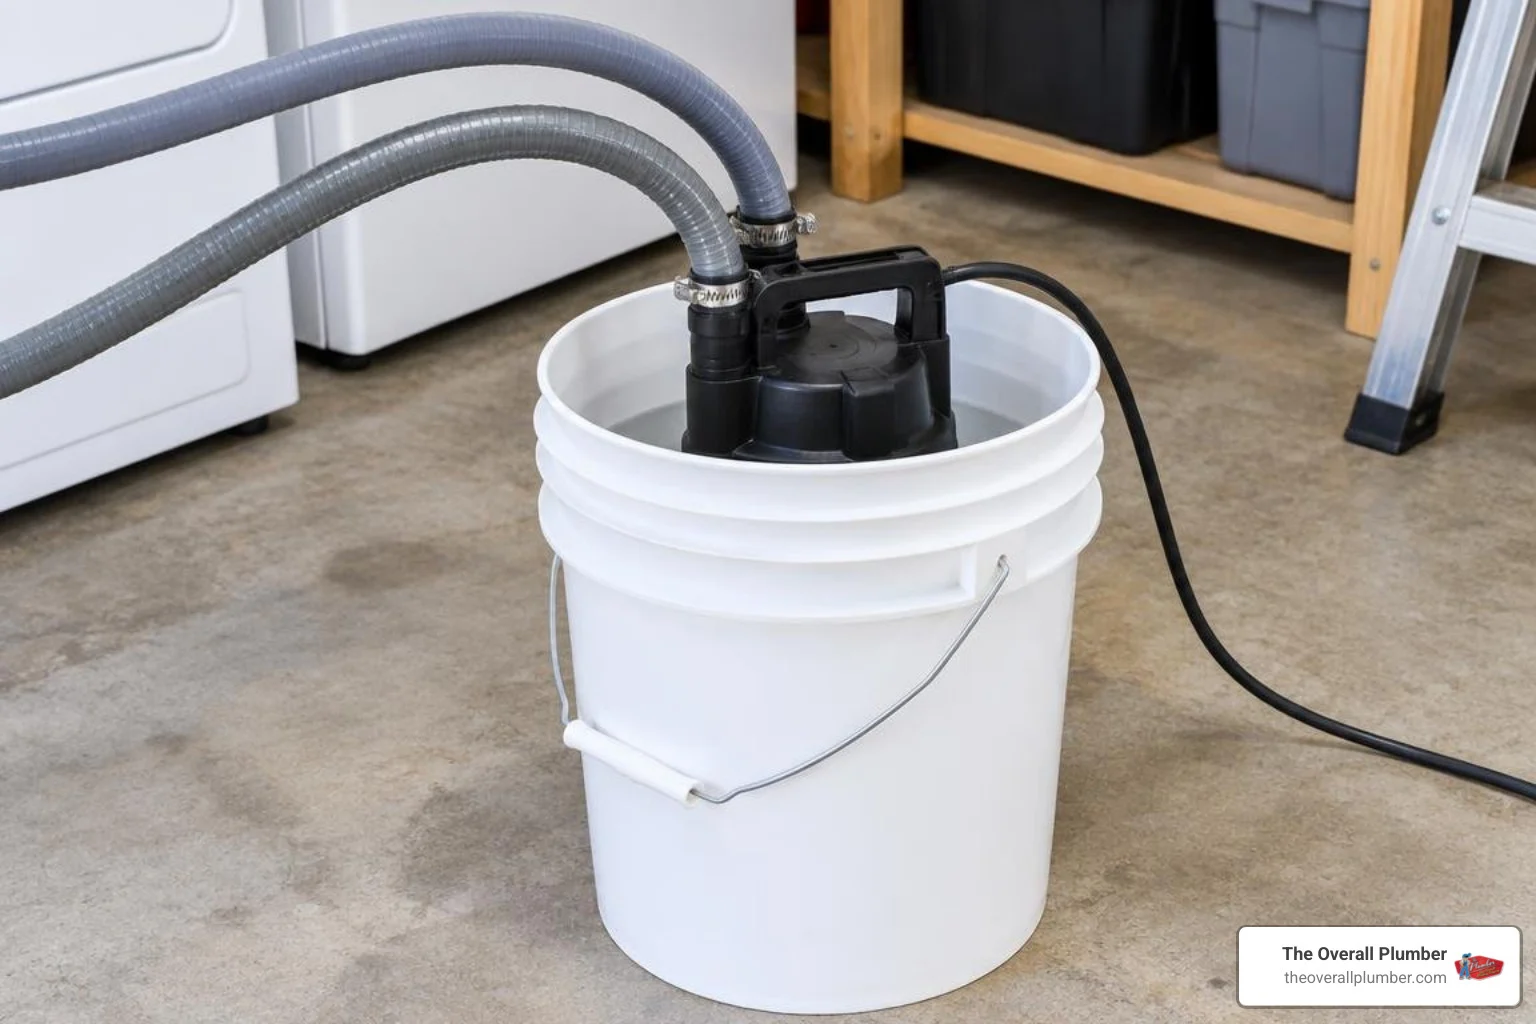
Descaling requires a few specific tools to establish a closed cleaning loop. You can purchase these items individually or buy a dedicated flush kit.
Here is what you need:
- Submersible Utility Pump: A small 1/6 to 1/5 horsepower pump designed for continuous duty.
- Two Washing Machine Hoses: 6-foot, 3/4-inch female-to-female garden hoses with clean rubber washers.
- Five-Gallon Plastic Bucket: To hold the descaling solution and catch circulating minerals.
- Descaling Solution: 3 to 4 gallons of undiluted food-grade white vinegar or an NSF-certified commercial tankless descaler.
- Adjustable Wrench and Screwdrivers: For service caps and cabinet access.
- Old Towels or Rags: To catch minor drips when disconnecting service ports.
White Vinegar vs. Commercial Chemical Descalers
Both standard white vinegar and formulated commercial solutions effectively clear heat exchangers, but each offers distinct characteristics.
| Factor | Undiluted Distilled White Vinegar | Commercial Descaling Solutions (Citric Acid-Based) |
|---|---|---|
| Active Ingredient | 5% Acetic Acid | Concentrated Citric Acid / Phosphoric Acid blends |
| Safety & Potability | Food-grade, non-toxic, safe for drinking water lines | NSF/ANSI 60 certified for potable systems when properly flushed |
| Material Compatibility | Safe for copper, stainless steel, brass, rubber, and ABS | Safe for metals and plastics; avoid on aluminum or magnesium |
| Circulation Time | 45 to 60 minutes | 30 to 45 minutes |
| Cost & Availability | Inexpensive and readily available at local grocery stores | Moderately priced at plumbing supply retailers |
| Odor | Noticeable vinegar aroma during and immediately after the flush | Mild or odorless |
Why Submersible Pump Horsepower Matters
Using the correct pump size is critical. A submersible pump rated between 1/6 and 1/5 HP delivers the ideal balance of pressure and flow.
A pump that is too powerful (such as a 1/2 HP or 3/4 HP sump pump) can create excessive velocity and backpressure, risking damage to sensitive internal flow turbines and mechanical water valves. Conversely, an underpowered pump cannot push air pockets through the convoluted heat exchanger loops, leading to stagnant pockets where scale remains unreacted. A 1/6 to 1/5 HP motor generates a steady, gentle flow that maximizes acid-to-mineral contact time without stressing internal components.
Step-by-Step Guide to Descale a Tankless Water Heater
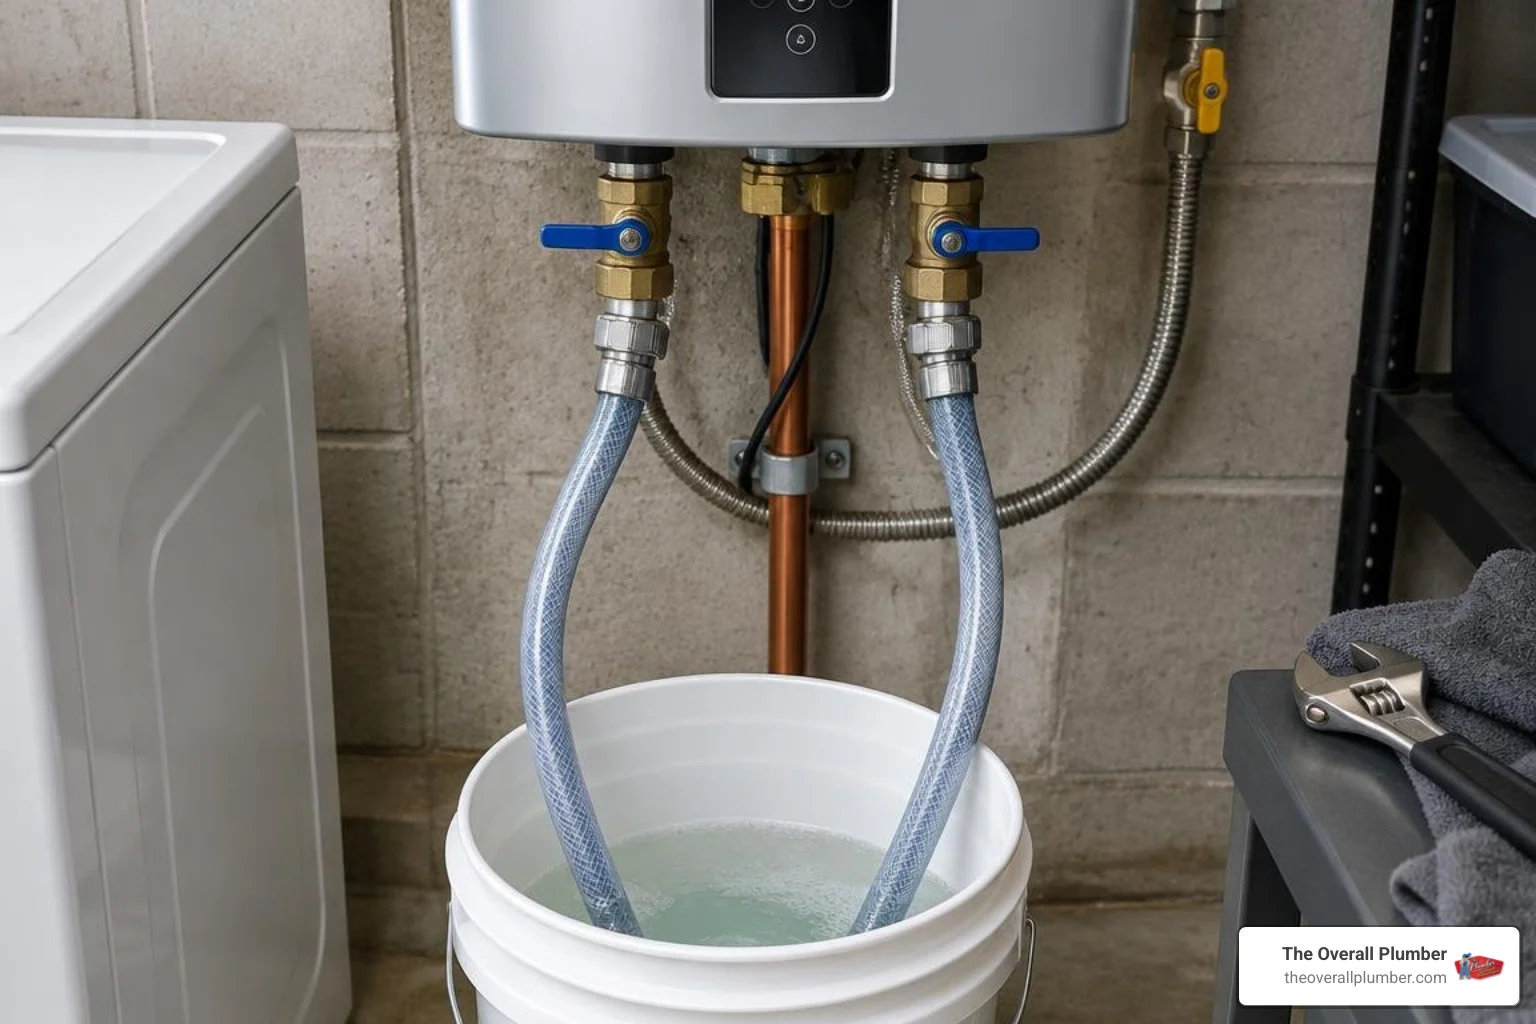
Before beginning, confirm your tankless unit is equipped with isolation valves (service valves). These valves isolate the water heater from your home’s main plumbing while providing dedicated threaded ports for maintenance. For a deeper look into proper plumbing setup, consult our guide to water heater installation.
Follow these steps to complete the descaling process:
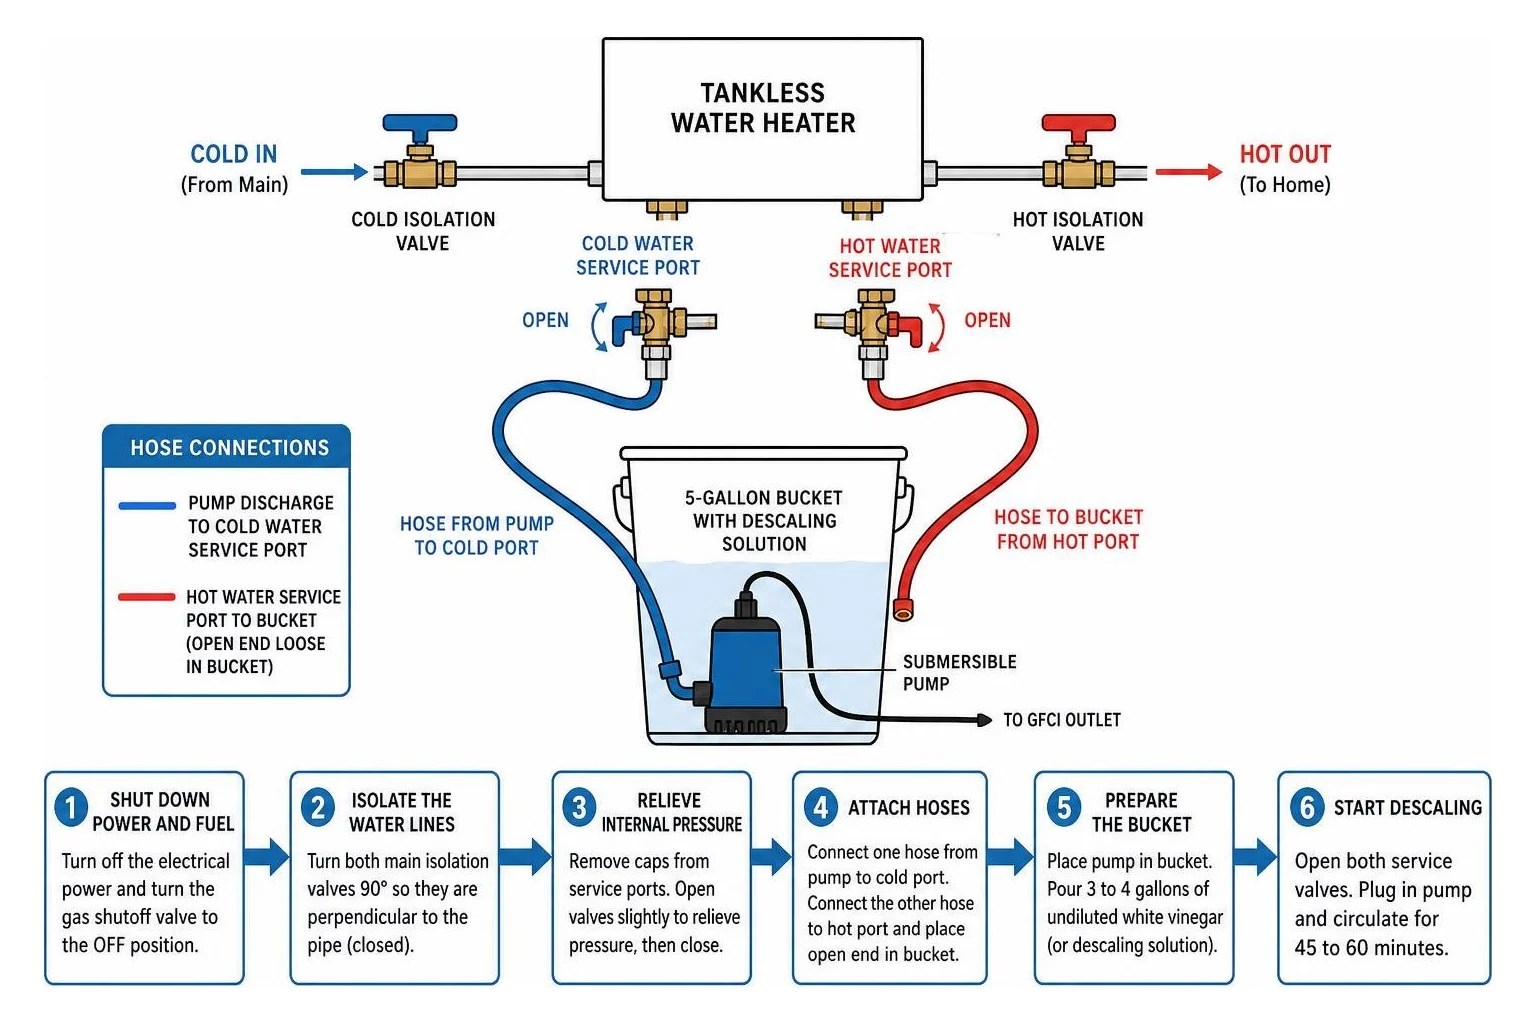
- Shut Down Power and Fuel: Turn off the electrical power by unplugging the unit or switching off its dedicated circuit breaker. Turn the manual gas shutoff valve to the perpendicular (OFF) position, or switch off the electric disconnect.
- Isolate the Water Lines: Locate the blue (cold) and red (hot) main isolation handles. Turn both handles 90 degrees so they are perpendicular to the pipe, shutting off water entering from the main and preventing water from flowing into your home’s hot water lines.
- Relieve Internal Pressure: Remove the threaded caps from the cold and hot service ports. Have a bucket or towel ready to catch residual water. Open the service port valves slightly to relieve trapped pressure, then close them.
- Attach Hoses: Connect one washing machine hose to the discharge outlet of your submersible pump and thread the other end securely onto the cold water service port. Connect the second hose to the hot water service port, placing its free open end loose into your 5-gallon bucket.
- Prepare the Bucket: Place the submersible pump directly into the base of the 5-gallon bucket. Pour 3 to 4 gallons of undiluted white vinegar (or your prepared commercial solution) into the bucket until the pump intake is fully submerged.
Circulating the Descaling Solution
- Open Service Valves: Turn both the cold and hot service port handles to the open position (parallel to the service port spout).
- Start the Pump: Plug the submersible pump into a grounded GFCI outlet. The pump will draw the cleaning solution from the bucket, push it up through the cold water inlet, force it across the heat exchanger, and discharge it out the hot water service hose back into the bucket.
- Circulate for 45 to 60 Minutes: Let the system run uninterrupted for 45 to 60 minutes (or 30 to 45 minutes if using a rapid commercial citric acid descaler).
- Monitor the Fluid: As the mild acid dissolves calcium carbonate, the solution may bubble, turn cloudy, or take on a bluish-green tint as it cleans copper heat exchangers. If the fluid becomes heavily discolored or filled with large chunks of scale halfway through, discard it, add fresh solution, and resume circulation.
Purging Residual Chemicals and Restoring Flow
- Turn Off and Drain the Pump: Unplug the submersible pump. Close the cold water service port valve, remove the pump hose from the cold port, and remove the pump from the bucket.
- Flush with Fresh Water: Leave the hot water service hose connected with its free end in the bucket (or run it to a floor drain). Slowly open the main cold water isolation valve (blue handle). Fresh municipal water will flow through the heat exchanger and flush residual vinegar and loosened particles out through the hot service port.
- Rinse for 3 to 5 Minutes: Let fresh water run through the system for 3 to 5 minutes, purging at least 15 to 20 gallons of water to completely clear any remaining acid.
- Close Service Ports and Reinstall Caps: Close the hot service port valve. Remove the drain hose and securely tighten the threaded service caps back onto both ports.
- Open Main Water Valves: Fully open both the main cold and main hot isolation valves.
- Check for Leaks: Inspect all valve stems, fittings, and service caps for drips.
- Restore Power and Gas: Turn the manual gas valve back on (parallel to the pipe) and restore electrical power. Open a hot water faucet in your home for a minute to bleed any trapped air from the fixture lines before testing burner ignition.
Following this detailed method ensures your unit operates safely; you can also reference our water heater flush service guide for broader system safety tips.
Cleaning the Water and Air Intake Filters
Descaling cleans the internal water passages, but comprehensive maintenance also requires inspecting your mechanical filters.
Cleaning the Cold Water Inlet Filter
Most tankless systems have a small cylindrical screen located at or near the cold water inlet to capture incoming sediment from municipal mains or private wells:
- With the cold isolation valve closed, place a rag beneath the inlet filter plug.
- Unscrew the filter assembly using an adjustable wrench.
- Rinse the fine mesh screen under clean running water, using an old toothbrush to remove grit and sand.
- Inspect the O-ring for cracks, re-seat the screen, and screw the plug back into place, tightening it snugly without over-torquing plastic threads.
Cleaning the Air Intake Filter
Gas tankless units draw outside air to support combustion. Many modern units feature an internal air intake screen inside the front cabinet:
- Ensure the unit is powered off, then remove the front casing panel screws.
- Locate the plastic filter screen situated on the air intake pipe assembly.
- Pull the screen out and wipe away accumulated household dust, lint, or pet dander.
- Reinstall the clean screen and replace the front panel. Keeping this filter clear ensures proper combustion and prevents flame failure error codes.
If your home currently relies on an older tank model, you might consider how upgrading your home with tankless water heater installation can provide high-efficiency performance with straightforward maintenance access.
Frequently Asked Questions About Tankless Maintenance
How often should you descale an on-demand water heater?
In areas with moderate water hardness, descale your unit once every 12 months. In regions with hard or very hard water (over 7 to 10 grains per gallon), perform descaling every 6 months to prevent heavy buildup. Installing an upstream whole-home water softening or scale prevention system helps protect the unit and extends maintenance intervals.
Can you use regular household vinegar for descaling?
Yes, standard food-grade distilled white vinegar with 5% acidity is safe, effective, and widely approved by tankless manufacturers. You will need 3 to 4 gallons of undiluted vinegar to ensure your submersible pump remains fully submerged throughout the entire circulation cycle.
What happens if you never descale your unit?
Skipping maintenance allows mineral scale to accumulate until it insulates the heat exchanger, driving up utility bills and causing uneven water temperatures. Eventually, extreme thermal stress leads to cracked heat exchangers, burned-out heating elements, recurring diagnostic shutdowns, and premature equipment replacement—often voiding the manufacturer’s warranty.