


Why Cast Iron Downpipe Repair Is Worth Getting Right
Cast iron downpipe repair is something most homeowners can tackle — at least partially — but knowing when to fix it yourself and when to call a pro makes all the difference.
Quick answer: How do you repair a cast iron downpipe?
- Assess the damage — small crack, large split, or full section failure?
- Clean the area — wire brush away rust, dirt, and loose paint.
- Seal small holes or cracks — use epoxy putty or a specialist crack sealant.
- Reinforce the repair — wrap with a water-activated fiberglass bandage.
- Replace badly damaged sections — cast iron is modular, so you only swap out what’s broken.
- Repaint — apply a quality exterior metal paint to protect the repair long-term.
Cast iron downpipes are tough. With proper care, they can last 80 to 100 years. But they do fail — cracks form, joints leak, and rust quietly eats through metal where you can’t easily see it. Left alone, a small drip can become a damp wall, a saturated ceiling, or worse. The good news is that most damage can be fixed without ripping out the entire system.
I’m Dayton Whitworth, a second-generation plumber with hands-on experience handling cast iron downpipe repair and all types of drainage issues across the Gulf Coast. Let’s walk through everything you need to know to fix your pipes the right way.
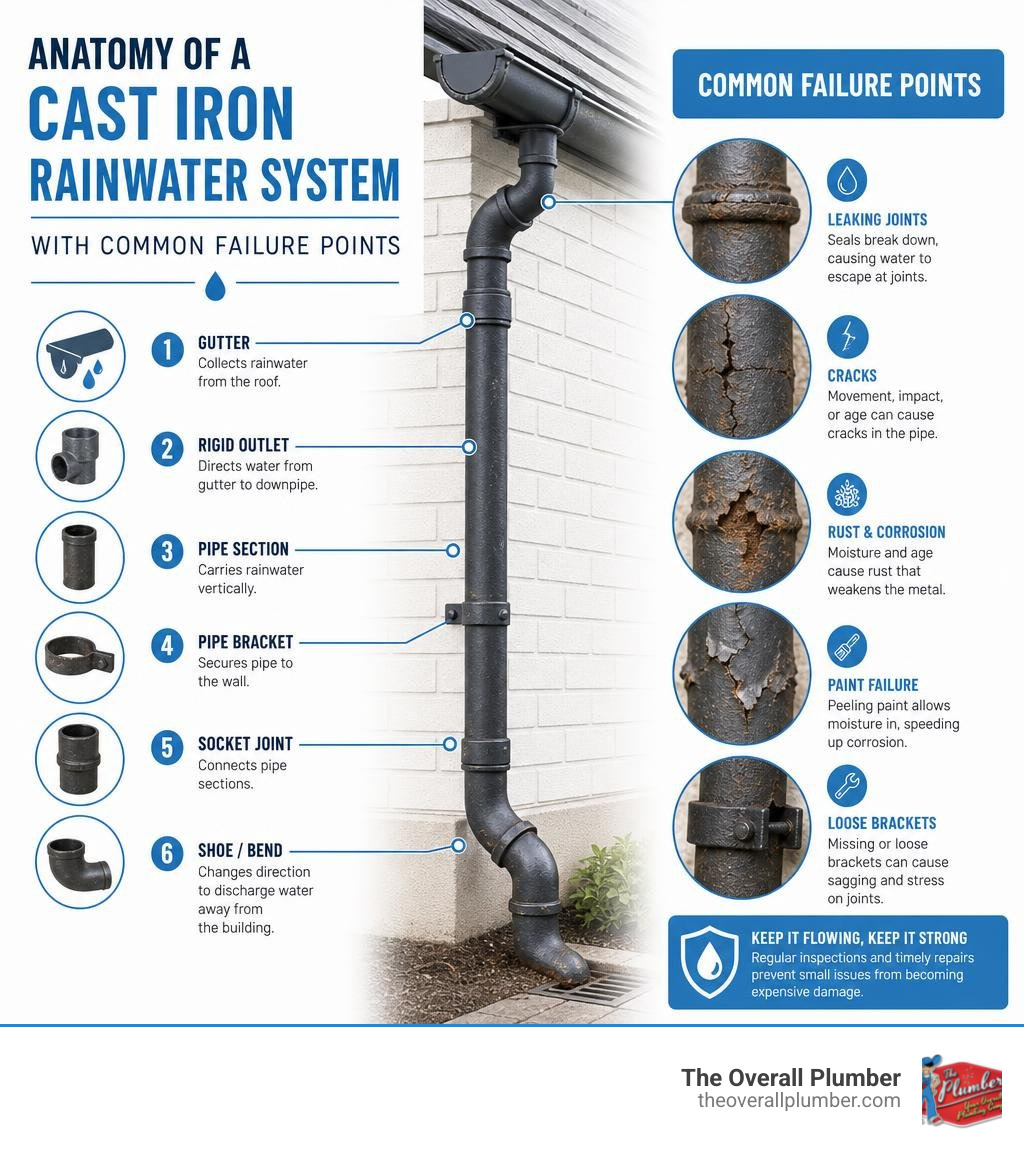
Identifying Damage and Common Cast Iron Downpipe Issues
Cast iron is legendary for its strength and historic charm, but it is not completely invincible. Over decades of service, the combination of constant moisture, thermal expansion, and shifting foundations can take a toll. In our coastal Texas climate—from the heavy humidity of Galveston to the intense downpours in Houston and Pasadena—cast iron downpipes face unique environmental stressors that accelerate wear.
When water is allowed to escape from a failing downpipe, the consequences go far beyond a simple drip. Escaping water quickly pools around your slab, saturates your siding, and seeps into your home’s structure. If the downpipe is routed internally or runs close to your foundation, a hidden leak can cause major structural damage before you even notice a puddle. If you suspect your drainage issues run deeper than an above-ground downpipe, consulting The Homeowner’s Guide to Sewer Camera Inspections can help you understand how professionals trace water paths from the roofline all the way to your underground lines.
The most common issues we see with cast iron downpipes include:
- Surface Rust and Deep Corrosion: While a light layer of surface rust is normal, deep pitting weakens the structural integrity of the metal, eventually leading to pinholes.
- Hairline Cracks: These tiny fractures often develop along the seams of the pipe due to age or stress. They may only leak during heavy downpours but will steadily expand over time.
- Longitudinal Splits: These are long, vertical cracks that run down the length of the pipe. They frequently occur when debris clogs the pipe, causing water to back up and freeze, or when structural shifting puts uneven pressure on the metal.
- Joint Leaks: Traditional cast iron joints were packed with linseed oil putty or mortar. As these materials dry out and crumble, water begins to seep through the connections.
- Damp Patches on Exterior Walls: If you notice localized dampness, moss growth, or staining on your brickwork or siding directly behind a downpipe, you almost certainly have a hidden leak.
Spotting the Signs of Cast Iron Failure
Catching these issues early is key to avoiding a massive repair bill. A thorough visual inspection should be performed at least twice a year—ideally in the spring and autumn. Grab a ladder, a flashlight, and a pair of binoculars to inspect the hard-to-reach sections.
Look closely for:
- Rust Staining and Peeling Paint: If the protective paint coating has failed, you will see bubbling paint and orange-brown rust streaks running down the pipe.
- Back-Edge Rot: This is the silent killer of cast iron rainwater systems. Because the back of the downpipe faces the wall, it stays wet longer, receives less sunlight, and is incredibly difficult to reach with a paintbrush. This is particularly common in decorative ogee profile gutters and rectangular downpipes where the flat rear surface rests flush against the building.
- Fractured Collars: Look at the joints (or collars) where individual pipe sections slide together. If these collars are cracked, the joint will lose its stability and leak.
If your downpipe connects directly into an underground drain and you are seeing unexplained dampness around your foundation in League City or Pearland, the issue might be hidden beneath the dirt. Utilizing a professional Video Camera Sewer Line Inspection is the fastest, most non-invasive way to see if your cast iron system is cracked underground.
The Ultimate Guide to Cast Iron Downpipe Repair
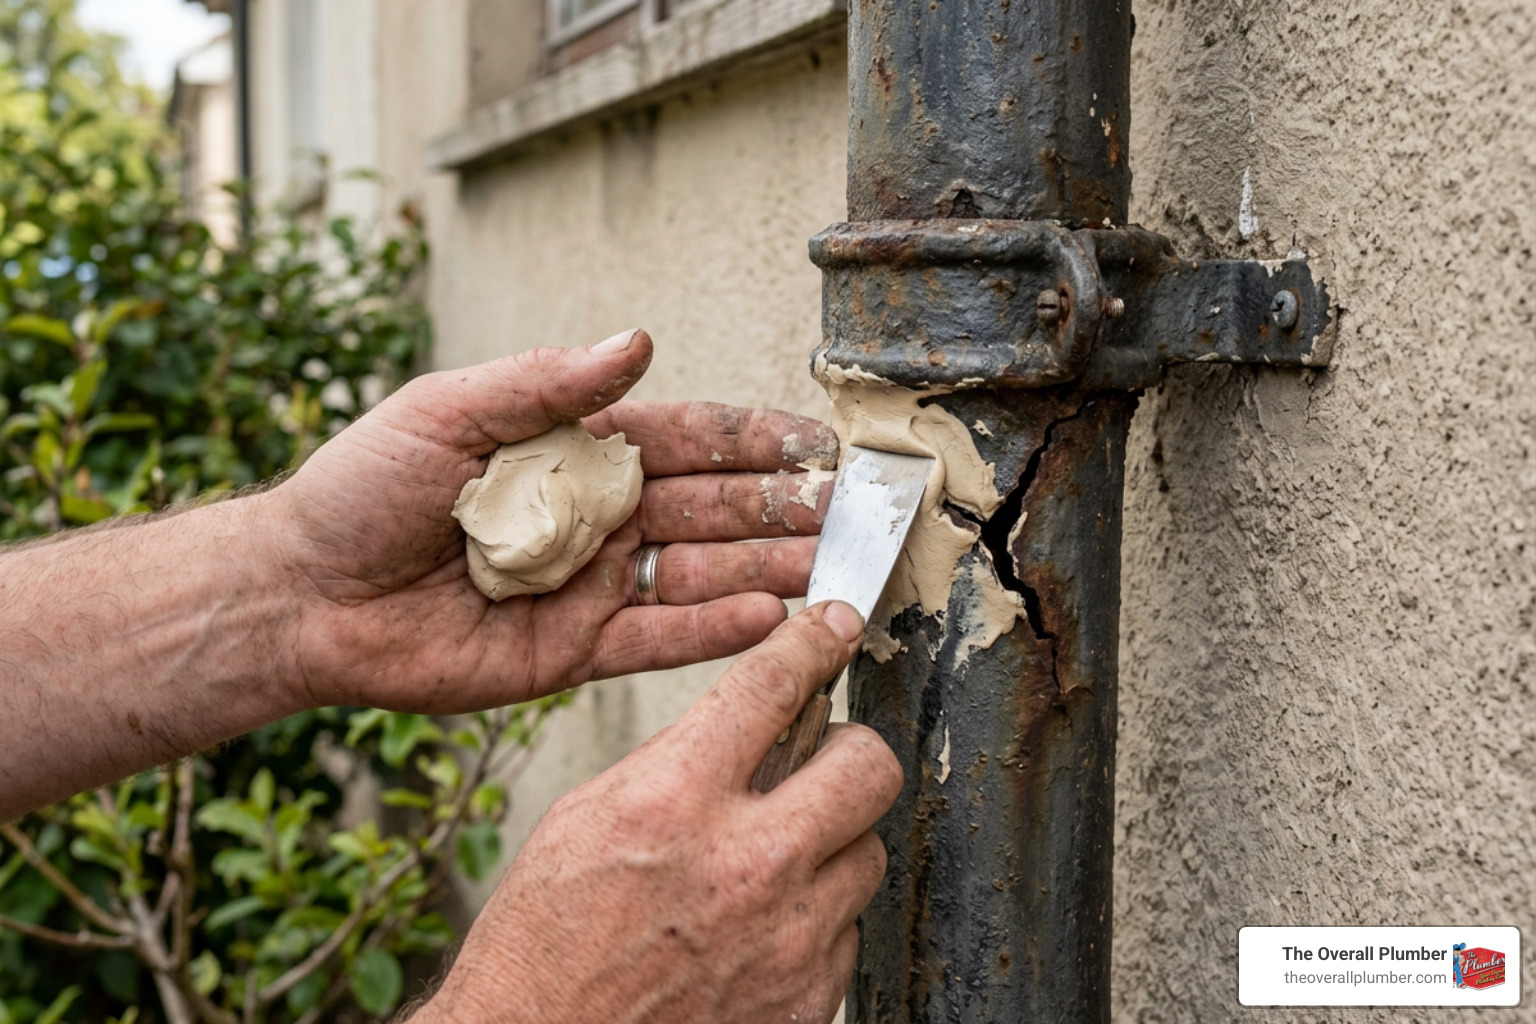
When you discover a crack or a leak in your cast iron downpipe, you do not automatically have to replace the entire system. Because cast iron is exceptionally rigid and holds its shape well, modern repair materials can bond to it beautifully, creating a permanent, watertight seal.
To achieve a durable repair, you must use high-quality materials designed specifically for metal. Standard household caulking or cheap silicone will quickly peel away under the expansion and contraction of the pipe. Instead, professional-grade kits, such as the SylWrap Cast Iron Pipe Repair Kit – Seal Cracked & Leaking Pipes, provide a multi-stage system that seals the leak and reinforces the pipe structurally.
Sealing Cracks and Holes
For localized damage like pinholes, hairline cracks, or even substantial longitudinal splits, a two-stage repair process is highly effective.
- Surface Preparation: This is the most crucial step. Use a stiff wire brush, sandpaper, or an angle grinder with a wire wheel to strip away all loose rust, old paint, and dirt around the damaged area. The metal must be clean, dry, and slightly abraded to ensure the repair compounds can bite into the surface.
- Apply the Primary Sealant: For small pinholes, knead a high-quality epoxy putty, like Superfast Steel, until it turns a uniform gray color. Press it firmly into the hole, smoothing the edges flat. For larger longitudinal cracks, use a specialized cartridge sealant like CrackSeal. Extrude the sealant directly into the crack, ensuring it completely fills the void.
- Reinforce with a Bandage: Once the primary sealant has been applied, wrap the pipe with a water-activated fiberglass pipe repair bandage (such as SylWrap HD). Simply submerge the bandage in water for a few seconds to activate the resin, then wrap it tightly around the pipe, overlapping each turn by 50%. Smooth the bandage down in the direction of the wrap to release air bubbles and ensure a tight bond.
This method is incredibly robust. In fact, a similar approach was highlighted in a technical Cracked Cast Iron Downpipe Repair at UK Hospital | Sylmasta.net, where maintenance engineers successfully sealed a massive 1.05-meter long longitudinal crack in a 150mm internal cast iron rainwater pipe in under 30 minutes. The repair stopped active leaking into a patient ward instantly and saved the facility thousands of dollars in replacement costs.
The curing times of your materials:
- Working Time: 2 to 5 minutes once the epoxy or bandage is wet/kneaded.
- Functional Cure: 30 to 45 minutes (the material will be hard to the touch).
- Full Cure: 24 hours for maximum pressure and temperature resistance.
Replacing Damaged Modular Sections
If a section of your downpipe has completely rusted through or split wide open, patching it with epoxy is only a temporary fix. Because cast iron is a modular system composed of individual interlocking sections, you can replace a single damaged piece without disturbing the rest of the system.
Replacing a section is a heavy, physical job that usually requires two people, especially when handling standard 6-foot (1.8-meter) lengths.
- Support the Surrounding Pipe: Before cutting or removing any section, ensure the sections above and below are securely anchored to the wall with heavy-duty brackets or ear bands.
- Cut Out the Damaged Section: Use a reciprocating saw with a metal-cutting blade or a specialized cast iron pipe cutter to carefully cut through the damaged area.
- Source a Matching Component: You must replace the damaged piece with a high-quality cast iron component of the exact same diameter and profile. You can learn more about sourcing authentic components in this guide: Can you repair cast iron downpipes? | Rainclear Resources.
- Install the New Section: Slide the new section into place. If you are integrating modern upgrades, such as a rainwater harvesting system, this is the perfect time to install a cast iron downpipe rain diverter – rain diverter for cast iron pipe.
- Seal the Joints: Pack the new joints with low-modulus silicone sealant or traditional jointing compound to allow for 3-4mm of thermal movement, ensuring a completely watertight connection.
Repair vs. Replacement: Lifespan and Cost Considerations

When faced with a failing cast iron downpipe, every homeowner asks the same question: Should I patch it up, or is it time to replace the whole thing?
To make the right decision, you have to weigh the upfront costs against the long-term value. A well-maintained cast iron downpipe has an incredible lifespan of 80 to 100 years. Plastic (PVC) gutters and downpipes may be cheaper upfront, but they warp, fade, and crack within 15 to 20 years under the intense Texas sun. Over its total lifespan, cast iron actually costs about a third of what you would spend repeatedly replacing plastic systems.
To get that full century of service out of your cast iron, regular maintenance is non-negotiable. The exterior of the pipes must be thoroughly repainted every 10 to 15 years to protect the metal from atmospheric moisture.
If you ignore minor leaks in your downpipes, the water will eventually find its way down to your home’s foundation. Over time, localized soil saturation can lead to foundation shifting and severe Sewer Line Problems and How to Avoid a Total Washout.
To help you compare your options, here is a breakdown of typical costs and considerations for repair versus replacement:
| Factor | Cast Iron Repair (DIY / Pro Patching) | Partial Section Replacement | Full System Replacement |
|---|---|---|---|
| Average Cost | $50 – $250 | $300 – $800 | $2,500 – $8,000+ |
| Time Required | 1 – 2 hours | 2 – 4 hours | 1 – 3 days |
| Lifespan of Fix | 10 – 20 years | 50+ years | 80 – 100 years |
| Aesthetic Impact | Minimal (if painted over) | Seamless match | Pristine, historic look |
| Best For | Hairline cracks, small holes, joint leaks | Single cracked collar or rusted section | Completely rusted-out, thin-walled pipes |
When to Repair and When to Replace
So, how do you draw the line between a simple repair and a full replacement?
It all comes down to the structural integrity of the remaining metal. If the pipe is still thick, heavy, and solid when tapped with a tool, it is an excellent candidate for repair. However, if the metal feels thin, flaking, or crumbles under light pressure, the pipe has reached the end of its lifespan.
Be highly cautious of trying to salvage heavily corroded pipes through aggressive cleaning methods. For example, as discussed in Repairing cast iron downpipe? – HomeOwnersHub, second-hand or severely weathered cast iron guttering and downpipes have up to a 50% failure rate under shot-blasting because the intense pressure instantly cracks the brittle, weakened metal. If the metal is that fragile, attempting to patch it is a waste of time and money.
Additionally, if your downpipes are failing because the underground cast iron drains they connect to are collapsed or completely corroded, replacing the above-ground pipe won’t solve your drainage issues. In these cases, you will need to address the underground lines. Fortunately, modern technology allows us to resolve these subterranean issues without destroying your landscaping. You can read about how this works in Why Trenchless Sewer Line Replacement is the Best Way to Save Your Yard.
Special Considerations: Historic Properties and DIY vs. Professional Work
If you own a historic, listed, or period property in places like the historic districts of Galveston or older neighborhoods in Houston, your cast iron downpipes are more than just plumbing—they are an essential architectural feature.
Before touching your rainwater system on a historic property, check with your local planning authority or conservation officer. While repairing existing cast iron downpipes generally does not require formal consent, replacing them with modern materials (like plastic or aluminum) almost always does. Historic preservation guidelines usually mandate that any replacement components must be direct, authentic cast iron matches.
When working on historic systems, follow these traditional best practices:
- Refer to a professional Installation Guide to ensure correct spacing, alignment, and jointing techniques that respect the original architecture.
- Avoid using modern, aggressive chemical rust converters that can damage old iron. Instead, stick to careful hand-wire-brushing.
- Use traditional linseed oil paint or high-quality breathable metal primers to protect the iron while allowing microscopic moisture to escape, preventing the paint from bubbling and peeling prematurely.
DIY Repairs vs. Hiring a Professional
Tackling a cast iron downpipe repair yourself can be a rewarding weekend project, but it is important to be realistic about your skills and safety.
When DIY makes sense: If the leak is at ground level, easily accessible, and consists of a small crack or a loose joint, a DIY repair using an epoxy repair kit is highly cost-effective. With a wire brush, some safety glasses, and a quality sealant kit, you can have the job done in an afternoon.
When to call in the professionals:
- Working at Heights: Cast iron downpipes are incredibly heavy. Trying to balance a 50-pound section of iron pipe while standing on a ladder thirty feet in the air is an recipe for disaster. Professionals use stable scaffolding, safety harnesses, and specialized hoisting equipment to do the job safely.
- Extensive Structural Damage: If multiple sections are failing, or if the downpipes are structurally integrated into your home’s walls, professional intervention is required to avoid damaging your siding or brickwork.
- Underground Connections: If your downpipe drains into a cracked underground line, a licensed plumber can perform a seamless Broken Pipe Repair to ensure your entire drainage system works flawlessly from roof to sewer.
Frequently Asked Questions About Cast Iron Downpipes
Can I perform a DIY cast iron downpipe repair?
Yes, you can absolutely perform a DIY repair on minor damage. If you are dealing with small pinholes, hairline cracks, or leaking joints that are easily accessible from the ground, a high-quality epoxy putty or a wrap-around pipe repair kit is perfect for a DIY fix. Just make sure to wear proper safety gear (gloves, safety glasses, and a dust mask), thoroughly wire-brush the metal to remove all rust, and follow the product’s curing instructions closely.
How much does a professional cast iron downpipe repair cost?
The cost of professional repair depends on several factors, including the height of the building, accessibility, and the extent of the damage. A simple localized repair or joint resealing at ground level typically costs between $150 and $300. However, if the job requires setting up scaffolding to reach upper stories, or if multiple modular sections must be cut out and replaced with authentic cast iron, the cost can range from $500 to $1,500 or more.
How long does a repaired cast iron downpipe last?
A professional-grade repair using high-quality epoxy putty, specialized sealants, and water-activated fiberglass reinforcement bandages typically has a cured material lifespan of 10 to 20 years. The exact longevity depends on the quality of the surface preparation, the thickness of the application, and environmental conditions. To maximize the lifespan of your repair, ensure the pipe is thoroughly cleaned before application and painted over with a protective, exterior-grade metal paint once cured.
Protect Your Home’s Drainage System Today
Your home’s rainwater system is its first line of defense against water damage. Neglecting a cracked or leaking downpipe can quickly lead to costly foundation issues, ruined siding, and damp interior walls. Whether your historic home needs a careful, authentic restoration or you need a rapid, durable seal on a modern cast iron stack, getting the job done right is essential for protecting your property.
At The Overall Plumber, we serve homeowners throughout Brazoria County, Houston, Clear Lake, Santa Fe, League City, Texas City, La Porte, Friendswood, Pearland, Pasadena, and Galveston. We pride ourselves on providing top-tier plumbing services with our signature satisfaction guarantees, priority scheduling, and absolutely no overtime fees.
If you are dealing with a stubborn leak, a cracked collar, or suspect your downpipes are causing underground drainage issues, we are here to help. For expert assistance with your home’s drainage and Broken Pipe Repair, contact our team today at (281) 668-8055.