


A Practical Guide to Toilet Installation: What Every Homeowner Should Know
Toilet installation is a DIY-friendly plumbing job most homeowners can complete in 1–2 hours with basic tools. Here is a quick overview of the process:
- Turn off the water and remove the old toilet
- Inspect the floor flange and scrape off old wax
- Install new closet bolts and a fresh wax ring
- Set the new toilet bowl and press down firmly to seat the seal
- Secure the bowl and attach the tank
- Connect the water supply line and check for leaks
- Install the seat, adjust the water level, and test flush
A standard toilet replacement does not require a permit in most areas as long as the drain location stays the same. Professional installation runs $224–$533 in 2026, including labor. A damaged floor flange adds $200–$400 to that total.
Replacing an old toilet also has real savings attached. Older toilets can use 3–5 gallons per flush. WaterSense-certified models cut that down to 1.28 GPF — up to 60% less water than pre-1994 units.
That said, not every installation goes smoothly. One homeowner followed a popular video tutorial step by step, only to discover eight months later that their flange sat just 3/8 of an inch below the finished floor. The result was over $1,300 in subfloor repairs — all from a single overlooked measurement.
I’m Dayton Whitworth, a second-generation plumber serving Greater Brazoria County, Galveston County, Houston, and the surrounding Gulf Coast, with hands-on experience across hundreds of toilet installation jobs of every type and complexity. In this guide, I’ll walk you through each step so you can avoid the mistakes that turn a simple swap into a costly repair.
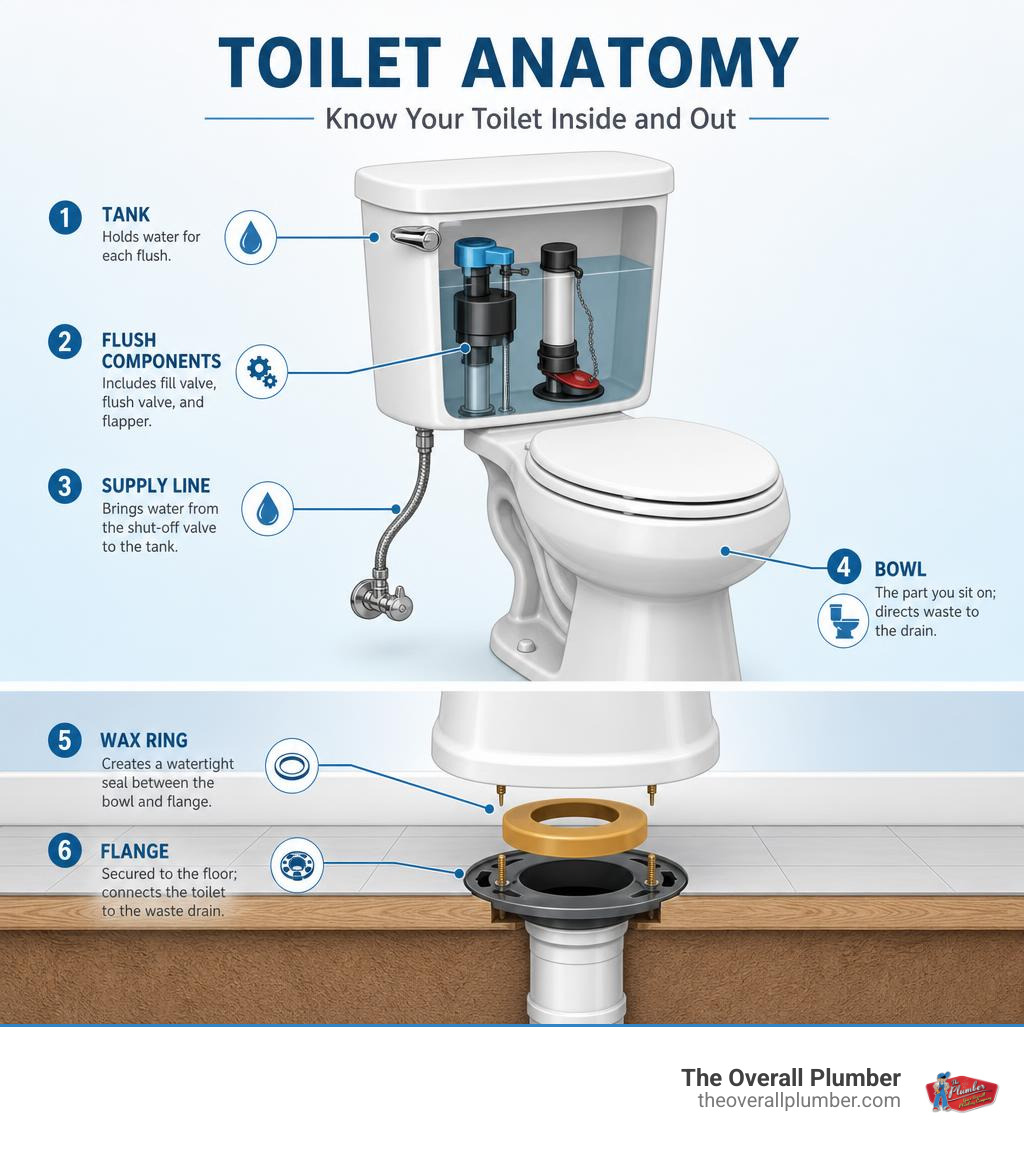
Planning and Preparing for Your Toilet Installation
Before rushing out to buy a shiny new throne, we need to do a little homework. Getting the right size and style ensures your bathroom layout remains functional and your installation goes off without a hitch.
Standard vs. Comfort-Height Toilets
Toilets generally come in two heights. Deciding between them depends on who will be using the bathroom and your personal preferences.
| Feature | Standard Height | Comfort-Height (ADA Compliant) |
|---|---|---|
| Seat Height | 14 to 15 inches | 16 to 18 inches (similar to a standard chair) |
| Best For | Shorter individuals, young children | Tall individuals, adults, those with mobility issues |
| Comfort | Traditional feel; can feel low for some | Easier on the knees and back when sitting or standing |
| Space Profile | Slightly more compact visual profile | Standard footprint, but taller presence |
Measuring the Rough-In Distance
The “rough-in” is the distance from the finished wall behind the toilet to the center of the floor drain.
- How to measure: Use a tape measure to measure from the finished wall (not the baseboard!) directly to the center of the plastic caps covering the floor bolts.
- Standard sizes: The standard rough-in is 12 inches. However, older homes—especially in established neighborhoods around Galveston, Pasadena, or Houston—might have 10-inch or 14-inch rough-ins.
- Buying tip: Always purchase a toilet that matches your rough-in. A 12-inch toilet will not fit on a 10-inch rough-in, and a 10-inch toilet on a 12-inch rough-in will leave an awkward, dusty gap behind the tank.
Code Clearances & Permits
Local building codes across Harris County and Galveston County require specific clearances to ensure safe and comfortable use:
- Front clearance: You must have at least 21 inches of clear, open space in front of the toilet bowl.
- Side clearance: There must be at least 15 inches from the centerline of the toilet bowl to any sidewall, vanity, or bathtub.
- Permit requirements: For a standard like-for-like replacement where you are not moving the drain line, a building permit is typically not required.
To help plan your project budget, check out our Toilet Installation Cost Guide for Every Budget. For additional step-by-step reading, you can also review this external guide on How to Install a Toilet.
Required Tools and Materials Checklist
Gathering your gear beforehand prevents those mid-project runs to the hardware store with a half-disassembled bathroom.
- Tools:
- Adjustable wrench
- Putty knife (plastic or metal)
- Hacksaw (to trim long closet bolts)
- Screwdriver (flathead and Phillips)
- Torpedo level
- Bucket, sponge, and old towels
- Rubber gloves and safety glasses
- Materials:
- New toilet (bowl, tank, and seat)
- New wax ring (or a high-quality waxless seal)
- New closet bolts with brass nuts and plastic washers
- Flexible, braided stainless steel water supply line
- Plastic toilet shims (for leveling on uneven tile or vinyl floors)
- Silicone caulk (optional, for sealing the base)
Step-by-Step Guide: How to Install a Toilet
While toilet installation is rated as an intermediate DIY task, following a logical, step-by-step sequence makes it highly manageable. Always keep the manufacturer’s specific instructions nearby, as minor details can vary between one-piece and two-piece designs.
Step 1: Safely Remove the Old Toilet
First, we must say goodbye to the old fixture without causing a water disaster.
- Shut off the water: Locate the shut-off valve on the wall behind the toilet. Turn it clockwise until it stops. If the valve is old, stuck, or leaking, you may need to replace it first. Read our helpful resource, Stop the Flow: A Guide to Installing Your New Toilet Shut-Off Valve.
- Empty the system: Flush the toilet and hold the lever down to drain as much water as possible from the tank and bowl.
- Sponge out the rest: Use a sponge and bucket to remove the remaining water from the bottom of the bowl and tank. Leaving water inside will result in a messy spill when you lift the toilet.
- Disconnect the supply line: Use an adjustable wrench to disconnect the water supply line from the bottom of the toilet tank. Keep a towel handy to catch any drips.
- Remove the bolts: Pop off the plastic bolt caps at the base of the toilet. Use your adjustable wrench to unscrew the nuts from the closet bolts. If they are rusted solid, apply a penetrating lubricant or carefully cut them off with a hacksaw.
- Lift and remove: Gently rock the toilet back and forth to break the old wax seal. Lift the toilet straight up to clear the floor bolts. Set the old toilet on a piece of cardboard or an old towel to protect your flooring from leftover wax and dirty water.
Step 2: Inspect and Prep the Floor Flange
The floor flange is the collar that connects the toilet to your home’s drain pipe. This step is critical; a dirty or broken flange is the root cause of most post-installation leaks.
- Scrape off the old wax: Use a putty knife to scrape the sticky, old wax ring off the flange. Clean the surface thoroughly so the new seal has a smooth, flat surface to bond with.
- Block sewer gases: Immediately stuff an old rag into the open drain line. This stops toxic sewer gases from entering your home and prevents you from accidentally dropping tools or hardware down the pipe. Just remember to remove the rag before setting the new toilet!
- Inspect for damage: Check the plastic or metal flange for cracks, corrosion, or warping. If the flange is broken or sits too low (more than 1/4 inch below the finished floor), it must be repaired or extended before you proceed.
Step 3: Install the Wax Ring for Your Toilet Installation
A watertight seal is what keeps your bathroom floor dry and your subfloor structurally sound.
- Insert new closet bolts: Slide the new brass closet bolts into the slots on the floor flange, pointing straight up. Slide the plastic retainer washers down the bolts to hold them upright and centered.
- Apply the wax ring: You have two options here. You can place the wax ring directly onto the cleaned floor flange, or you can invert the toilet bowl on a soft towel and press the wax ring firmly onto the “horn” (the outlet on the bottom of the bowl).
- Pro Tip: For beginners, we highly recommend placing the wax ring directly onto the flange. This makes it much easier to ensure the ring is perfectly centered before lowering the heavy porcelain bowl.
- Consider waxless seals: If you dread dealing with sticky wax, high-quality rubber waxless seals are a great alternative. They are cleaner to install and allow you to reposition the toilet if you don’t get the alignment right on the first try.
To understand the science behind a leak-free barrier, check out our guide on how to Stop the Swamp with a New Toilet Seal.
Step 4: Set the New Toilet Bowl
This is the moment of truth. You will want to take your time to align everything perfectly.
- Remove the drain rag: Double-check that you have pulled the temporary rag out of the drain pipe!
- Align and lower: Lift the toilet bowl by the rim (having a helper makes this much easier). Hover over the flange, align the holes in the toilet base with the upright closet bolts, and lower the bowl straight down.
- Compress the seal: Apply firm, downward pressure using your body weight. Press straight down on the center of the bowl. You will feel the wax ring compress. Hold pressure for about 5 seconds.
- Do not twist or rock: Once the toilet touches the floor, do not wiggle, twist, or rock it. Doing so will break the fresh wax seal, making a leak highly likely.
- Check for level: Place your torpedo level across the bowl. If the toilet tilts, slide plastic toilet shims under the low spots. Never try to level the toilet by overtightening the floor bolts, as this will crack the porcelain.
For detailed manufacturer diagrams on proper seating, you can refer to the Toilet Installation and Alignment Guide.
Step 5: Secure the Bowl and Install the Tank
With the bowl level, we can secure it to the floor and attach the water tank.
- Tighten the floor nuts: Place the plastic washers and brass nuts onto the closet bolts. Alternating sides, tighten the nuts gradually with your wrench.
- Crucial Warning: Tighten the nuts until they are snug, but do not overtighten. Porcelain is fragile; too much force will crack the base, ruined before you even use it.
- Trim the bolts: If the closet bolts stick up too high for the decorative plastic caps to snap on, use a hacksaw to carefully trim off the excess thread.
- Prep the tank (for two-piece models): Fit the large rubber tank-to-bowl gasket over the flush valve opening on the bottom of the tank. Insert the tank bolts and rubber washers from the inside of the tank.
- Mount the tank: Lower the tank onto the back of the bowl, aligning the tank bolts with the holes in the bowl.
- Secure the tank: Thread the washers and nuts onto the tank bolts underneath the bowl. Tighten them evenly, alternating sides to keep the tank level. Tighten until the tank makes firm contact with the bowl’s three points of contact.
For specific torque guidelines, refer to the Two-Piece Toilet Installation Instructions.
Step 6: Connect Water Supply to Complete the Toilet Installation
Now we connect the plumbing and test our work.
- Attach the supply line: Thread the metal nut of your new braided stainless steel supply line onto the water shut-off valve. Thread the plastic nut onto the fill valve shank at the bottom of the toilet tank.
- Hand-tighten first: Always start the threads by hand to avoid cross-threading. Tighten the plastic nut on the fill valve hand-tight, plus a 1/4 turn with a wrench.
- Turn on the water: Slowly open the shut-off valve counterclockwise. Let the tank fill with water and watch the connections closely.
- The paper towel test: Lay dry paper towels on the floor around the base of the toilet and directly under the water supply connections. Check them after 10 minutes, and again after 24 hours. If there is a slow, silent leak, the paper towel will show dampness immediately.
Step 7: Final Adjustments and Seat Installation
We are almost at the finish line! Let’s dial in the performance.
- Install the seat: Place the new toilet seat over the mounting holes. Insert the plastic bolts, tighten the nuts from underneath, and snap the decorative covers shut.
- Adjust the water level: Look inside the tank. The water should rise to the “fill line” marked on the inside wall or overflow tube. If it is too low or too high, turn the adjustment screw on the float cup to set the correct level.
- Test flush: Flush the toilet several times. Watch the bowl fill and drain. Listen for any unusual gurgling and check the floor base again for leaks.
If you ever run into flushing issues down the road, you can learn how simple it is to maintain your internal tank parts by reading How to Replace a Flapper in Less Than an Hour.
Common Mistakes That Cause Leaks or Rocking
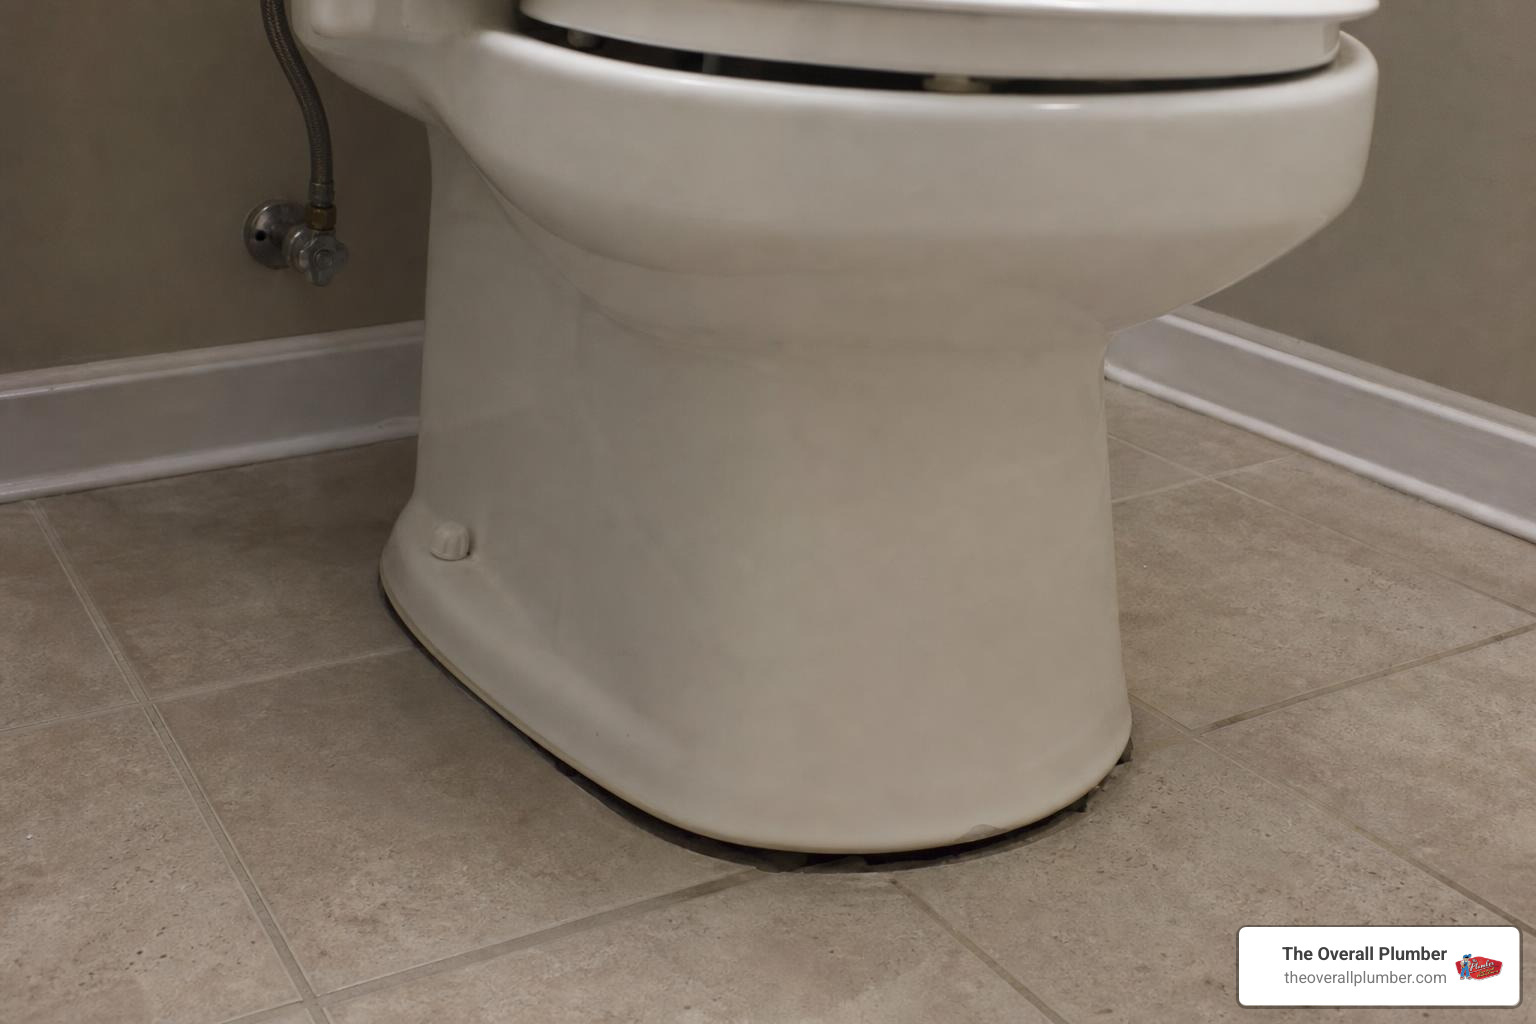
Even experienced DIYers can fall into a few common traps. Keep these pitfalls in mind to ensure your installation lasts for decades:
- Overtightening the closet nuts: This is the number one cause of broken toilets. It is incredibly tempting to give the wrench one last turn, but too much pressure will crack the porcelain base instantly. Tighten only until snug.
- Reusing the old wax ring: Never, ever reuse a wax ring. Once compressed, wax loses its elasticity and cannot form a reliable seal a second time. Always use a brand-new wax ring or rubber seal.
- Ignoring an uneven floor: If your bathroom floor is uneven, the toilet will rock back and forth when used. This rocking motion will break the wax seal within a few months, leading to a hidden, slow leak that rots your subfloor. Always use plastic shims to level the base, and trim them flush with the toilet footprint.
- Setting the flange too low: If you recently laid new tile or vinyl flooring, your floor flange might now sit below the level of the finished floor. A standard wax ring cannot bridge this gap. You must install a flange extender kit or use an extra-thick wax ring to prevent leaks.
When to Call a Professional Plumber
While many homeowners can tackle a basic toilet swap, certain scenarios require the specialized tools and training of a licensed professional.
- A cracked or corroded floor flange: If your flange is made of old cast iron or is severely cracked, repairing it requires cutting out the old pipe and soldering or gluing a new connection. This is a job best left to a pro.
- Severe subfloor damage: If your old toilet was leaking silently, you might discover soft, rotting plywood around the drain. Replacing a rotted subfloor requires structural carpentry and plumbing realignment.
- Wall-hung or smart toilets: Modern wall-hung units require specialized framing inside the wall, and advanced smart toilets require dedicated electrical outlets and precise water pressure profiles.
If you are looking to upgrade to a high-efficiency model, you can review the official EPA WaterSense Toilet Guidelines and Efficiency standards.
How long does a standard toilet installation take?
For a confident DIYer, a standard same-location toilet replacement takes about 1 to 2 hours. A professional plumber can typically complete a standard swap in 45 to 90 minutes, depending on the condition of the existing flange and shut-off valve.
Do I need a permit to replace a toilet?
In most Texas jurisdictions—including Santa Fe, League City, Pearland, and Houston—you do not need a permit for a simple like-for-like toilet replacement. However, if you are remodeling your bathroom and plan to move the drain pipe to a new location, a plumbing permit and official inspection will be required.
Why is my newly installed toilet constantly running?
If you hear water running continuously after installation, check the following:
- The float cup is set too high: Adjust the float screw so the water shuts off before reaching the top of the overflow tube.
- The flapper chain is too tight: If the chain connecting the flush handle to the flapper is too short, it will hold the flapper open, letting water leak into the bowl.
- The flapper is misaligned: Ensure the rubber flapper is properly aligned and seating flat against the flush valve opening.
Schedule Your Professional Toilet Replacement Today
If you would rather bypass the heavy lifting, sticky wax, and potential leak worries, we are here to help. At The Overall Plumber, we provide professional Toilet Replacement Services across Brazoria County, Galveston County, and the Greater Houston area.
We bring years of local expertise to every job, offering a 100% satisfaction guarantee, priority scheduling, and absolutely no overtime fees or trip charges. Plus, if we find any underlying issues with your drain lines during the swap, our team can perform immediate drain cleaning with high-tech augers and camera inspections. We also offer comprehensive plumbing protection plans to keep your entire home running smoothly. Call us today at (281) 555-0199 to schedule your appointment!