


Diagnosing Leaks Before Starting Toilet Seal Repair
Before you put on rubber gloves and start taking your bathroom apart, you need to verify where that puddle is actually coming from. Water at the base of the toilet does not automatically mean the seal on the floor has failed. Gravity brings water down to the floor regardless of whether the leak originates from a loose supply line near the wall or an leaking tank bolt higher up.
Tracing the water to its source avoids unnecessary effort and ensures your toilet seal repair addresses the actual issue instead of a secondary symptom.
Modern Diagnostic Checklist
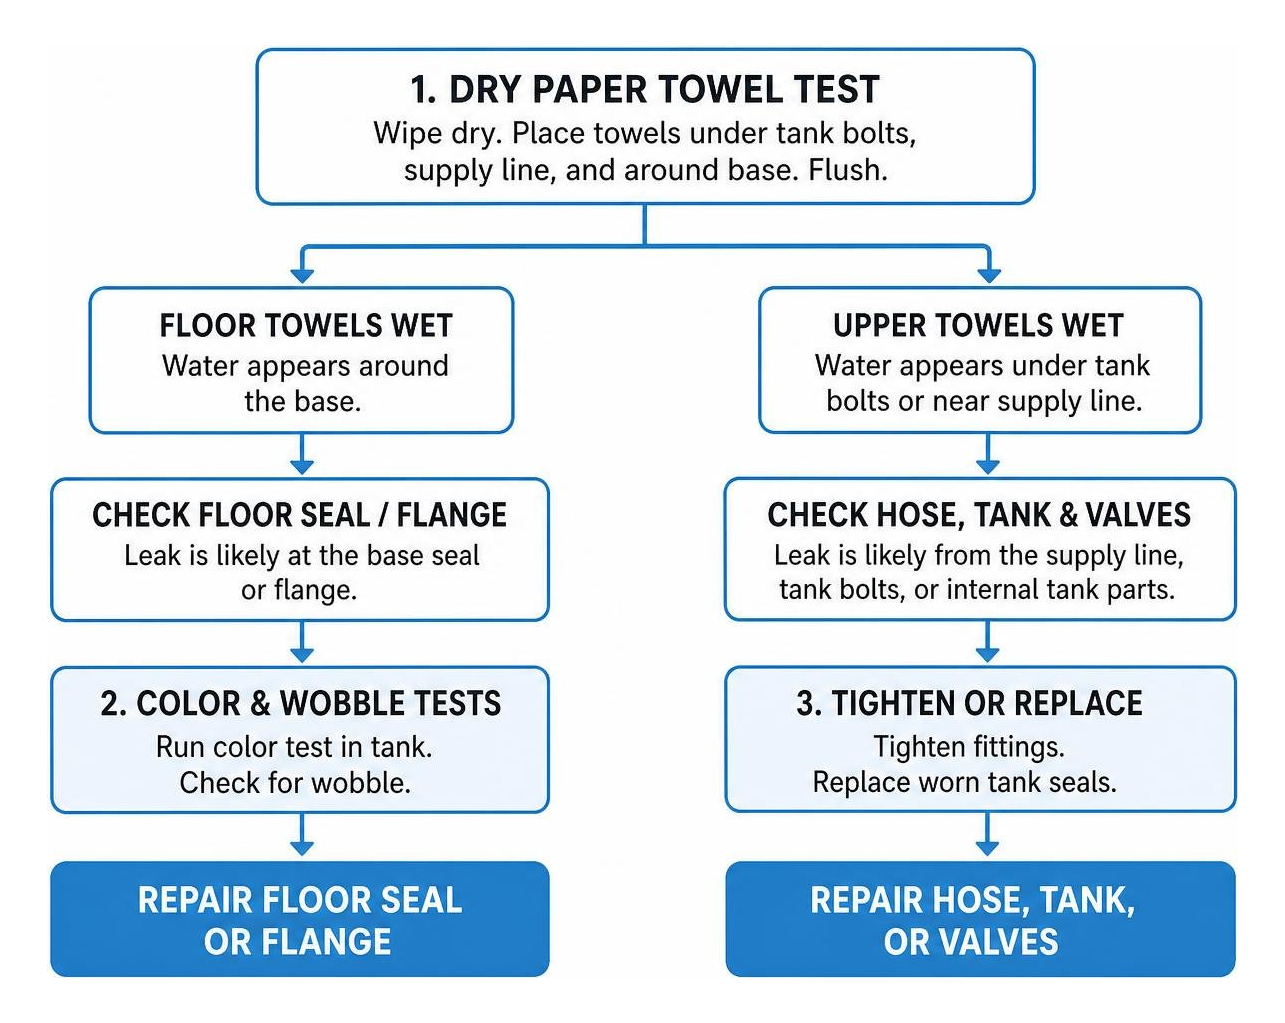
- Perform the Dry Paper Towel Test: Wipe down the whole toilet—from the top of the tank down to the bowl and floor—until completely dry. Lay dry paper towels all around the base, beneath the water supply valve, and directly under the tank bolts. Flush the toilet. If the paper towels at the floor get wet while the ones under the tank remain bone-dry, the floor seal is likely to blame.
- Execute the Color Test: Drop a few drops of dark food coloring or a colored cleaning tablet into the tank (do not flush yet). Wait 20 minutes. If colored water appears in the bowl without flushing, your flush valve flapper is leaking. If colored water appears on the floor immediately after a flush, you likely have a primary seal failure or a cracked flange.
- Conduct the Wobble Check: Place your hands on the sides of the toilet bowl and gently sway it side to side. If the toilet moves even a tiny fraction of an inch, the seal beneath it has likely failed.
Identifying Signs of a Failing Toilet Seal
Recognizing the early signs of a bad seal will save you from major structural repair bills later on. When the seal breaks down, you might notice:
- Water Pooling Around the Base: This usually appears right after flushing, though slow leaks can create a small, continuous puddle around the mounting bolts.
- Foul, Unmistakable Sewer Odors: The seal does not just keep water in—it holds sewer gas back. A faint, persistent sewer gas smell in your bathroom usually points to a compromised seal.
- Spongy, Discolored, or Soft Flooring: Moisture can soak into subflooring beneath tile or vinyl long before water shows on top.
- A Rocking or Wobbling Fixture: Flexible seals like standard wax compression rings cannot bounce back once pressed out of shape. Once a toilet wobbles, the wax seal breaks and stays broken.
Ignoring these clues will cost you far more than a $15 repair part. Read our full guide on why you Don’t Let Your Money Flush Away With a Broken Toilet Seal to protect your home’s flooring.
Differentiating Base Leaks From Tank and Valve Issues
Water can trickle down the porcelain and fool you into believing you have a bad floor seal when the real culprit sits higher up:
- High-Humidity Condensation: During humid Texas summers, cold water filling the tank can cause the outer porcelain to sweat. This condensation drips down the bowl and pools at the floor base, mimicking a seal leak.
- Leaking Water Supply Lines: Check the threaded connection where the flexible hose connects to the toilet fill valve and the shut-off valve at the wall.
- Tank-to-Bowl Donut Washer Leaks: On a close-coupled two-piece toilet, a large rubber gasket sits between the upper tank and lower bowl. If this seal degrades, water leaks out every time you flush, running down the back of the toilet to the floor.
If you notice water dripping down behind the bowl rather than seeping out from under the base, replace the tank bolts and donut gaskets to resolve the leak.
Essential Tools and Materials for Seal Replacement
A successful DIY repair requires the right tools before you shut off the water. Running to the home improvement store with a disassembled toilet in your bathroom is never fun!
Gather these essentials before starting:
- Safety Gear: Thick rubber gloves, eye protection, and old rags.
- Hand Tools: Plastic putty knife (metal knives can scratch porcelain or PVC), adjustable wrench, mini hacksaw (for cutting old, seized bolts), and a torpedo level.
- Cleaning & Prep Supplies: Small sponge or bucket, water-solidifying crystals (like LiquiLock), disinfectant cleaner, and paper towels.
- Replacement Parts: New closet T-bolts (preferably solid brass to prevent rust), a replacement seal (wax or wax-free), plastic toilet shims, and 100% silicone bath caulk.
Wax vs. Wax-Free Options for Toilet Seal Repair
Choosing the right type of seal depends on your plumbing experience and the condition of your floor flange:
| Feature / Property | Traditional Wax Ring | Modern Wax-Free Seal |
|---|---|---|
| Material Composition | Molded petroleum wax | Elastomer / Rubber polymer |
| Install Forgiveness | Single-use; shifting the toilet breaks the seal | Reusable; allows toilet repositioning |
| Flange Compatibility | Best for flanges level or 1/4″ above floor | Works with flanges above, even, or below floor |
| Temperature Resistance | Can melt or drop under extreme pipe heat | Highly heat-resistant; will not melt |
| Longevity Expectancy | Can last the lifetime of the toilet if unmoved | 10+ year warranty; stays flexible |
| Mess Factor | Sticky residue; requires thorough scraping | Clean install; no messy cleanup needed |
Both options perform well when installed correctly. A traditional wax ring offers a long-proven seal, while wax-free seals like the Korky Wax Free Toilet Seal Kit or the Fluidmaster Better Than Wax Universal Seal allow you to reset the toilet if you do not line up the closet bolts on your first try.
Preparing the Bathroom and Safety Tools
Preparation keeps the job clean and prevents plumbing odors from filling your home:
- Turn off the water supply valve behind the toilet by turning the handle clockwise until tight.
- Flush the toilet and hold down the handle to drain as much water as possible from the tank and bowl.
- Remove remaining standing water using a sponge or water-absorbing crystals.
- Disconnect the flexible supply line using your adjustable wrench.
- Plug the exposed drain pipe with a bundle of old rags right after lifting the toilet. Open drain lines release noxious sewer gas that can be unpleasant and flammable.
5 Guaranteed Methods for Fixing a Leaking Toilet Base
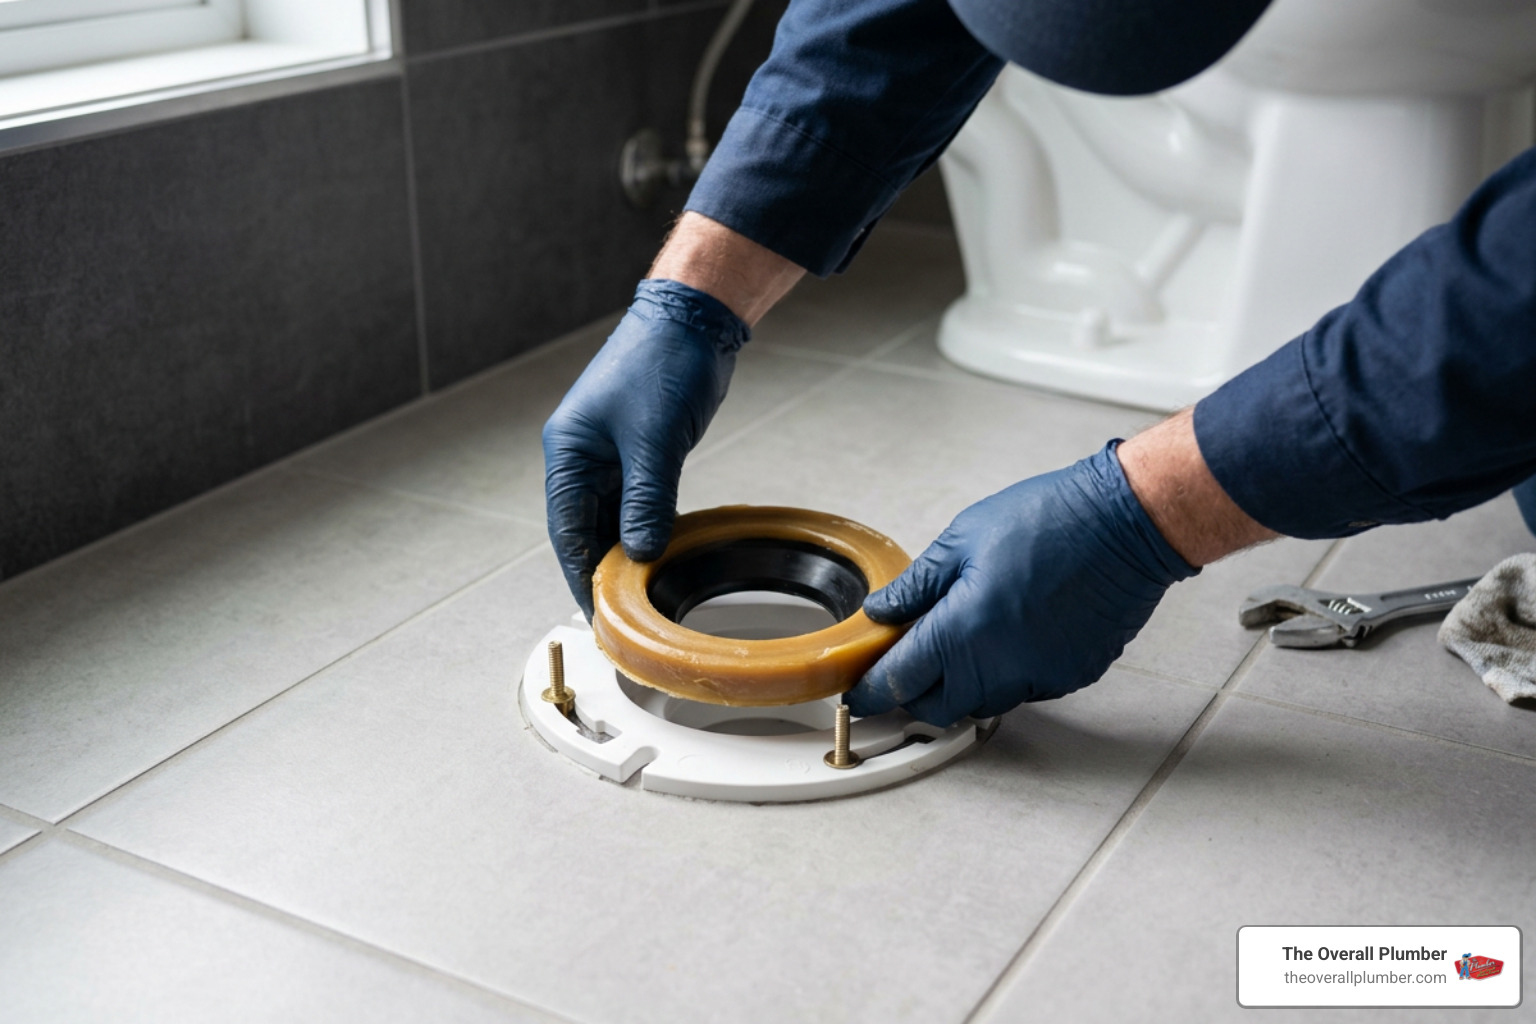
Every bathroom setup is a little different. Depending on your home’s flooring height, flange condition, and toilet type, choose the repair method below that matches your situation. For a quick visual overview of toilet resetting, check out WikiHow’s step-by-step toilet seal repair guide.
Method 1: Replacing a Failed Traditional Wax Ring
This traditional method works best when your floor flange sits flush with or slightly above your finished floor.
- Remove Old Hardware: Pry off the plastic bolt caps at the base and unbolt the closet nuts using an adjustable wrench.
- Lift and Move the Toilet: Carefully lift the toilet straight up. Have a helper assist you to avoid straining your back or chipping the porcelain. Place the toilet sideways onto old towels or cardboard.
- Scrape the Horn and Flange: Use a plastic putty knife to thoroughly scrape all old wax away from the toilet horn (the bottom outlet) and the floor flange. Clean both surfaces dry.
- Stuff the Drain: Block the exposed drain pipe with a rag to hold back sewer gas.
- Install New Closet Bolts: Slide brand-new solid brass T-bolts into the flange slots, keeping them aligned parallel to the back wall. Use small plastic retaining washers to hold them straight.
- Set the Wax Ring: Place the new wax ring centered firmly onto the floor flange (or press it onto the bottom horn of the toilet per the package instructions).
- Lower the Bowl: Remove the drain rag! Lower the toilet straight down over the T-bolts. Press down firmly with your full body weight centered over the bowl to compress the wax. Do not twist or rock the toilet side-to-side once contact is made.
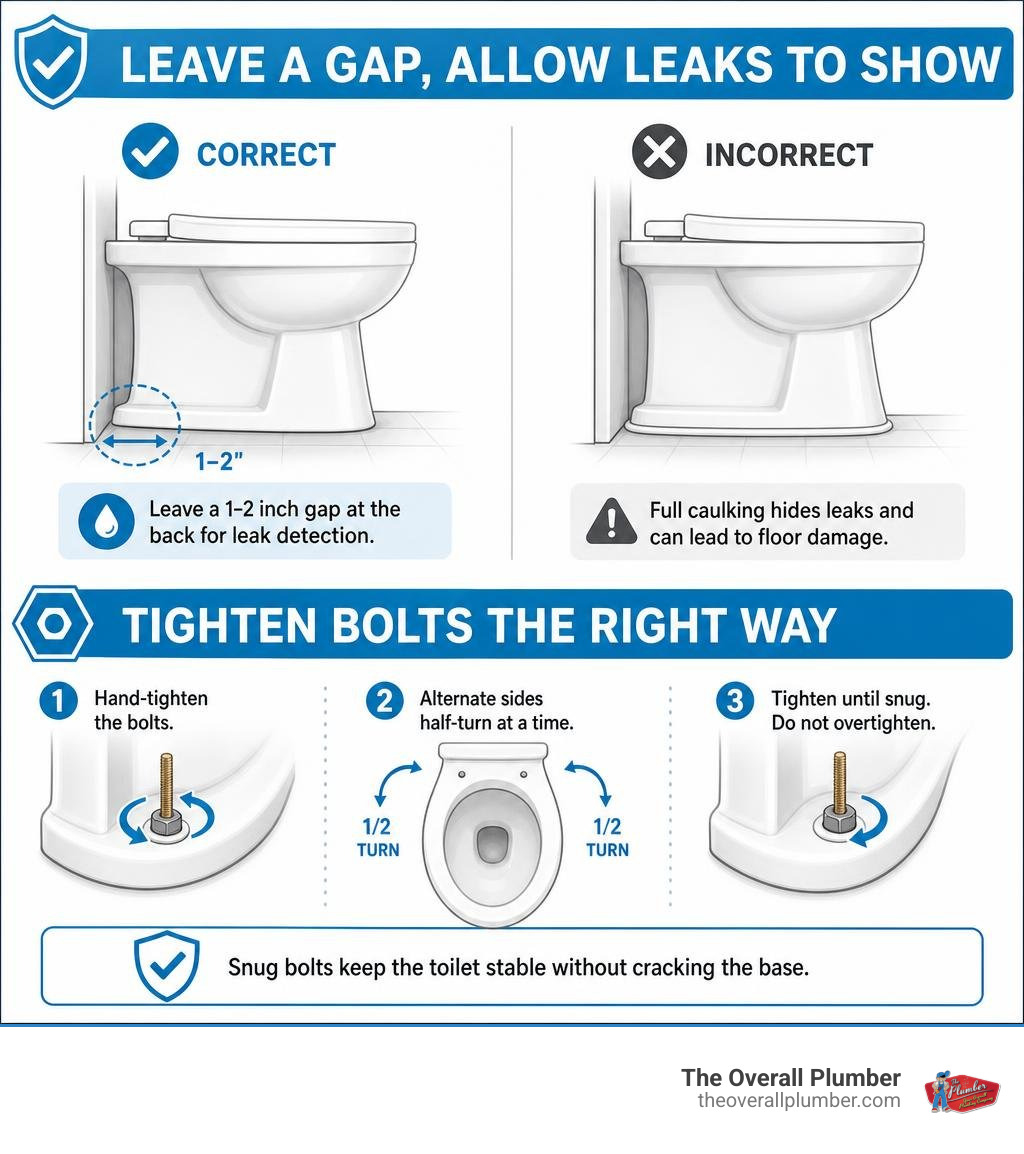
- Secure the Hardware: Thread the washers and nuts onto the bolts. Alternate tightening back and forth between the left and right sides a half-turn at a time. Tighten them snug—do not over-tighten, or you will crack the porcelain base!
- Reconnect and Test: Reattach your water line, open the shut-off valve, and let the tank fill. Flush several times while inspecting the floor with a dry paper towel.
For more technical details on choosing standard versus jumbo wax rings, consult the product packaging guidelines.
Method 2: Installing a Rubber Wax-Free Seal
If you are tackling your first toilet seal repair or want a mess-free project, an elastomer rubber seal is a modern alternative.

- Unbolt, lift the toilet, and clean off the old wax as described in Method 1.
- Place the foam/rubber wax-free gasket directly over the clean flange.
- Line up the inner flexible rubber sleeve inside the 3-inch or 4-inch drain opening.
- Lower the toilet straight down onto the mounting bolts.
- Because rubber polymer seals remain elastic, you can lift and adjust the toilet if your alignment is off without ruining the gasket.
- Tighten the mounting bolts evenly and reconnect your water supply.
Learn more about clean installation options in our post on how to Stop the Swamp With a New Toilet Seal.
Method 3: Fixing Recessed or Low Flanges With Extenders
Did you recently install new tile or laminate flooring over old flooring? This often leaves the original floor flange sitting 1/4 inch or more below the level of the new floor. A standard wax ring will not compress enough to create a reliable seal here.
- The Wrong Fix: Never stack two standard wax rings on top of each other! Stacked wax rings often slide apart, leading to leaks beneath your subfloor.
- The Right Fix: Install a plastic flange extender kit (such as a Set-Rite spacer) over the existing flange. Apply a bead of 100% silicone between the original flange and the extender ring to keep it watertight. Secure the extension ring through the subfloor using stainless steel screws.
- Alternative: You can also use an extra-thick (jumbo) wax ring or a wax-free seal designed to span recessed flange depths.
Method 4: Repairing Damaged Flanges and Securing Wobbly Toilets
If your closet flange is cracked or missing a piece where the T-bolts slide in, the toilet will wobble and break its floor seal repeatedly.
- Install a Flange Repair Ring: Screw a split metal or PVC flange repair bracket over the damaged slots of your existing flange to reinforce the bolt channels.
- Set the Toilet & Level It: Once your new seal is in place and the toilet sits over the bolts, place a torpedo level across the bowl seat.
- Insert Plastic Shims: If the floor is uneven and the toilet rocks, push hard plastic toilet shims into the gaps under the bottom rim until the toilet sits level and firm.
- Trim Excess Shim: Trim off the excess plastic shim flush with the base using a sharp utility knife before tightening the base bolts.
For detailed hardware lists and instructions for securing toilet bases, check out Lowes.com toilet parts.
Method 5: Replacing Tank-to-Bowl Donut Seals
If your diagnostic tests revealed that the leak comes from the joint between the upper tank and lower bowl on a two-piece toilet, replace the inner donut washer.
- Shut off the water supply and completely drain the cistern.
- Unscrew the two tank bolts from beneath the back rim of the toilet bowl using an adjustable wrench.
- Lift the ceramic tank off the bowl and set it gently upside down on a soft towel.
- Peel away the degraded, swollen rubber donut washer from the central flush valve nut.
- Press a new, chemical-resistant rubber donut gasket firmly onto the flush valve nut.
- Install brand-new tank bolts equipped with soft rubber sealing washers.
- Lower the tank back onto the bowl and hand-tighten the nuts underneath.
- Use a wrench to alternate tightening each side a half-turn at a time. Keep the tank level to avoid cracking the porcelain.
Best Practices to Prevent Future Plumbing Leaks
Once your toilet seal repair is complete, a few finishing steps will ensure your repair lasts for years to come.
Avoid Base Caulking Errors
Many homeowners make the mistake of running a bead of caulk all the way around the base of the toilet.
- Leave a Small Gap at the Back: Always leave a 1-inch to 2-inch un-caulked gap at the very back base of the toilet along the floor.
- Why It Matters: If your wax seal ever fails in the future, that small rear gap allows escaping water to seep onto the bathroom floor where you can see it. Full caulking traps water beneath the toilet base, silently rotting your subfloor, joists, and ceiling below before you notice a problem.
For more details on complete toilet setups, read our guide on How to Install a Toilet in 7 Steps.
Maintenance and Inspection Tips
- Re-check Bolt Tightness: Check the tightness of your closet floor bolts 2 to 3 weeks after installation. As the toilet settles into its new seal, the base nuts may require a light quarter-turn to remain secure.
- Stop Toilet Wobble Immediately: If someone bumps the toilet and it begins to rock, insert shims right away. Allowing a toilet to rock will ruin the floor seal.
- Inspect Supply Hoses: Replace flexible braided water supply hoses every 5 years to prevent unexpected bursts.
Frequently Asked Questions About Base Leaks
Can I use silicone instead of replacing the toilet seal?
No. Applying silicone or caulk around the outside base of a leaking toilet does not fix a failed seal. Water will continue escaping the drain flange beneath the bowl, pooling secretly under your floor tile and rotting your wood subfloors. Caulking over a leak only hides structural damage until your floor gives way.
How long does a toilet seal repair take?
For a standard DIYer, a toilet seal repair typically takes 1 to 2 hours from start to finish. The process involves shutting off the water, draining the fixture, unbolting and lifting the bowl, cleaning the old flange, setting a new seal, and tightening everything back down safely.
When should I call a professional plumber for toilet seal repair?
While replacing a wax seal is a manageable DIY job, you should call a licensed plumber if:
- The PVC or cast-iron flange beneath the toilet is broken, rusted away, or completely loose.
- The subfloor around the toilet feels soft or spongy, indicating advanced wood rot.
- You are uncomfortable lifting a heavy porcelain toilet (which can weigh 60 to 120 lbs).
- The leak persists even after you replaced the seal.
Protecting Your Home From Hidden Water Damage
If you hit a roadblock with a broken flange, rotten subfloor, or stubborn leak during your toilet seal repair, our team at The Overall Plumber is here to help across Houston, Brazoria County, Clear Lake, Santa Fe, League City, Texas City, La Porte, Friendswood, Pearland, Pasadena, Galveston, Harris County, and Galveston County. We provide clear pricing with no trip charges, backed by our satisfaction guarantee, no overtime fees, and priority scheduling. Learn more through our Toilet Replacement Services.