


A Running Toilet Is Costing You More Than You Think
Toilet repair is something most homeowners will need to deal with at some point — and the sooner you act, the better. Here’s a quick look at the most common fixes:
Quick answers for common toilet problems:
- Toilet keeps running — Replace the flapper (fixes ~65% of cases, costs $5–$15)
- Toilet leaks at the base — Replace the wax ring or tighten tank bolts
- Tank fills slowly — Clean or replace the fill valve
- Ghost flushing — Test with food coloring; likely a worn flapper seal
- Weak flush — Check water level in tank and inspect the flush valve
A running toilet isn’t just annoying — it’s an active plumbing leak. According to the EPA, about 20% of US toilets are running right now. That adds up to roughly 200 gallons of wasted water every day, or $150–$300 per year on your utility bill. The good news? Most toilet problems come down to a handful of small parts that cost $5–$30 and can be replaced in under an hour.
In this guide, we walk through exactly how to diagnose and fix the most common toilet problems — step by step, no plumbing degree required.
I’m Dayton Whitworth, a second-generation plumber serving the Greater Houston and Gulf Coast area, and toilet repair is one of the most common calls our team at The Overall Plumber handles. In the sections below, I’ll share the same practical approach we use in the field so you can tackle most repairs with confidence.
Understanding Your Toilet Anatomy Before a Toilet Repair
Before diving into a toilet repair, it helps to understand what is happening inside the tank. When you press the flush handle, a series of mechanical actions occur in a matter of seconds.
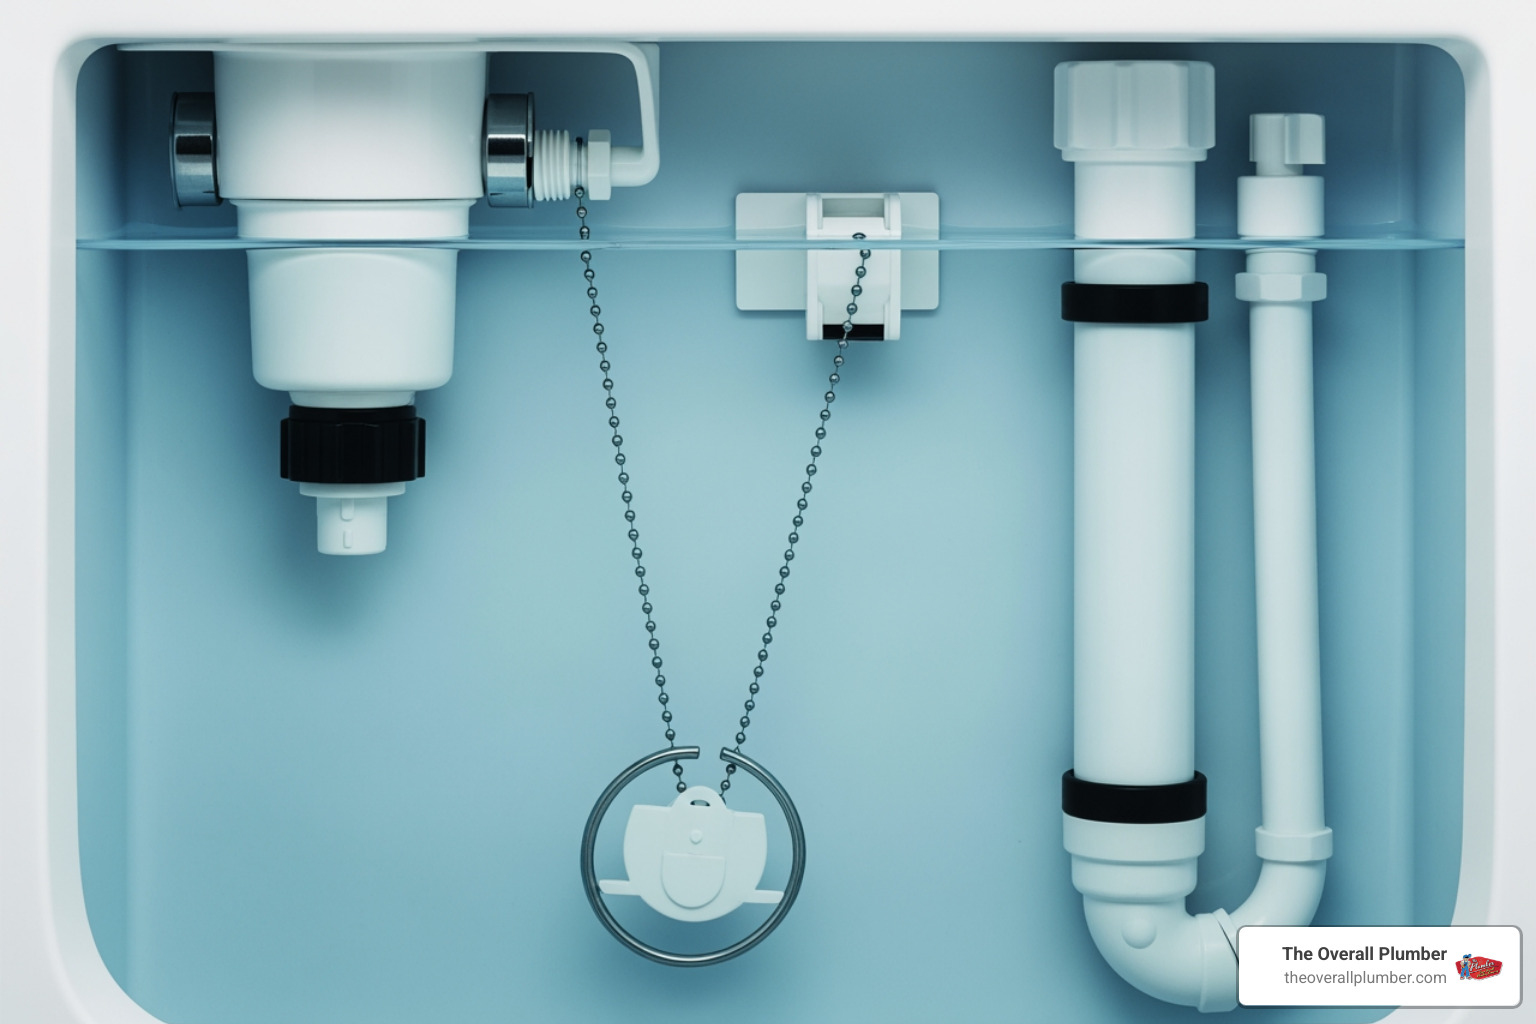
Inside a standard gravity-flush toilet tank, you will find several key components working together:
- The Flush Handle & Trip Lever: The external handle connected to a metal or plastic arm inside the tank.
- The Lift Chain: Connects the trip lever to the flapper.
- The Flapper (or Flush Valve Seal): A rubber seal that sits over the opening at the bottom of the tank, holding the water in place until you flush.
- The Flush Valve: The plastic or brass assembly that channels water from the tank down into the bowl. It includes the overflow tube.
- The Overflow Tube: A safety tube that drains excess water directly into the bowl if the fill valve fails to shut off, preventing the tank from overflowing onto your bathroom floor.
- The Fill Valve: The device responsible for refilling the tank after a flush. It is connected directly to your home’s water supply line.
- The Float Mechanism (Float Ball or Float Cup): A device that rises and falls with the water level. Once the water reaches a set height, the float shuts off the fill valve.
When you push the handle, the lift chain pulls the flapper up, allowing the tank’s water to rush through the flush valve and into the bowl. This rapid flow of water creates the siphon effect that clears the bowl. As the tank empties, the flapper falls back down to seal the flush valve. Meanwhile, the dropping float opens the fill valve, refilling the tank and sending a small amount of water down the overflow tube to replenish the bowl’s standing water. Once the float reaches its designated height, the fill valve shuts off the water flow.
Understanding these mechanics is crucial. If you want to perform a comprehensive overhaul of these components, you can learn How To Rebuild a Toilet Tank to Give New Life to an Old Toilet – This Old House to get a complete reset on your tank’s operational parts.
One-Piece vs. Two-Piece Toilet Repair
Toilets generally come in two designs: one-piece and two-piece. A two-piece toilet has a separate tank bolted to the bowl, while a one-piece toilet integrates the tank and bowl into a single, continuous mold of porcelain.
This design difference matters immensely when purchasing replacement parts. Many universal toilet repair kits are optimized for two-piece toilets. One-piece toilets often require specialized, low-profile fill valves or proprietary flappers because their tanks are shallower and configured differently. Always check your toilet type and measure your existing flapper (typically 2-inch or 3-inch) before buying replacement parts.
How to Diagnose Common Toilet Problems
A successful toilet repair begins with an accurate diagnosis. You do not want to buy an entire rebuild kit if your only issue is a tangled lift chain.
Diagnosing a Running Toilet
If you hear water trickling or your toilet suddenly cycles on and off by itself (a phenomenon known as “ghost flushing”), you have a slow leak.
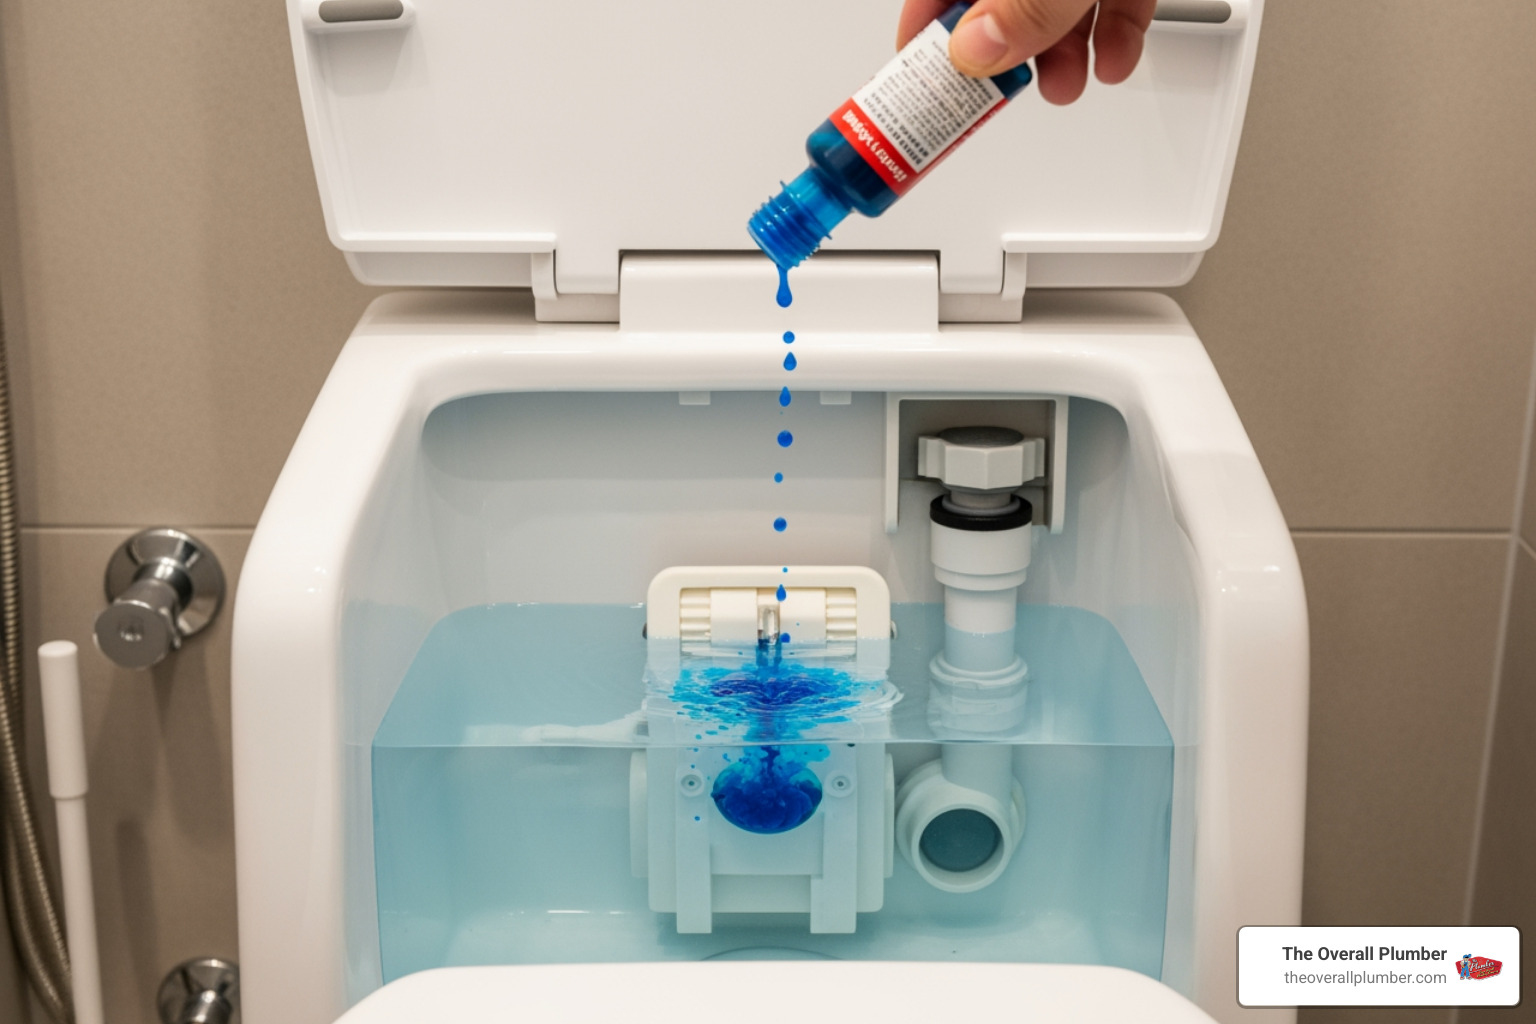
The easiest way to confirm this is with the food coloring test:
- Remove the tank lid carefully (porcelain is heavy and chips easily).
- Add 5 to 10 drops of dark food coloring (blue, green, or red) into the tank water.
- Do not flush the toilet.
- Wait 15 to 20 minutes.
- Check the toilet bowl. If the water in the bowl has changed color, your flapper is not sealing properly, allowing water to leak slowly from the tank into the bowl.
If the bowl water remains clear but the toilet continues to run, look at the overflow tube. If water is spilling over the top of the overflow tube, your fill valve is either set too high or is failing to shut off. If the water level is below the overflow tube and there is no leak into the bowl, you may have a faulty fill valve mechanism. You can read more about troubleshooting these quick-fix scenarios in this guide on How to Fix a Running Toilet in 10 Minutes.
Identifying Leaks at the Base or Tank
External leaks require immediate attention because water pooling around the toilet can rot your bathroom subfloor, ruin your flooring, and promote toxic mold growth.
- Leaks Between the Tank and Bowl: If you notice water dripping from the underside of the tank when you flush, the tank bolts, washers, or the large spud gasket between the tank and bowl have likely deteriorated.
- Leaks at the Base: If water puddles around the bottom of the toilet on the bathroom floor, the wax ring seal has failed. This seal sits between the toilet bowl and the floor flange. If you suspect this is the case, you need to read our guide to Stop the Swamp with a New Toilet Seal to prevent serious structural damage.
5 Steps to Complete Your DIY Toilet Repair
Before you pick up a tool, gather your supplies and prepare your workspace.
Tools and Materials Needed:
- Adjustable wrench
- Screwdriver (flathead and Phillips)
- Replacement parts (flapper, fill valve, or a complete kit)
- Sponge and bucket
- Plumber’s tape
- Rubber gloves
For safety, always work gently. Overtightening plastic nuts or brass bolts against delicate porcelain can easily crack the tank or bowl, turning a simple $15 repair into a full replacement. If your shut-off valve is old, stiff, or leaking, consult Stop the Flow: A Guide to Installing Your New Toilet Shut-Off Valve before proceeding.
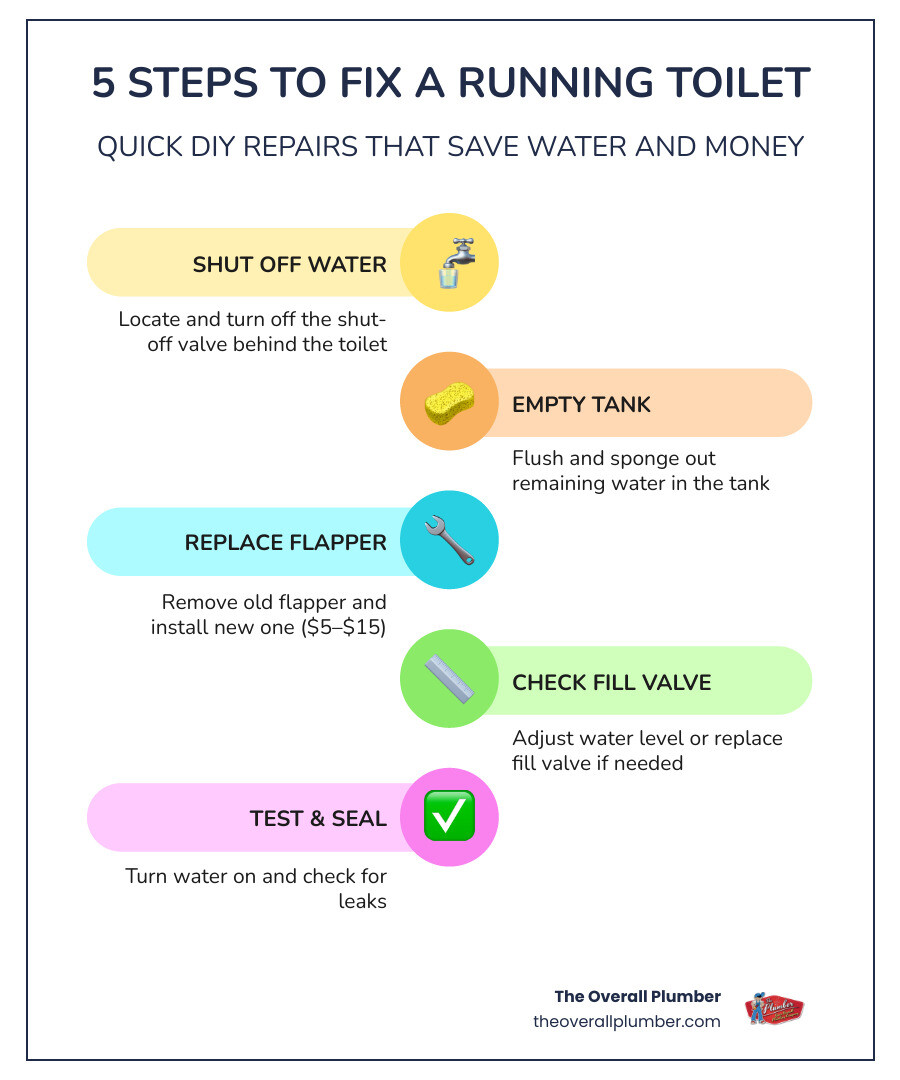
Step 1: Shut Off the Water and Drain the Tank
Every plumbing repair begins by cutting off the water supply. Locate the oval-shaped shut-off valve on the wall behind or beneath your toilet. Turn it clockwise until it stops.
Once the water is off, flush the toilet and hold the handle down to drain as much water as possible from the tank. You will still have an inch or two of water left at the bottom. Use a sponge, old towel, or a wet/dry vacuum to soak up this remaining water so your workspace stays completely dry.
Step 2: Replace a Worn Toilet Flapper
A worn-out flapper is responsible for about 65% of all running toilets. Over time, chlorine and minerals in municipal water degrade the rubber, preventing a tight seal.
- Disconnect the lift chain from the trip lever arm. Note which hole it was hooked to.
- Slide the rubber ears of the old flapper off the pegs of the overflow tube.
- Take your old flapper to the hardware store to ensure you buy an exact match (2-inch or 3-inch).
- Install the new flapper by slipping its ears over the overflow tube pegs.
- Reattach the lift chain to the trip lever. Ensure there is only a tiny bit of slack (about 1/4 inch) when the handle is at rest. If the chain is too long, the flapper won’t open fully; if it’s too tight, the flapper won’t seal. If your handle is loose or sticking, check out our guide on how to fix a Toilet Handle Loose issue.
Step 3: Install a New Fill Valve
If your toilet tank is slow to fill, makes high-pitched whining noises, or won’t stop running because of a faulty float, it is time to replace the fill valve.
- Disconnect the water supply line from the shank of the fill valve underneath the tank using an adjustable wrench. Keep a small bucket underneath to catch any drips.
- Unscrew the plastic locknut securing the fill valve to the bottom of the tank.
- Lift the old fill valve out of the tank.
- Prepare your new fill valve (such as the highly durable Korky 2X Long Life Universal Complete Toilet Repair Kit 4010XC). Adjust the height of the new valve so that the “critical level” mark on the valve body sits at least 1 inch above the top of the overflow tube.
- Insert the new fill valve into the tank opening, ensuring the rubber washer is placed on the shank inside the tank to create a watertight seal.
- Tighten the locknut hand-tight from underneath, then add a quarter-turn with a wrench. Do not overtighten!
- Reattach the water supply line and the small rubber refill tube, clipping the tube to the top of the overflow tube so it drains directly inside. For additional tips on replacing various internal components, refer to DIY Toilet Repair: How to Fix Any Toilet Issue | True Value Hardware.
Step 4: Replace the Flush Valve and Tank Gasket
If the plastic flush valve seat is cracked or corroded, replacing the flapper won’t stop the leak. You must replace the entire flush valve assembly, which requires removing the tank.
- Disconnect the water supply line and remove the tank bolts from underneath the tank.
- Carefully lift the tank off the bowl and place it upside down on a soft towel.
- Unscrew the large plastic locknut securing the flush valve to the bottom of the tank.
- Push the old flush valve out.
- Install the new flush valve, ensuring the tapered rubber spud gasket is positioned correctly on the inside of the tank. Secure it tightly with the locknut on the outside.
- Place the new tank-to-bowl gasket over the locknut.
- Reinstall the tank onto the bowl, inserting new tank bolts with rubber washers inside the tank. Alternately tighten the brass nuts underneath to keep the tank level and prevent cracking the porcelain.
Step 5: Address Clogs and Reseat the Bowl
If your toilet is leaking from the base or wobbles when you sit on it, you must remove the bowl to replace the wax ring and check the floor flange.
- Unscrew the floor bolts holding the toilet bowl to the floor.
- Gently rock the bowl side-to-side to break the old wax seal, then lift the bowl and place it on its side on a garbage bag.
- Scrape away the old, sticky wax from the bottom of the bowl and the floor flange using a putty knife.
- Inspect the flange. If it is cracked or loose, install a metal repair ring.
- Place a new wax ring onto the floor flange or directly onto the bottom of the toilet bowl outlet.
- Lift the bowl, align it over the floor bolts, and press down firmly to compress the wax ring. Do not rock the toilet after setting it, as this will break the new seal.
- Hand-tighten the floor nuts, add a small turn with a wrench, and trim any excess bolt length. If you are dealing with a severe clog during this process, read our expert advice on How to Unclog Toilet with a Snake. For a complete walkthrough on full installations, check out How to Install a Toilet – Ace Tips & Advice.
When to Repair vs. Replace Your Toilet
Not every toilet can—or should—be saved. Sometimes, replacing an outdated or damaged toilet is the smartest financial move.
| Factor | Repair It | Replace It |
|---|---|---|
| Porcelain Condition | No visible damage. | Hairline cracks in the bowl or tank (risk of catastrophic flooding). |
| Water Efficiency | Toilet uses 1.6 gallons per flush (GPF) or less. | Older model using 3.5 to 7.0 GPF (wasting thousands of gallons annually). |
| Repair Frequency | First issue in several years; minor part replacement. | Constantly clogging, running, or requiring weekly attention. |
| Estimated Cost | $10 – $50 in DIY parts. | $150 – $400+ for a brand-new, water-efficient model. |
If you decide that a replacement is the best route for your home, review our comprehensive Toilet Installation Cost Guide for Every Budget to plan your project.
Frequently Asked Questions About Toilet Repair
How much does a professional toilet repair cost?
On average, homeowners spend about $250 to have a professional plumber repair a toilet. Depending on the complexity of the leak or clog, professional rates typically range from $45 to $200 per hour. Handling minor repairs like flapper swaps yourself can save you significant money.
Why does my toilet run intermittently?
This is almost always caused by a slow, silent leak at the flapper. As water slowly drains out of the tank into the bowl, the water level drops. Once it falls below a certain point, the float triggers the fill valve to turn on for a few seconds to top off the tank, creating an intermittent running sound.
Can a leaking toilet damage my bathroom floor?
Yes. A slow leak at the base of your toilet can seep into the subfloor unnoticed for months. This moisture rots the wooden subfloor, ruins vinyl or tile flooring, and creates a breeding ground for mold, eventually requiring thousands of dollars in structural repairs.
Schedule Professional Plumbing Services Today
If your DIY toilet repair gets too complicated, or if you discover a cracked tank, broken flange, or a leak that you just can’t track down, we are here to help.
At The Overall Plumber, we proudly serve homeowners across Brazoria County, Houston, Clear Lake, Santa Fe, League City, Texas City, La Porte, Friendswood, Pearland, Pasadena, Galveston, Harris County, and Galveston County, Texas. We provide top-tier drain cleaning, sewer camera inspections, and reliable repair services with no trip charges, no overtime fees, and a 100% satisfaction guarantee. Give us a call today at (281) 668-8055 to speak with a professional.
If you decide it’s time to retire your old fixture entirely, check out our professional Toilet Replacement Services to explore your options.