


Why Camera Inspection Repipe Prep Is Essential Before Major Plumbing Work
To prepare your home for a plumbing camera inspection, clear a direct pathway to your main cleanout, secure pets, and pause high-volume water use like laundry and showers. Ensuring clear physical access and stagnant water flow allows technicians to immediately evaluate pipe walls from the inside out without exploratory digging. By reviewing the homeowners guide to sewer camera inspections, property owners can see how camera inspection repipe prep establishes a visual diagnostic baseline that ensures repair recommendations are backed by real-time optical data.
Plumbing diagnostic standards require full visibility before drafting a rehabilitation plan. High-resolution optical heads travel through the interior of the line to evaluate wall thickness, joint integrity, grade consistency, and structural stability. This non-invasive assessment protects landscapes, driveways, and interior flooring from unwarranted trenching while providing a clear baseline for your plumbing system. When homeowners understand what the camera reveals, they can make informed decisions about whether a targeted repair or a full repipe is the right investment for their property.
Identifying Severe Pipe Defects and Failures
During a scoping session, the camera head encounters various physical obstructions and structural failures that dictate whether a pipe can be saved or must be replaced. Each defect presents a distinct visual signature on the monitor, and experienced technicians use these patterns to recommend the most cost-effective long-term solution.
- Tree Root Intrusion: Tree roots enter through micro-fractures or failing mortar joints in search of moisture. Over time, hair-like roots expand into dense root masses that catch solid waste and crack pipes apart. The camera often shows root tendrils snaking through joint gaps and wrapping around the pipe interior.
- Pipe Bellies and Sagging: Soil shifting, improper bedding, or seismic settling cause sections of the line to lose their downward slope. These low spots collect standing water and heavy solids, resulting in repeated backups. On camera, a belly appears as a section where water pools instead of flowing freely toward the main.
- Internal Corrosion and Scale: Aging metallic lines suffer from tuberculation and rust flake buildup. This rough surface catches toilet paper and debris, restricting flow capacity. The camera reveals orange-brown scale deposits that narrow the effective pipe diameter and create snag points for waste.
- Cracked and Fractured Clay: Vitrified clay pipes, common in older residential neighborhoods, are brittle. Ground movement frequently causes longitudinal cracks, shear fractures, and complete wall collapses. These failures show up as jagged breaks, missing pipe sections, or soil intrusion visible through the lens.
- Offset and Displaced Joints: When adjacent pipe segments shift out of alignment, wastewater catches on the exposed lip, eroding surrounding soil and compounding joint displacement. The camera documents the exact degree of offset, which helps determine whether a spot repair or full replacement is warranted.
Commercial main laterals often exhibit severe chemical degradation and accelerated fat, oil, and grease (FOG) accumulation compared to residential lines, requiring high-temperature water jetting before an optical inspection can even begin. The same principle applies to residential lines that have gone years without professional maintenance: the camera can only report what it can see, and a clean pipe wall is essential for accurate diagnosis.
Determining When Full Repiping Is Needed
The visual data gathered during the scope helps your plumbing team determine whether a section of your line has failed beyond simple repair.
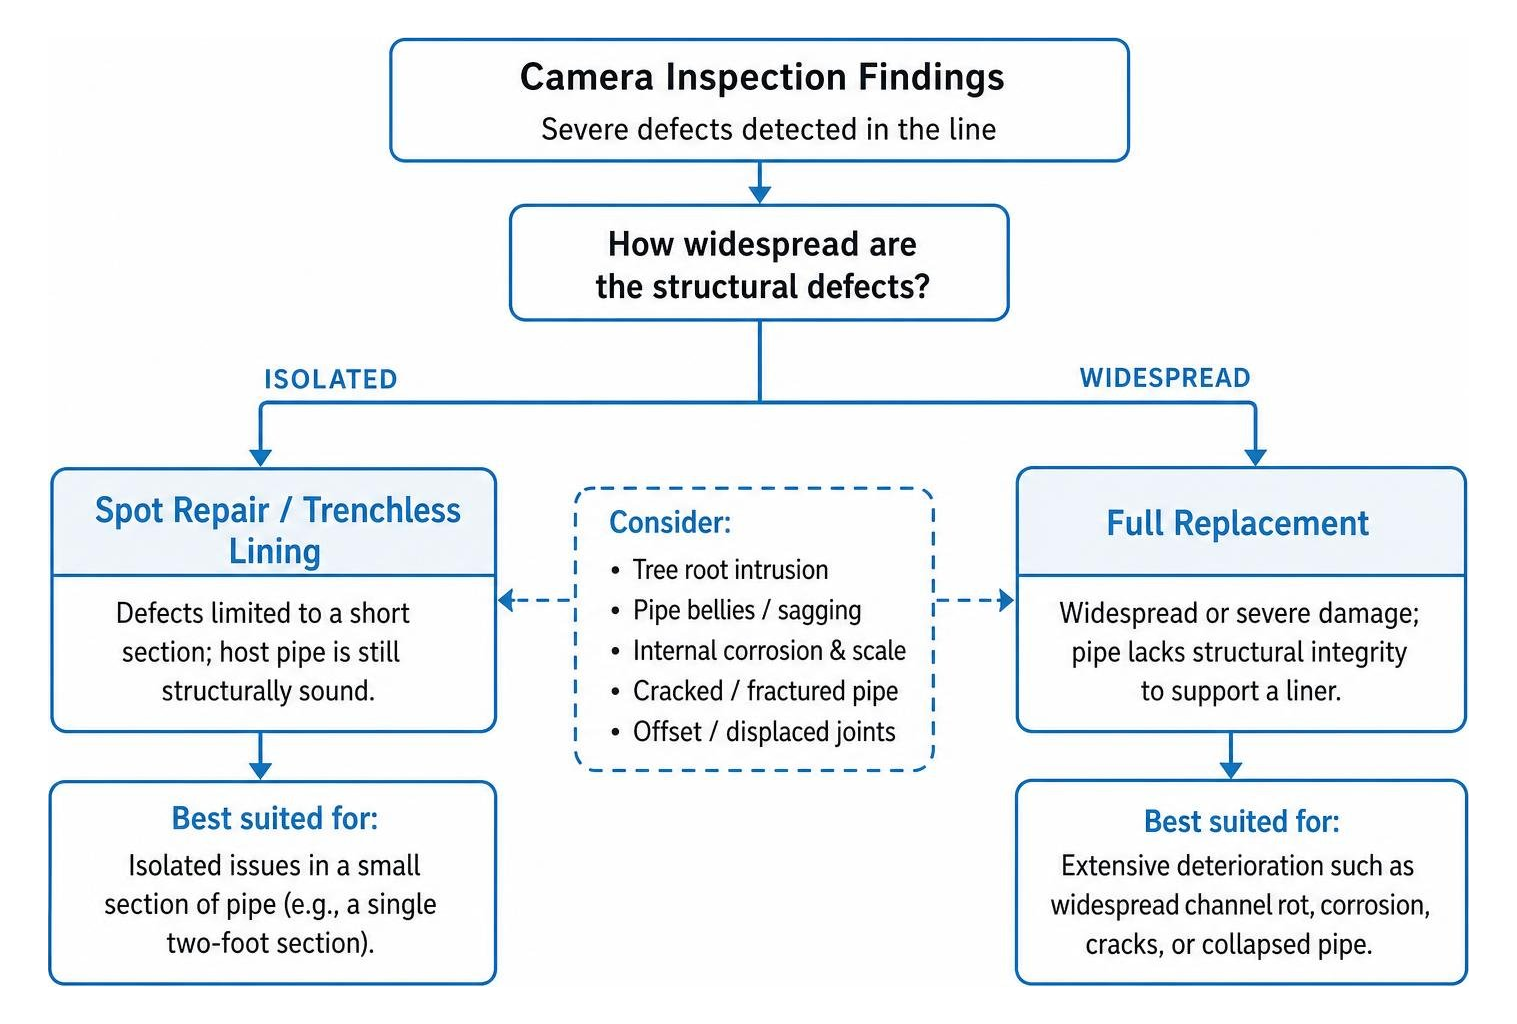
If the camera reveals widespread channel rot along the bottom of a cast iron run, cracked and collapsed clay sections, or a reverse-grade belly that keeps trapping waste, full replacement is typically the most reliable long-term solution. Reviewing a comprehensive guide to house repiping costs and process helps put these diagnostic findings into perspective against your long-term budget, so you know what to expect before committing to a full repipe. In many cases, the camera footage itself becomes the deciding factor: when multiple defect types appear in the same run, patching one section often leaves the rest of the line vulnerable to the same failure modes within a few years.
How to Prepare Your Property for a Plumbing Scope
A smooth diagnostic visit depends on clear physical access to your plumbing system. You can stop the guesswork with a camera line inspection in texas city by preparing the surrounding workspace before our technicians arrive. Taking a few minutes to ready your property means the technician can spend the entire appointment gathering diagnostic data rather than clearing obstacles or waiting for water to settle.
Step-by-Step Homeowner Camera Inspection Repipe Prep
Preparing your home for a camera inspection requires just a few simple steps:
- Clear Pathways to Cleanouts: Locate your exterior sewer cleanout—typically a 3- to 4-inch PVC or cast iron threaded cap near the foundation or front curb. Trim back overgrown shrubs, move patio furniture, and ensure a straight line of access for equipment. A clear path prevents delays and protects your landscaping from accidental damage.
- Provide Basement or Crawlspace Access: If your home utilizes an interior cleanout, clear personal storage items to allow at least four feet of working space around the access point. Technicians need room to maneuver the camera reel and monitor without disturbing your belongings.
- Secure Pets and Clear Gates: Keep dogs and cats in a closed room or indoors to ensure technicians can move between service vehicles and cleanouts safely. A calm environment also keeps the camera equipment free from curious paws and reduces stress for your animals.
- Pause High-Volume Water Use: Do not run washing machines, dishwashers, or showers during the diagnostic inspection. Flowing water obscures the camera lens and conceals floor-level pipe fractures. Stagnant water in the line allows the camera to capture crisp, detailed images of the pipe walls.
- Compile Symptom History: Write down how often backups happen, which fixtures drain slowly, and whether you smell sewer gas. This history helps the technician focus on problem areas and correlate visual findings with the symptoms you have been experiencing.
Plumbing crews use advanced self-leveling sewer cameras to keep images upright while moving through complex branch bends. This technology ensures that every joint, fitting, and transition is documented from the correct orientation, making the resulting footage easier for both technicians and homeowners to interpret.
Drain Clearing and Hydro Jetting Camera Inspection Repipe Prep
When a pipe is completely backed up with standing wastewater, heavy grease, or thick roots, the camera lens will be blinded upon entry. Optical equipment cannot see through opaque sludge or standing sewage, and attempting to push the camera through a fully obstructed line risks damaging the equipment and producing unusable footage.
In these situations, technicians clear the line before running the camera. Running a mechanical drain snake punches a relief hole to drain standing water, while hydro jetting scours grease, scale, and roots from the inner pipe walls. This preparatory step is not a substitute for the camera inspection itself; rather, it creates the conditions under which the camera can do its job effectively.
Once the pipe walls are clean, the camera can clearly reveal the structural condition of the pipe material beneath the debris. Following pipe camera diagnostic standards guarantees that small cracks and structural defects are not hidden beneath biological slime. A thorough pre-inspection cleaning often reveals defects that would otherwise go undetected, which is why experienced plumbing teams treat clearing and scoping as complementary steps in the same diagnostic workflow.
Diagnostic Technology, Depth Mapping, and Project Planning
Modern pipe diagnostics rely on advanced tracking instruments to take the guesswork out of repair planning. Rather than approximating where a problem lies, plumbers map the line’s exact layout before touching a shovel. Learning about the local guide to main water line repiping shows how surface mapping simplifies both supply and drain line rehabilitation. The same locator technology that pinpoints a sewer defect can also mark the path of a water service line, reducing excavation time and preventing damage to adjacent utilities.
Sonde Locators, Self-Leveling Cameras, and Depth Mapping
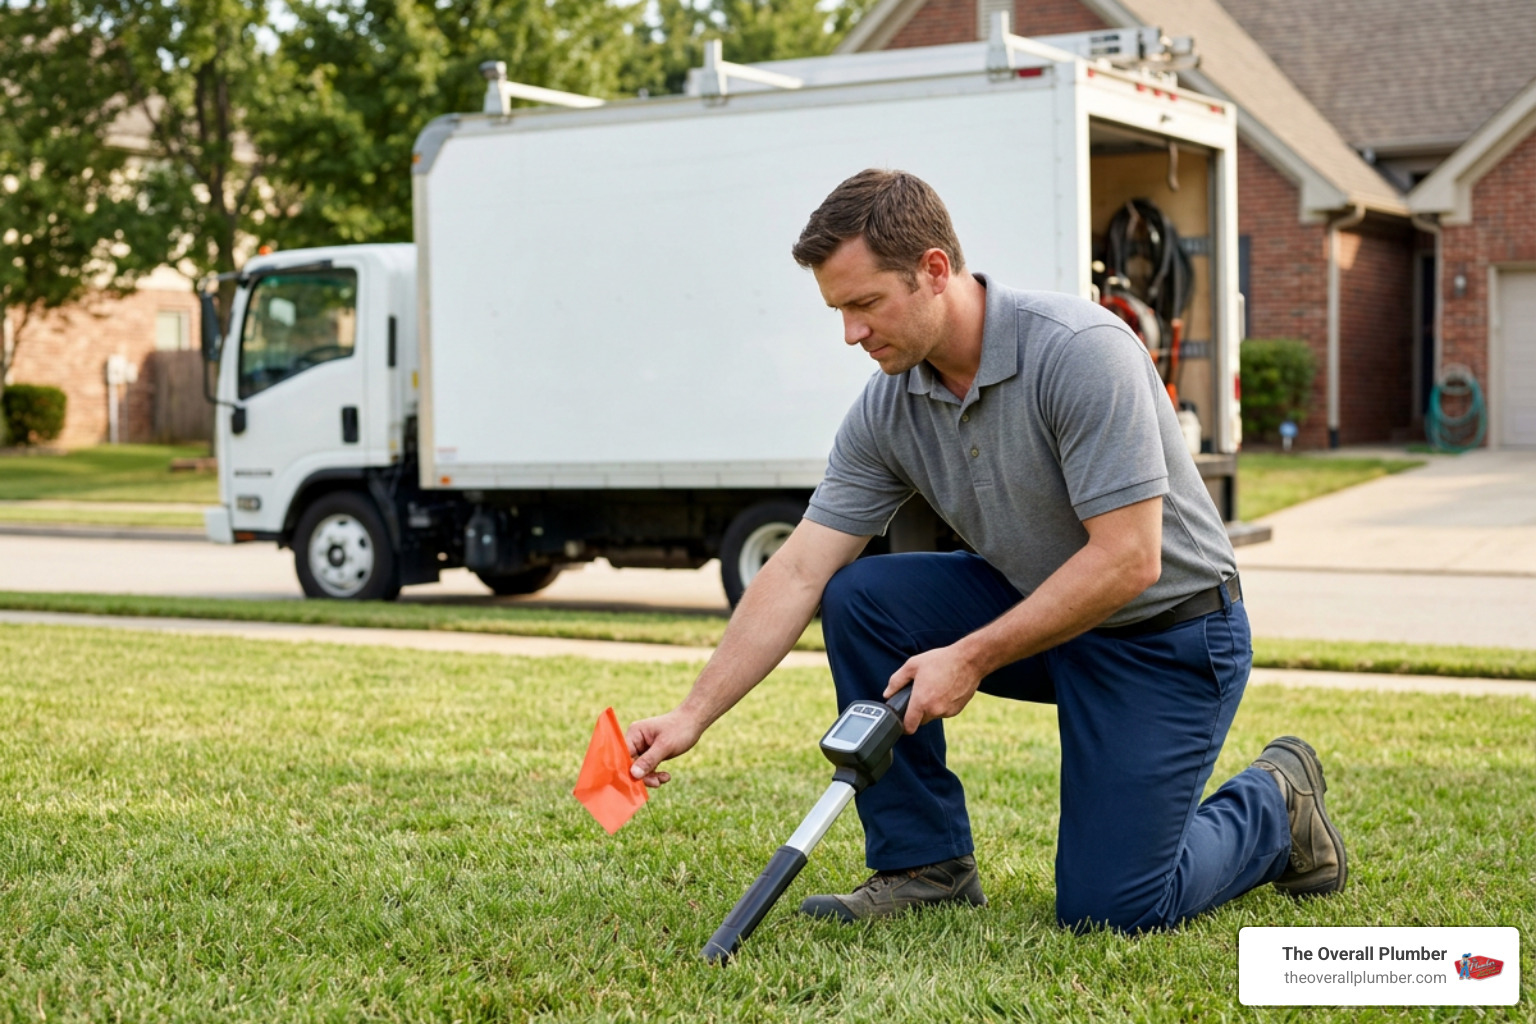
Modern diagnostic reels utilize built-in 512Hz sonde transmitters embedded directly behind the camera optics. As the push rod navigates through lateral lines, the sonde broadcasts an electromagnetic frequency through soil, asphalt, or concrete. This signal travels upward through the ground and is detectable from the surface, allowing technicians to track the camera’s position in real time without any digging.
Up on the surface, the plumber sweeps a digital locator wand across the ground to pick up the signal. The locator triangulates:
- The exact surface position of the camera head.
- The precise burial depth (down to the inch).
- The direction and pitch of the piping run.
Rugged high-definition pipe inspection technology combines real-time footage with mechanical distance counters. This allows your plumbing crew to mark exact excavation boundaries on your lawn with spray paint, avoiding costly damage to utility lines, trees, or concrete driveways. When a defect is located at a specific depth and distance from the cleanout, the repair team can plan a surgical excavation that minimizes disruption to your property.
Inspection Cost Breakdown and What to Request in Your Video Report
A standalone residential plumbing camera inspection typically costs between $125 and $500. The final price depends on how easy the cleanout is to access, how long the pipe run is, and whether extra services are needed:
- Standard Visual Inspection: $125 – $300
- Sonde Surface Locating & Depth Staking: $40 – $100
- Video Recording & Written Diagnostic Report: $50 – $150
- Pre-Inspection Snaking or Jetting: $250 – $800
When your inspection is complete, request a digital copy of the raw video footage, distance markers showing where defects were found, and a written report noting both inspected sections and any inaccessible zones. Having this documentation on file gives you a permanent record of your pipe condition, which is valuable for insurance claims, real estate transactions, and future maintenance planning. A thorough report should also include the technician’s observations about pipe material, diameter, and overall condition so you can track changes over time.
Frequently Asked Questions About Plumbing Camera Inspections
How long does a sewer camera inspection take and what does it cost?
A standard sewer camera inspection takes 30 to 60 minutes for most residential properties. The process may take longer if the technician has to locate buried cleanouts, pull a toilet for roof stack access, or clear heavy clogs to restore visibility. Standard inspections range from $125 to $500, depending on access and documentation needs. Homes with longer lateral runs, multiple cleanouts, or difficult access points may fall at the higher end of that range, while straightforward single-story homes with easily accessible exterior cleanouts typically complete on the lower end.
Should camera inspections occur before or after hydro jetting?
Ideally, a complete diagnostic workflow uses both. An initial pre-cleaning camera pass identifies major blockages, collapsed sections, or severe offsets to make sure it is safe to run high-pressure water tools. Pushing a jetter into a collapsed pipe can worsen the damage or send water into the surrounding soil, so the pre-cleaning scope acts as a safety check.
Once hydro jetting clears out the roots and grease, a second post-cleaning camera pass examines the clean pipe walls for structural cracks, channel rot, and joint separation without visual obstruction. This two-pass approach ensures that no defect is missed and that the cleaning process itself did not reveal additional problems that were previously hidden.
What common defects in older cast iron or clay pipes require repiping?
Older drainage systems face several material-specific failure points:
- Cast Iron Channel Rot: Water running along the bottom of horizontal cast iron pipes gradually wears the metal away until the bottom of the pipe disappears completely, allowing wastewater to erode the soil underneath. This condition is often visible on camera as a dark, irregular channel along the pipe floor.
- Heavy Tuberculation: Rust and mineral buildup narrow the inside of the pipe, catching waste and causing persistent blockages. In severe cases, the effective pipe diameter can shrink by half or more, making the line functionally obsolete even if the outer wall remains intact.
- Clay Pipe Shear Breaks: Earth settling snaps rigid vitrified clay pipes at the hubs, allowing soil to wash into the line and sinkholes to form in the yard. The camera shows a clean break with soil visible beyond the pipe wall.
- Joint Separation: Mortar and rubber gaskets break down over decades, allowing root systems to easily spread throughout the sewer lateral. Separated joints appear as gaps between pipe segments, often with root masses growing through the opening.
Ready to assess your system before starting a major plumbing project? Call our team at 832-772-5551 to schedule your high-definition camera inspection today.