


What Causes a Slow Bathtub Drain and How to Diagnose It
To fix a slow bathtub drain, remove and clean the stopper assembly, extract trapped hair using a plastic barbed snake, plunge the drain with a sealed overflow, flush the line with baking soda and vinegar, or snake deeper through the overflow opening. Most bathtub drainage issues stem from shed hair binding with soap scum, body oils, and conditioner residue right beneath the surface. Every time someone showers, loose strands wash down the drain and snag on the crosshairs, stopper linkage, or pipe walls, creating a sticky mat that restricts water flow.
Other factors can worsen the problem:
- Mineral Scale: In areas with hard water, calcium and magnesium build up along the inner walls of the plumbing, catching hair much faster than smooth pipe.
- Corroded Cast Iron: Older drainage systems made of cast iron develop rough, flaky rust deposits that act like Velcro for debris.
- Foreign Objects: Small items like shampoo caps, hair ties, razor guards, or children’s bath toys occasionally slip past the strainer and create an immediate anchor point for clogs.
Diagnosing the issue begins with simple scope mapping. Run water in your bathroom sink and flush the toilet. If the sink drains smoothly and the toilet does not gurgle, the obstruction is local to your tub. However, ignoring the issue will only let the blockage compound over time, and waiting for a clog to clear itself is a recipe for disaster once a slow drain turns into standing wastewater.
Local Obstructions vs. Main Line Restrictions
Understanding where the clog sits saves time and prevents unnecessary headaches:
- Local Clog (Single Fixture): If only the bathtub is draining sluggishly while every other fixture in the house runs freely, the obstruction sits in the stopper, the tub strainer, or the P-trap directly beneath the tub floor.
- Branch-Line Restriction (Multiple Bathroom Fixtures): If the bathtub, shower, and bathroom sink all drain slowly or bubble when emptied, the blockage is lodged deeper in the secondary branch line serving that specific bathroom group.
- Vent Stack Blockage: Plumbing vents equalize pressure in your pipes. When leaves, bird nests, or debris block the roof vent, drains pull air from nearby fixtures, creating a vacuum that slows water flow and produces noticeable gurgling sounds.
- Main Sewer Line Backup: If running water anywhere in the house causes sewage to back up into the lowest tub or shower, the main sewer lateral is obstructed and requires immediate attention.
Stopper and Linkage Misalignments
Sometimes a tub drains slowly even when the pipe itself is clean. Many bathtubs use trip-lever or turn-style stoppers connected to an internal linkage rod behind the overflow plate. If this linkage slips out of adjustment over time, the internal plunger will not lift high enough when you flip the switch. Water flow becomes restricted simply because the drain opening is half-closed. Checking and adjusting the threaded rod on your overflow plate can instantly restore full drainage without any pipe cleaning required.
How to Fix Your Tub in 5 Chemical-Free Steps
Mechanical clearing and non-corrosive methods are always the safest approach for your home. Caustic store-bought chemicals generate extreme heat, corrode metal joints, and soften PVC pipes. Learning how to unclog a slow drain without chemicals – Repair Habit protects your plumbing system while getting your bathroom back in working order. Follow these field-tested DIY slow bathtub drain fixes to eliminate standing water.
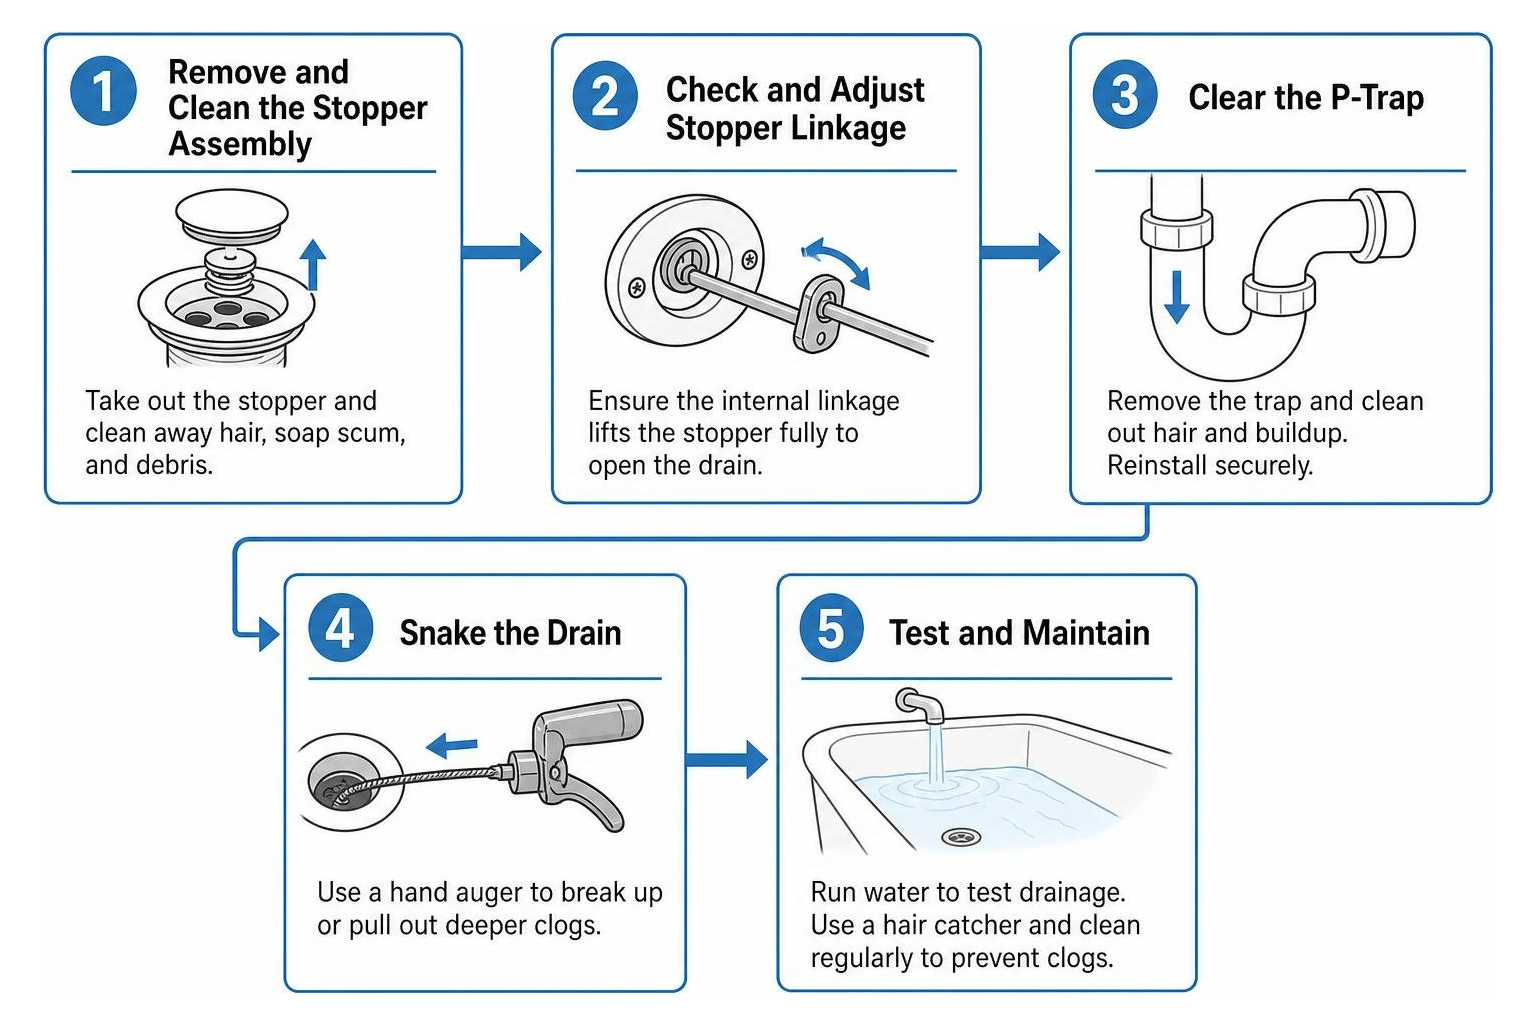
Step 1: Remove and Clean the Stopper Assembly
Start by clearing the mechanical components at the tub opening:
- Identify Your Stopper Type: Determine if your tub has a push-pull, lift-and-turn, toe-touch, or trip-lever stopper.
- Unscrew the Mechanism: Most push-pull and lift-and-turn stoppers unscrew counterclockwise from the center post. Look for a small set screw under the cap if it does not turn freely.
- Extract Trapped Hair and Slime: Use a paper towel or old rag to wipe away the thick mat of hair and dark biofilm clinging to the underside of the stopper and the drain crosshairs.
- Inspect the Rubber Gasket: Check the rubber seal on the stopper for cracks or deterioration, clean it thoroughly with warm water, and set it aside.
Step 2: Extract Hair Using a Plastic Barbed Drain Snake
A flexible plastic barbed tool (often sold as a Zip-It) is the most effective DIY tool for shallow hair clogs:
- Insert the Tool: Slowly guide the barbed strip down through the drain opening, wiggling it gently past the crosshairs.
- Rotate and Engage: Once inserted 12 to 18 inches, twist the tool slightly so the sharp barbs snag the hair mat.
- Pull Straight Up: Slowly draw the tool out of the drain. Do not yank violently, as thin plastic tools can snap if pulled too hard against metal crossbars.
- Dispose and Repeat: Pull the hair cluster off the tool directly into a trash bag, wipe the tool clean, and insert it at different angles until it comes out clear.
Step 3: Clear a Slow Bathtub Drain with a Cup Plunger
Plunging uses hydraulic pressure to break apart soft clogs lodged past the crossbars:
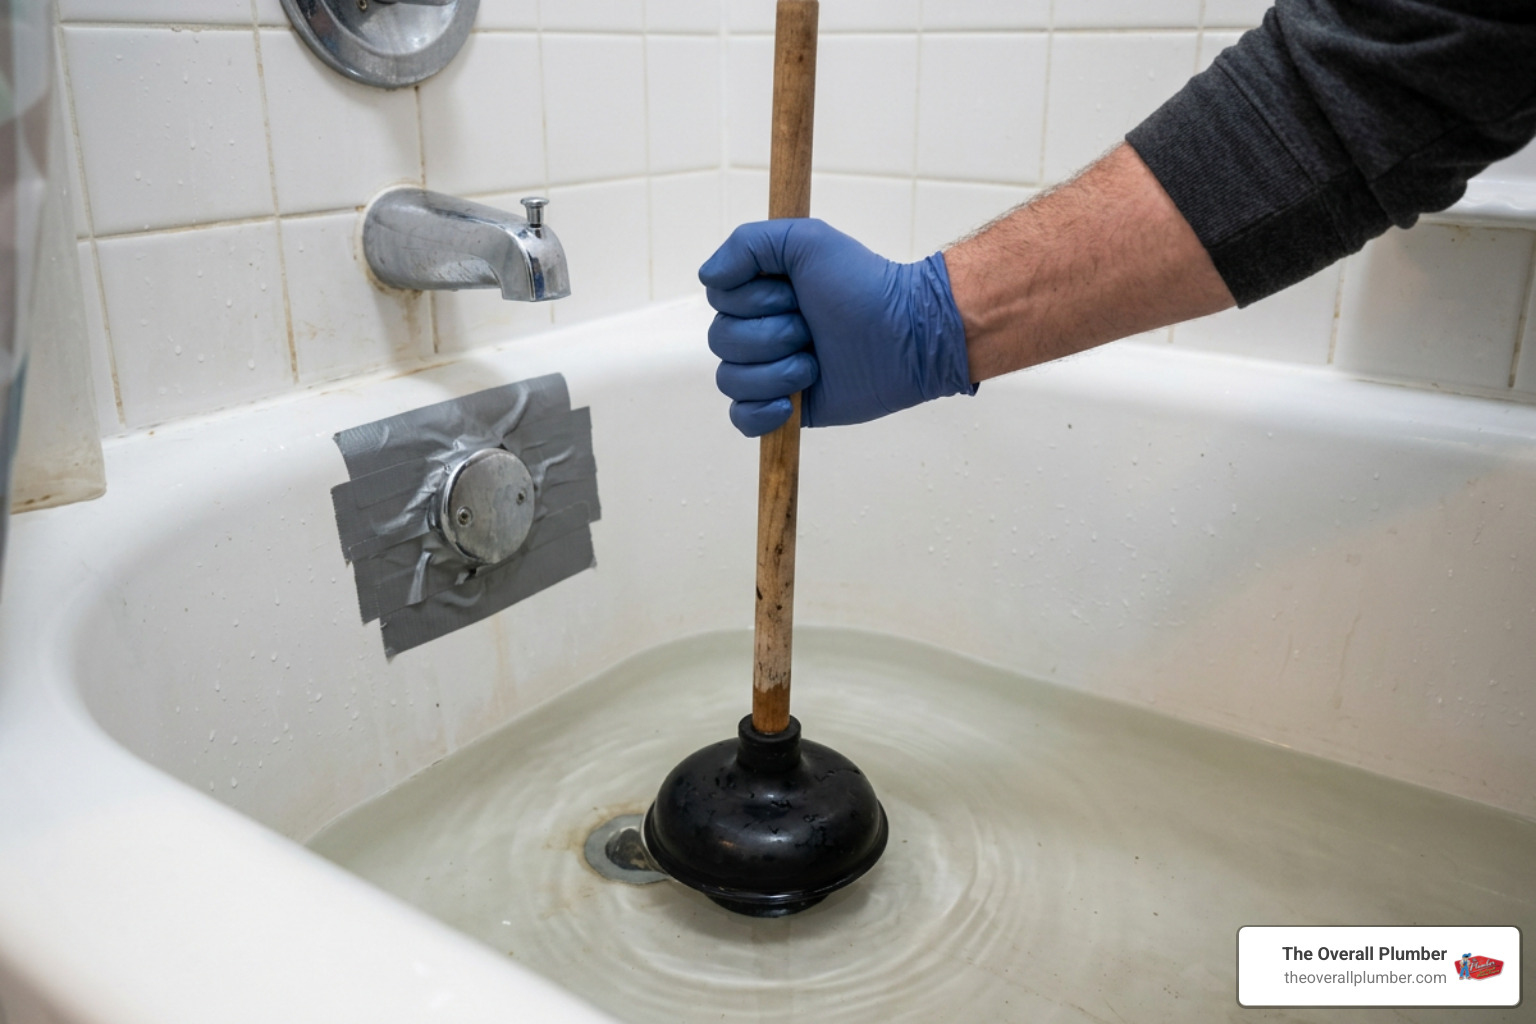
- Seal the Overflow Opening: Remove the overflow faceplate on the tub wall and firmly tape a wet rag or heavy-duty duct tape over the opening. Without an airtight seal here, plunging simply pushes air out of the overflow rather than forcing water down the drain pipe.
- Add Standing Water: Ensure there is roughly 1 to 2 inches of standing water in the tub basin to submerge the lip of the plunger cup.
- Use a Flat Cup Plunger: Position a flat-bottomed cup plunger directly over the drain opening to establish a firm seal against the tub floor.
- Plunge with Rhythmic Force: Push down and pull up vigorously 10 to 15 times while keeping the seal intact. The upward suction pull is what dislodges packed debris.
- Test the Flow: Remove the plunger and run hot water to check if the water spirals down freely.
Step 4: Flush Debris with Baking Soda, Vinegar, and Hot Water
A natural effervescent wash helps break down sticky soap film coating the pipe walls:
- Dry the Drain Area: Let any standing water drain out completely so the mixture reaches the blockage directly.
- Add Baking Soda: Pour 1/2 cup of dry baking soda (sodium bicarbonate) straight down the drain opening.
- Follow with White Vinegar: Pour 1 cup of distilled white vinegar down the drain. The mixture will immediately fizz and foam, releasing carbon dioxide that works into greasy soap layers.
- Let It Dwell: Cover the drain with a wet rag or drain stopper for 20 to 30 minutes to contain the reaction inside the pipe.
- Flush with Hot Water: Bring a kettle of water to a near boil (or run your tap on its hottest setting for modern PVC pipes) and flush the drain steadily to wash away loosened residue.
Step 5: Snake Through the Tub Overflow Drain Pipe
When a clog sits deeper in the trap, snaking through the main drain opening can be difficult because of tight bends and crossbars. The overflow pipe provides a straight shot to the P-trap:
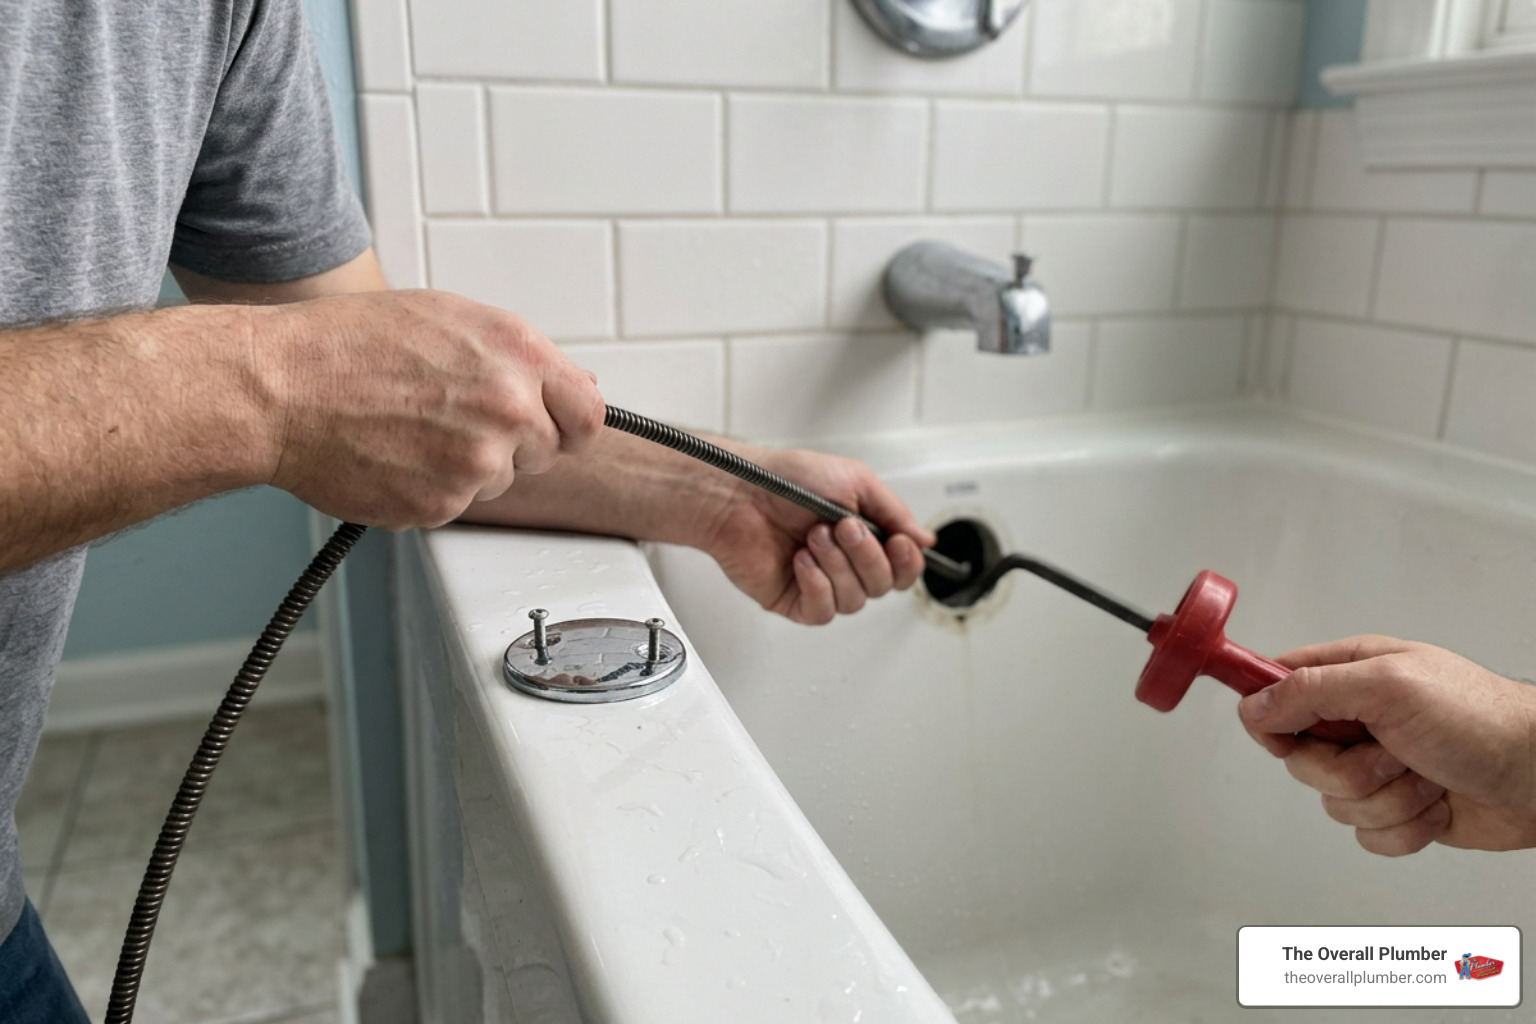
- Remove the Overflow Plate: Unscrew the two mounting screws holding the overflow cover plate to the tub wall and lift out the plate along with any attached linkage mechanism.
- Feed the Cable: Insert the tip of a manual 1/4-inch hand auger (plumber’s snake) directly into the overflow pipe.
- Navigate the Trap: Feed the cable down until you feel resistance around the P-trap (usually 2 to 3 feet down).
- Rotate the Drum: Tighten the thumbscrew on the auger and crank the handle clockwise while applying gentle forward pressure to bore through or hook the blockage.
- Retrieve and Flush: Slowly retract the cable, clean off hooked debris, reinstall the overflow plate, and run hot water for two minutes to ensure the line is wide open.
Preventing Future Buildup and Long-Term Drain Care
Keeping your tub drain clear requires far less effort than clearing a severe clog. Establishing simple habits will prevent buildup from accumulating inside your plumbing lines:
- Install a Quality Hair Catcher: Place a silicone or fine stainless-steel mesh drain protector over the opening to catch loose strands before they enter the plumbing.
- Perform Weekly Hot-Water Rinses: Run hot tap water down the drain for two minutes at the end of each week to liquefy residual body oils and soap film before they solidify.
- Moderate Heavy Bath Oils and Body Butters: Thick bath oils, Epsom salts with essential oils, and clay masks coat pipes quickly. Follow these products with hot water and a small squirt of degreasing dish soap.
- Clean Strainers Regularly: Empty your hair catcher after every shower rather than waiting for water to pool around your feet.
| DIY Method | Primary Target | Typical Tool Cost | Effectiveness Rating |
|---|---|---|---|
| Stopper Cleaning | Surface hair and biofilm | $0 (Basic household tools) | High for immediate drain opening |
| Barbed Snake (Zip-It) | Hair mats in upper 18 inches | $5 – $10 | Very High for routine shower clogs |
| Cup Plunger | Soft clogs and soap blockages | $8 – $15 | High (requires sealed overflow) |
| Baking Soda & Vinegar | Soap scum and minor organic film | $2 – $5 | Moderate (best for maintenance/odor) |
| Overflow Hand Snake | Deep P-trap blockages | $25 – $45 | Very High for stubborn, deep clogs |
Frequently Asked Questions About Bathtub Clogs
Can chemical drain openers permanently damage my plumbing pipes?
Yes. Chemical drain cleaners containing sodium hydroxide (caustic soda) or concentrated sulfuric acid generate extreme heat through exothermic reactions. This heat can warp, soften, or melt PVC and ABS drainage pipes, dissolve rubber slip-joint washers, and accelerate severe corrosion inside older cast-iron or galvanized lines. Furthermore, if the chemical fails to clear the obstruction, your bathtub remains filled with corrosive, toxic water that creates a safety hazard for anyone working on the plumbing later.
How do I troubleshoot a slow bathtub drain that gurgles?
A gurgling bathtub drain indicates a venting problem or a developing restriction in the downstream branch line. When water flows down a restricted or unvented line, it creates negative air pressure (a partial vacuum) behind it. To equalize that pressure, the line sucks air backward through the bathtub P-trap, making a distinct bubbling or sucking sound. If clearing the tub trap does not resolve the gurgling, check your roof vent stack for blockages or consult a professional to inspect the branch line.
How much does professional drain clearing usually cost?
The cost to have a licensed professional clear a residential drain typically averages around $275 for standard single-fixture stoppages. If the obstruction sits farther down in a secondary branch line, professional clearing generally ranges from $350 to $500. Main sewer line service requiring heavy-duty motorized augering or hydro-jetting typically ranges between $450 and $575, depending on cleanout accessibility and the severity of the buildup.
Professional Drain Cleaning Services
When routine DIY methods fail to restore a fast swirl to your bathtub, deeper obstructions such as mineral scale, pipe damage, or a blockage farther down the line may need professional service. The Overall Plumber provides drain cleaning with motorized augers and high-definition camera inspections, with no trip charges, no overtime fees, and straightforward upfront pricing.
We serve homeowners in Houston, Clear Lake, Santa Fe, League City, Texas City, La Porte, Friendswood, Brazoria County, and nearby communities. If your bathtub remains slow after the DIY steps above—or multiple fixtures are draining poorly—contact The Overall Plumber online to request prompt drain-cleaning service and priority scheduling.