

Top Features to Look for in a Toilet Fill Tube Rubber Seal
The best toilet fill tube rubber seal for most homes is a precision-molded EPDM or silicone diaphragm that matches your fill valve’s exact diameter, typically about 1.14 inches (29 mm), with a Shore A hardness between 40 and 90. Standard Nitrile (NBR) seals work for budget repairs and well water, while EPDM and silicone last longer in chlorinated municipal water. When you hear a continuous hiss inside your tank at 2:00 AM, the tiny rubber diaphragm resting under your fill valve cap is usually the culprit. A faulty seal fails to regulate internal tank pressure, causing the fill valve to trickle water continuously into the overflow pipe. Choosing the correct replacement prevents water waste and protects your plumbing system from erratic pressure fluctuations.
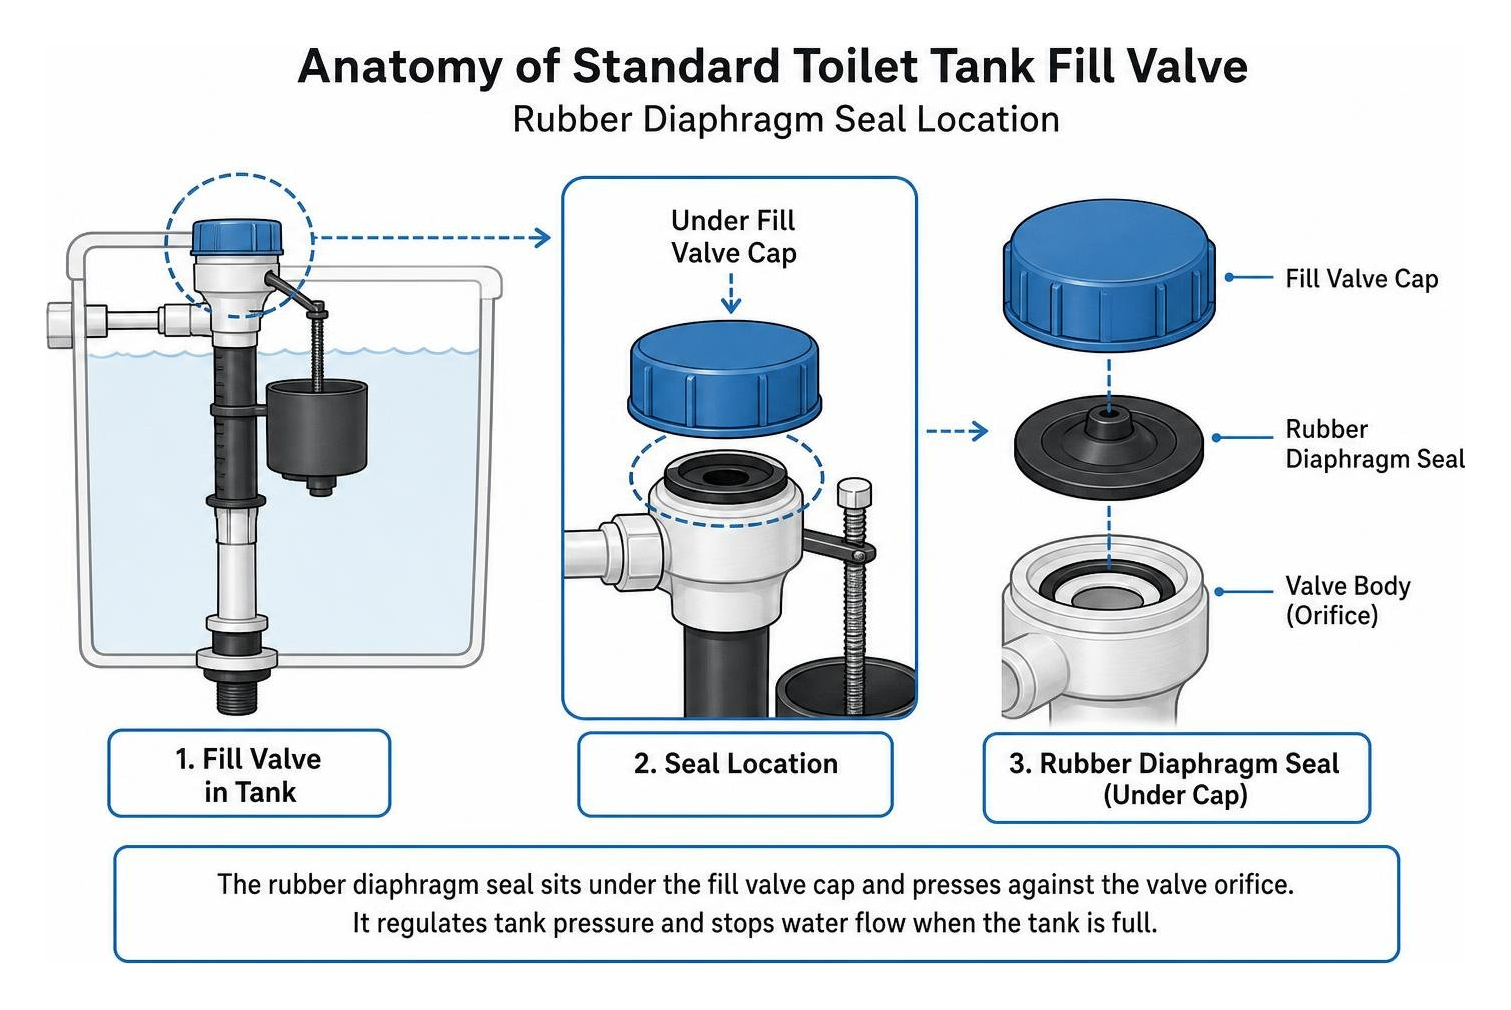
When shopping for a replacement seal, several critical specifications determine whether your repair will last months or years:
- Exact Seal Diameter: Most standard residential diaphragms measure approximately 1.14 inches (29 mm) in outer diameter. Even a half-millimeter mismatch can cause high-pressure bypass leaks, noisy vibration, or failure to shut off entirely.
- Material Composition: Standard seals utilize vulcanized rubber, Nitrile (NBR), EPDM, or premium silicone. Each material performs differently based on regional water chemistry and temperature.
- Shore Hardness Rating: High-quality replacement seals maintain a Shore A hardness between 40 and 90. A seal that is too soft will distort under municipal water pressure, while one that is too rigid will fail to seat properly against the valve orifice.
- Chemical & Chlorine Resistance: Chloramines and municipal purification additives degrade standard natural rubber over time. Choosing enhanced polymers prevents premature softening, warping, and breakdown.
| Feature / Material | Standard Nitrile (NBR) | EPDM Rubber | Premium Silicone | Viton (FKM) |
|---|---|---|---|---|
| Typical Lifespan | 1–3 Years | 3–5 Years | 5–8 Years | 7–10 Years |
| Chlorine Resistance | Fair | Very Good | Excellent | Superior |
| Operating Temp Range | -20°F to 212°F | -40°F to 250°F | -60°F to 400°F | -15°F to 400°F |
| Flexibility & Sealing | Good | Excellent | Superior | Very Good |
| Best Application | Budget fixes, well water | Standard municipal water | Harsh or treated water | Heavy chemical exposure |
Best Replacement Seals for Popular Toilet Fill Valves
Finding the right rubber gasket for toilet tank fill valve repairs depends entirely on matching the diaphragm profile to your valve assembly. You can browse trusted hardware selections like Flush valve seal Toilet Parts & Repair at Lowes.com or check dedicated options on Amazon through listings like Toilet Fill Valve Seal Replacement.
If you are dealing with tank-to-bowl base leaks rather than fill valve issues, heavy sponge rubber units such as the Fit-All Tank-to-Bowl Gasket by Wal-Rich. handle the base sealing. However, for internal valve pressure control, precision diaphragms are what you need.
Universal Diaphragm Seals for Common Valve Brands
The classic diaphragm design features a molded rubber disc with a rigid plastic or reinforced center pin. The most widely recognized version in North American households is the Toilet Fill Valve Replacement Seal | 242 Toilet Seal | Fluidmaster, also available via local suppliers as the 242 Toilet Replacement Seal, Rubber, For: 400A .
These standard replacements fit an incredible variety of residential hardware, including Fluidmaster 200, 400A, 747, and 703A series, alongside many private-label builder-grade valves. Multi-packs such as the 2 Pcs Toilet Fill Valve Seal Replacement Tank Part For Diaphragm Od 9 06 provide affordable backups for multi-bathroom homes.
- Pros: Highly affordable ($2 to $5), universally stocked, and simple to press into the top groove.
- Cons: Standard rubber degrades quickly if exposed to chemical tank drops.
Heavy-Duty EPDM and Silicone Toilet Fill Tube Rubber Seal Upgrades
For homes facing hard municipal water or heavy chlorination, standard rubber can turn gummy within a couple of years. Industrial manufacturers such as Rubber Gasket for Toilet Tank Fill Valve | ZXLSEAL specialize in precision-molded EPDM and engineered silicone diaphragms built with tighter manufacturing tolerances (±0.05 mm).
- High Tear Resistance: Silicone and EPDM compounds resist tearing during high-pressure shutoff cycles.
- Resistant to Water Hammer: Denser Shore A elastomer compounds absorb the abrupt shock wave when the valve snaps shut, reducing pipe shudder.
- Anti-Aging Chemistry: These polymers resist blistering and cracking caused by municipal oxidizers.
Quick DIY Guide to Replacing Your Fill Tube Gasket
Replacing a fill valve seal requires minimal mechanical experience and can be completed in under ten minutes. Video guides like How to Replace a Toilet Fill Valve Seal Easily! no tools needed. show how simple this fix can be. When a valve fails to shut off, consulting visual resources like Fill Valve Does Not Shut Off : Clean or Replace the Seal helps pinpoint whether you need a quick rinse or an outright swap.
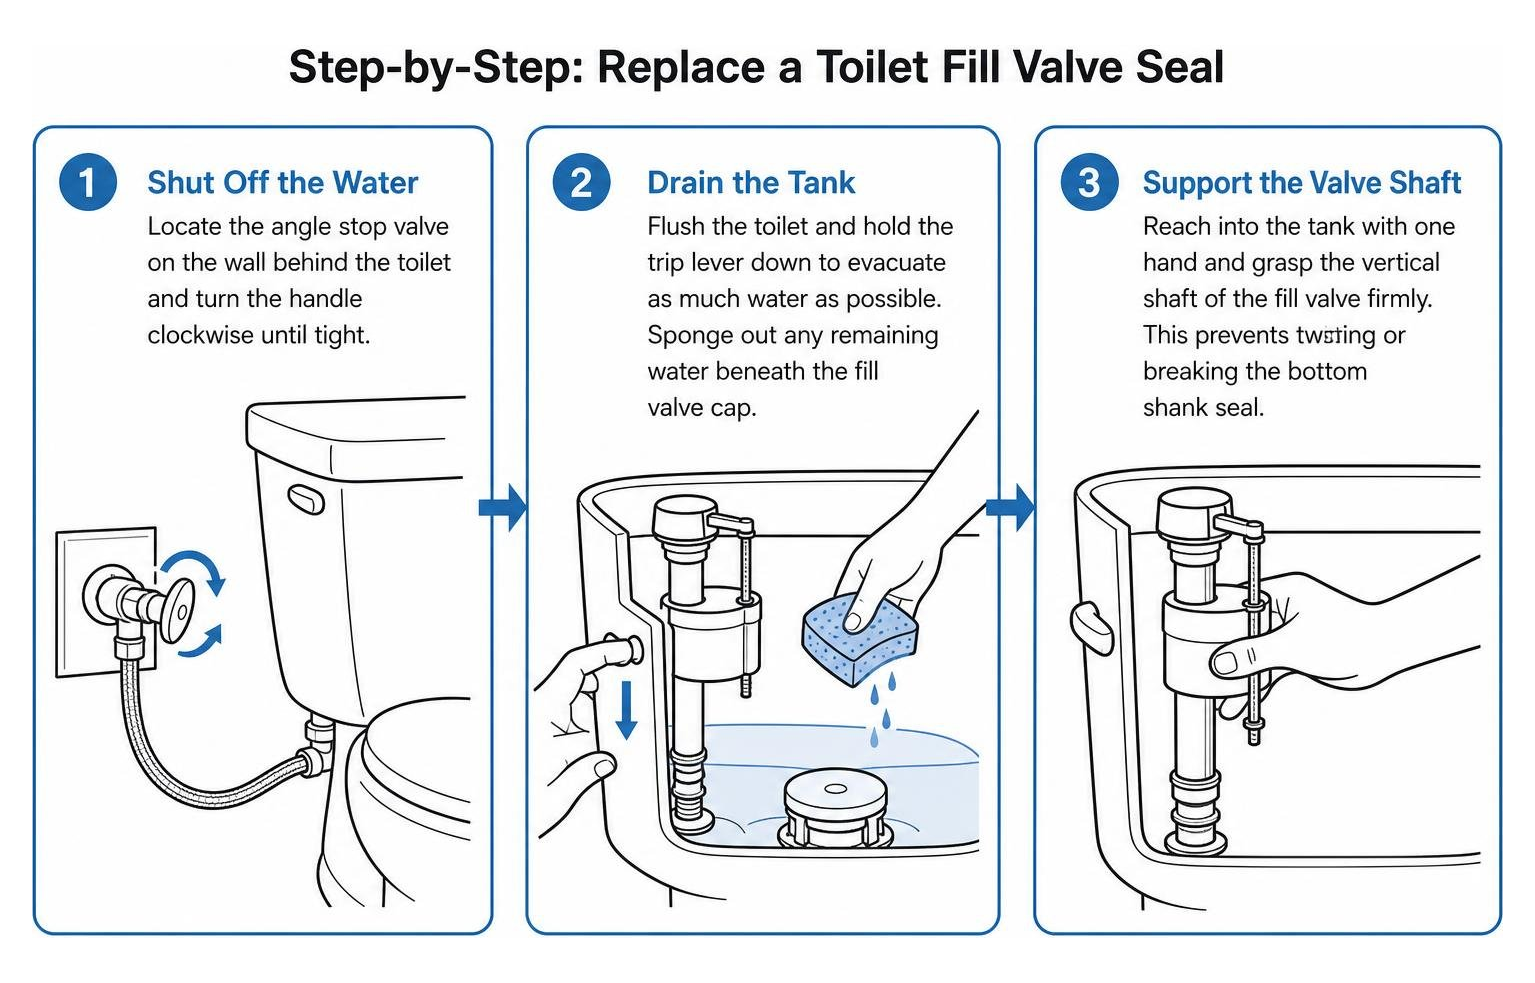
Step-by-Step Toilet Fill Tube Rubber Seal Installation
- Shut Off the Water: Locate the angle stop valve on the wall behind the toilet and turn the oval handle clockwise until tight.
- Drain the Tank: Flush the toilet and hold the trip lever down to evacuate as much water as possible. Sponge out any remaining water beneath the fill valve cap.
- Support the Valve Shaft: Reach into the tank with one hand and grasp the vertical shaft of the fill valve firmly. This prevents twisting or breaking the bottom shank seal.
- Twist the Top Cap: With your other hand, press down lightly on the top cap and rotate it counter-clockwise (about one-eighth of a turn) to unlock the tabs. Lift the cap and attached lever arm off the valve housing.
- Remove the Old Seal: Pop the worn rubber diaphragm out from the underside of the top cap or the top rim of the valve body.
- Flush the Water Line: Hold an inverted cup or plastic container loosely over the uncapped valve body. Turn the wall supply valve on slightly for 5 seconds. The rushing water will blow out sand, rust flakes, and mineral scale from the riser pipe without splashing your ceiling. Turn the water back off.
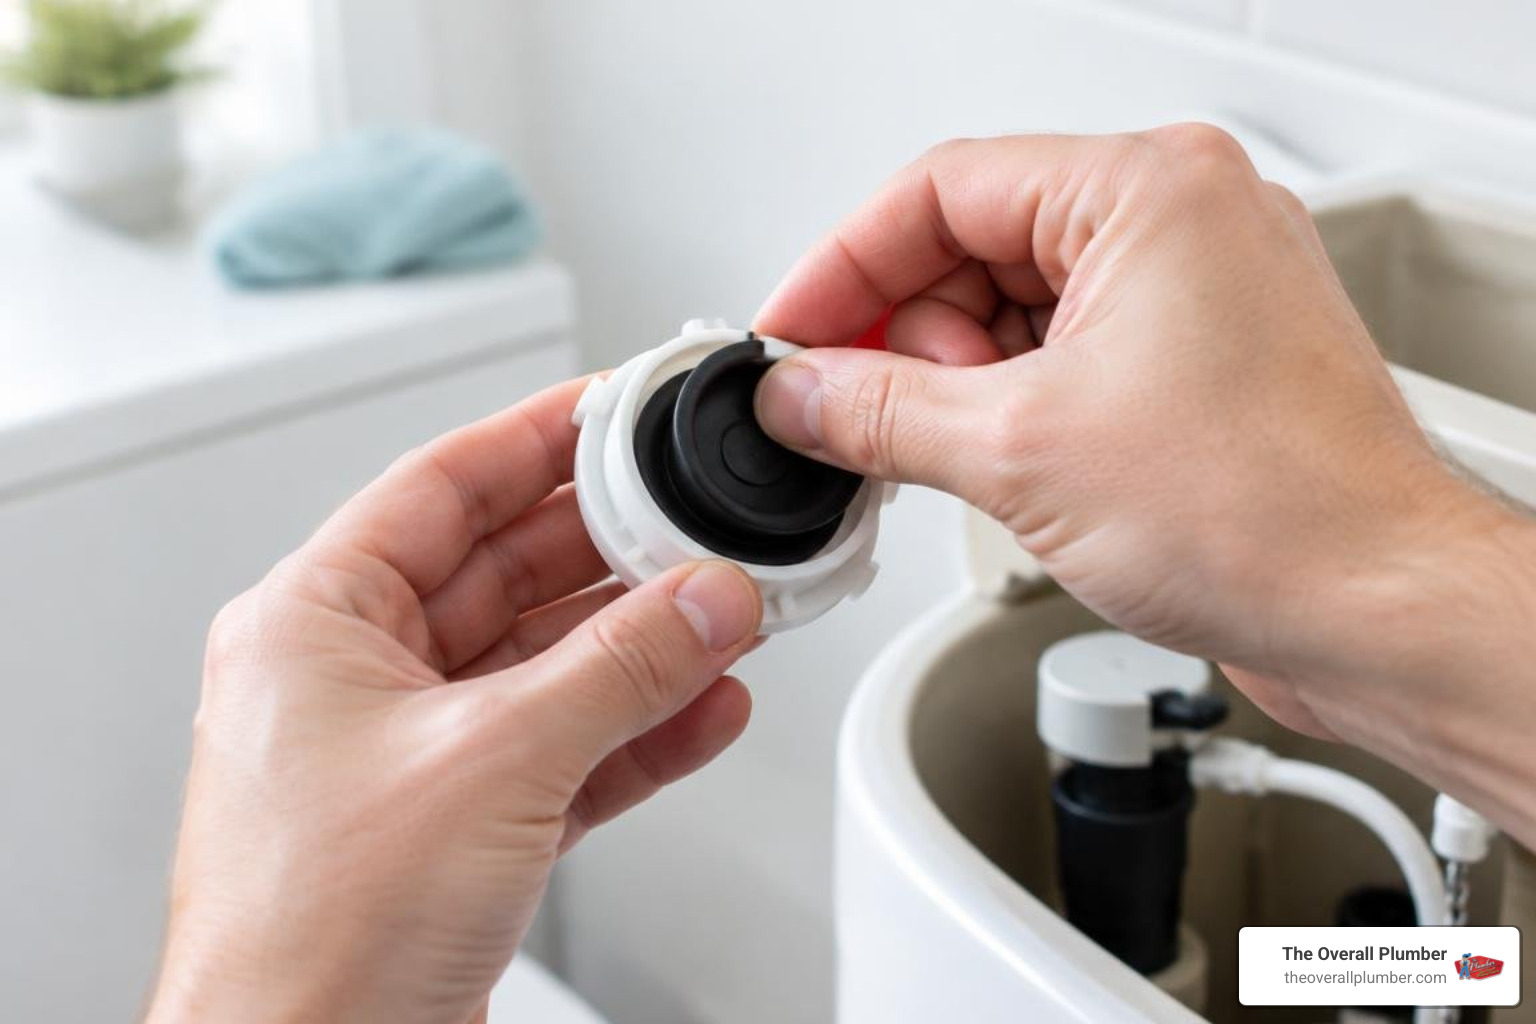
- Seat the New Seal: Place your new seal into the cap assembly, ensuring the raised rubber ridge or alignment pin faces the correct direction as indicated by the manufacturer.
- Reassemble and Test: Align the cap tabs with the body slots, press down, and rotate clockwise until the cap clicks into its locked position. Snap the small black refill tube back into the overflow pipe clip. Turn the water supply back on and check for a crisp, clean shutoff.
Common Installation Mistakes and Troubleshooting
- Debris Trapped Under the Diaphragm: Even a grain of sand trapped beneath the new rubber seal will prevent a complete seal, causing a continuous trickle. Always flush the valve body before installing the new seal.
- Inverted Seal Installation: Installing the diaphragm upside down prevents the valve arm from compressing the pilot hole, leaving the water running at full blast.
- Misaligned Lock Tabs: Failing to twist the cap until it locks firmly can allow the cap to pop off under full water pressure, resulting in an unconstrained geyser inside the tank.
- Refill Tube Shoved Down the Overflow Pipe: If the rubber refill tube is pushed too deep inside the overflow pipe rather than secured above the rim with a clip, it can siphon water continuously from the fill valve into the bowl. Be sure not to confuse fill valve issues with standard flapper wear, a topic often discussed in municipal water guides like Let’s Talk About Toilet Flappers! Old or worn-out ….
Frequently Asked Questions about Toilet Fill Valve Seals
Can I replace just the seal instead of the entire fill valve?
Yes. If the valve body is free of mineral scaling and structural cracks, swapping just the diaphragm seal is the most economical way to stop leaks. A replacement seal costs only a few dollars, whereas replacing the entire valve assembly takes more time, requires draining the tank completely, and involves disconnecting the supply line under the tank.
Why is my fill valve still leaking after installing a new seal?
If water continues to hiss or run into the overflow pipe after installing a new seal, check for three common problems:
- Line Sediment: Unseat the cap and flush the supply line to dislodge grit that may have settled on the new rubber.
- Damaged Plastic Seat: Inspect the molded plastic lip on top of the valve body. If mineral buildup or a hairline crack exists on this rim, the rubber seal cannot seat evenly.
- Float Arm Binding: Ensure the float cup slides up and down freely without rubbing against the tank wall or refill tube.
Can in-tank bleach tablets damage a new rubber seal?
Yes. Drop-in chemical tablets containing concentrated chlorine or bleach release corrosive oxidizers directly into standing tank water. These chemicals attack flexible elastomers, turning rubber gummy, brittle, and distorted within months. Using drop-in tablets voids the warranty of nearly every major valve manufacturer and significantly shortens the lifespan of fill valve seals and flappers alike.
If you need expert assistance diagnosing persistent toilet leaks or plumbing issues, contact our team today at 1-800-555-0199 to speak with a specialist.