


What to Do When Your Outdoor Spigot Leaks When Turned On
If your outdoor spigot leaks when turned on, here’s what’s most likely causing it and what to do:
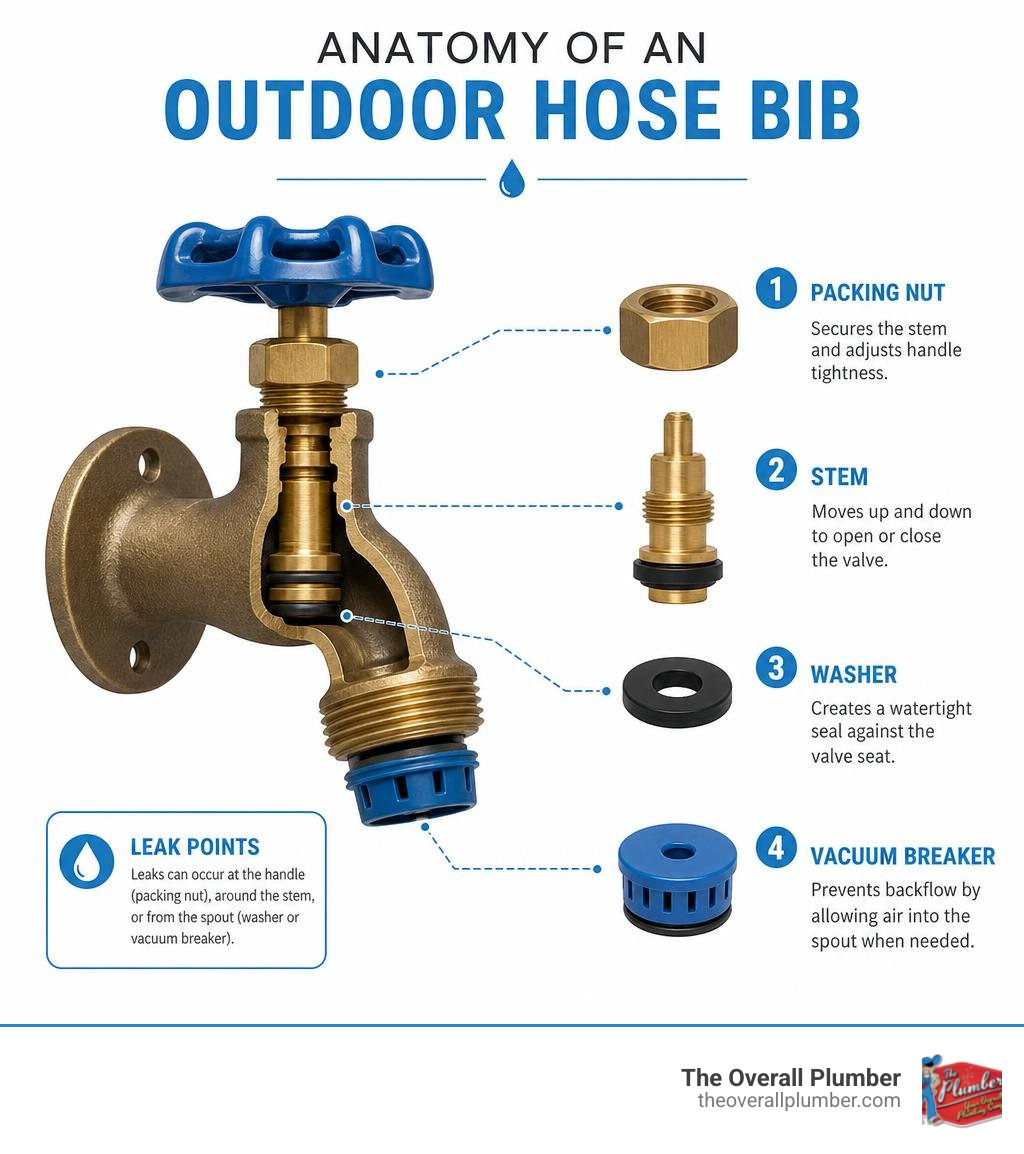
- Loose packing nut — tighten it a quarter turn clockwise with an adjustable wrench
- Worn rubber washer — remove the stem assembly and replace the washer (costs $5–$10)
- Damaged O-ring — swap it out when reassembling the stem
- Freeze damage — inspect for cracks; you may need a full replacement
- Faulty vacuum breaker — replace the cap or the breaker unit itself
Most outdoor spigot leaks are a simple DIY fix that takes under 30 minutes and costs less than $15 in parts.
You walk out to water the garden on a July morning, turn the handle, and notice water spraying from the base of the handle or dripping steadily from the spout. It looks minor. But that small drip can waste over 1,000 gallons of water per year — and push your monthly utility bill up by as much as 20%.
Outdoor spigot leaks are one of the most common plumbing problems homeowners face, and one of the most ignored. The leak usually starts at one of two places: the handle or the spout. Each points to a different failed component inside the faucet — and knowing which one is leaking tells you exactly what to fix.
I’m Dayton Whitworth, a second-generation plumber serving Greater Houston, Galveston County, and the surrounding Gulf Coast, with hands-on experience diagnosing and repairing outdoor spigot leaks when turned on across hundreds of homes in the region. In this guide, I’ll walk you through every step — from pinpointing the source of the leak to replacing the right part — so you can get it done right the first time.
Why Your Outdoor Spigot Leaks When Turned On
When your outdoor spigot (also known as a hose bib or sillcock) is turned off, the internal valve shutoff is tightly sealed against the water pressure coming from your home. However, the moment you turn the handle to open the valve, water rushes into the faucet body. If there is a compromised seal, a worn-out washer, or a loose connection inside, water will take the path of least resistance and leak out of the fixture.
Understanding how these components interact is key to a successful repair. Over time, seasonal thermal expansion, high water pressure, and mineral deposits degrade the seals. If you want to dive deeper into the mechanics of handle leaks specifically, you can read more about How to Fix a Leaking Outdoor Spigot Handle.
Standard vs. Frost-Free Spigots
In our service areas across Houston, Pasadena, and Galveston, we see two primary types of outdoor spigots:
- Standard Compression Spigots: These are common in older homes throughout Harris and Galveston counties. They feature a short valve stem (usually 2 to 3 inches long) where the water shutoff occurs right at the exterior wall. Because the water sits right at the edge of the house, these are highly vulnerable to freezing during our occasional Texas winter cold snaps.
- Frost-Free Spigots (Frost-Proof Sillcocks): These modern fixtures feature a long metal stem assembly (typically 8 to 14 inches long) that extends deep inside the heated crawlspace or wall cavity of your home. The actual flow-control valve sits at the very back of this stem, safe from freezing temperatures.
While frost-free models are incredibly reliable, they are not invincible. If you leave a garden hose attached during a freezing night, water gets trapped inside the long stem. When that water expands by about 9% as it freezes, it splits the internal copper tube. You won’t notice the damage in the winter, but when spring arrives and you turn the spigot on, water will spray inside your wall cavity.
Diagnosing the Source of the Leak
Before grabbing your toolbox, you need to know exactly where the water is escaping. This quick diagnostic chart will help you isolate the issue:
| Leak Location | What It Looks Like | Likely Culprit | Primary Fix |
|---|---|---|---|
| Around the Handle | Water seeps or sprays from behind the packing nut only when the faucet is turned on. | Loose packing nut, worn stem packing, or degraded O-ring. | Tighten the packing nut 1/4 turn, or replace the internal O-ring/packing material. |
| From the Spout (When Off) | A constant drip or steady stream from the mouth of the faucet when the handle is fully closed. | Worn-out stem washer or a damaged, corroded valve seat. | Replace the rubber stem washer at the base of the valve stem. |
| From the Vacuum Breaker | Water sprays or leaks from under the plastic cap on top of the spigot, especially when a hose is attached. | Degraded vacuum breaker diaphragm or cracked plastic cap. | Unscrew the vacuum breaker cap and install a replacement kit. |
| Behind the Wall / Siding | Water pools at the foundation or dampens the interior drywall when the spigot is turned on. | Split faucet body caused by freeze-thaw damage. | Call a professional immediately to replace the entire frost-free sillcock. |
To help you visualize the troubleshooting process, we have mapped out the decision-making steps below:

How to Fix Your Outdoor Spigot in 6 Steps
Most standard and frost-free spigot repairs can be completed using basic tools you likely already have in your garage.
Step 1: Shut Off the Water Supply
Before you loosen a single thread, you must shut off the water supply to the spigot. If your home has a dedicated indoor shut-off valve for your outdoor lines (often located in a utility closet, basement, or crawlspace near the spigot), turn it off clockwise.
If your home does not have individual shut-offs—which is common in many Pearland and League City neighborhoods—you will need to shut off the main water valve to the entire house, usually located near your water meter at the street. Once the water is shut off, open the outdoor spigot completely to drain any remaining water from the line. For additional expert safety tips on preparing your workspace, check out this guide on How to Fix a Leaky Outdoor Faucet (With Expert Tips).
Step 2: Remove the Handle and Packing Nut
With the water off and the line drained, it is time to disassemble the fixture:
- Locate the retaining screw in the center of the faucet handle.
- Use a multi-bit screwdriver to remove the screw, then pull the handle straight off the stem. (If it is stuck due to mineral buildup, tap it gently with the handle of your screwdriver).
- Underneath the handle, you will see the packing nut (sometimes called the bonnet nut).
- Place an adjustable wrench on the packing nut. Critical Step: Use a pipe wrench or a second pair of pliers to hold the faucet body steady. This prevents the entire spigot from twisting and breaking the pipe connection behind your siding.
- Turn the packing nut counterclockwise to loosen and remove it.
Step 3: Inspect and Replace the Washer or O-Ring
Once the packing nut is loose, grip the stem with your pliers and pull it straight out of the faucet body.
- If your leak was coming from the spout: Look at the very end of the stem assembly. You will find a flat or beveled rubber washer held in place by a brass screw. Remove the screw, swap out the worn washer with a matching one from a faucet washer assortment kit, and reinstall the screw.
- If your leak was coming from the handle: Look just inside or behind the packing nut. You will see either a rubber O-ring or graphite/Teflon packing string wrapped around the stem. If it is flat, brittle, or cracked, slide it off and replace it.
Step 4: Check the Valve Seat and Stem
Before reassembling the faucet, peer inside the empty spigot body with a flashlight. The rubber washer presses against a smooth metal ring called the valve seat to stop the water flow.
If you live in an area with hard municipal water—such as parts of Friendswood or Santa Fe—mineral scale can build up on this seat. If the valve seat is rough, corroded, or covered in white mineral deposits, a new rubber washer will not seal correctly and will quickly wear out again. You can use a faucet seat dressing tool (valve seat grinder) to gently smooth out the metal surface, or use a small wire brush to clear away mineral deposits.
Step 5: Reassemble the Spigot Components
Now that your new parts are in place, apply a thin layer of waterproof, silicone-based plumber’s grease to the new rubber washer, O-ring, and the threads of the valve stem. This lubricates the seals and ensures smooth operation for years to come.
Slide the stem assembly back into the faucet body. Thread the packing nut back on clockwise by hand to avoid cross-threading. Use your adjustable wrench to snug the packing nut down. Remember: do not overtighten! A quarter-turn past hand-tight is usually sufficient. Overtightening can crush the packing material and make the handle incredibly stiff and difficult to turn.
Step 6: Turn On the Water and Test for Leaks
With everything securely reassembled, slide the handle back onto the stem and tighten the retaining screw. Make sure the outdoor spigot is turned to the “off” position.
Go back to your main water supply or indoor shut-off valve and slowly turn the water back on. Walk back outside and inspect the spigot. It should be completely dry. Next, turn the spigot handle on. Test the flow, and attach a garden hose with a spray nozzle. Shut off the nozzle to create backpressure—this is the ultimate test to ensure your packing nut and O-ring are fully sealed.
The Risks of Ignoring a Leaking Hose Bib
It is easy to look at a minor drip on the side of your house and think, “I’ll get to that next month.” However, leaving a leak unaddressed can lead to severe structural issues and financial headaches down the road. If you suspect an active leak that you cannot locate, utilizing professional Local Leak Detection And Repairs Houston Plumber services is the best way to safeguard your property.
Water Waste and High Utility Bills
The financial impact of a leak accumulates much faster than most homeowners realize:
- A slow, steady leak of about 30 drips per minute wastes over 1,000 gallons of water every single year.
- A more aggressive drip of one drop per second wastes roughly 5 gallons of water per day, or over 3,000 gallons annually.
- This constant water loss can easily increase your monthly municipal water bill by 20% or more, essentially throwing money down the drain.
Structural Damage and Mold Growth
The physical damage caused by outdoor leaks is often hidden behind your walls. Because the Gulf Coast is naturally humid, any extra moisture introduced into your home’s structural framing is an open invitation for trouble.
Water leaking from a damaged spigot or a split frost-free stem inside the wall will slowly seep into your home’s sill plates, wall studs, and insulation. Over time, this constant dampness leads to wood rot, crumbling drywall, and toxic mold growth inside your living spaces. Additionally, pooling water at the base of your exterior walls can erode the soil around your slab, leading to incredibly expensive foundation settling issues.
Frequently Asked Questions About Outdoor Spigot Leaks
Why My Outdoor Spigot Leaks When Turned On But Not When Off
This specific symptom points directly to a failed packing washer, O-ring, or a loose packing nut. When the spigot is turned off, the internal flow control valve is sealed tightly at the back of the fixture, isolating the water pressure upstream. No water reaches the stem threads.
However, the moment you turn the handle “on,” water fills the entire chamber of the spigot. If the packing seal around the spinning stem is worn out, water will seep upward through the threads and leak out from behind the handle.
How to Fix an Outdoor Spigot Leaks When Turned On with a Hose
If your spigot only leaks when a garden hose is attached and the hose nozzle is closed, the issue is caused by backpressure. When the water has nowhere to go, it pushes backward against the spigot’s safety devices.
Most modern building codes require a vacuum breaker (anti-siphon valve) on outdoor spigots to prevent dirty hose water from being siphoned back into your home’s clean drinking supply. If the internal rubber diaphragm inside your vacuum breaker is torn or mineral-encrusted, this backpressure will cause water to spray wildly from under the plastic vacuum breaker cap. Replacing the vacuum breaker insert will solve this problem.
When should I replace instead of repair a frost-free spigot?
While replacing washers and O-rings is highly effective, you should opt for a full replacement of your frost-free spigot if:
- The outer brass body of the faucet is visibly cracked, split, or bulging due to freeze damage.
- The internal brass valve seat is deeply pitted or corroded beyond what a resurfacing tool can fix.
- The spigot is more than 15 years old and the metal components have become brittle.
- The fixture leaks inside your home’s walls or crawlspace when turned on.
Schedule Professional Spigot Repair and Maintenance
While many hose bib repairs are highly manageable DIY projects, some situations demand professional expertise. If your spigot is soldered directly to your home’s copper water lines, if the pipe has split inside your wall, or if you simply prefer the peace of mind that comes with professional installation, our team at The Overall Plumber is here to help.
We proudly serve homeowners throughout Houston, Galveston, Pearland, League City, and the surrounding communities. When you work with us, you benefit from our comprehensive Residential Plumbing services, state-of-the-art camera inspections, and advanced drain cleaning with augers.
We stand behind our work with The Plumber Guarantee, offering:
- 100% satisfaction guarantees
- No trip charges
- Priority scheduling
- No overtime or hidden fees
Whether you are dealing with minor Faucet Leaks or require a complete frost-free spigot replacement, we will get the job done right. Contact us today at (281) 668-8055 to schedule your service!